
E-SYSTEM
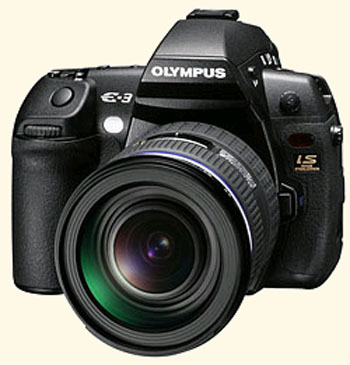
E-3 ON TEST

including the new SWD12-60mm ED standard zoom & HLD4 battery grip
|
E-SYSTEM
E-3 ON TEST
including the new SWD12-60mm ED standard zoom & HLD4 battery grip
|
|
REVIEW NOTES; E-3 BACKGROUND; NAVIGATION GENERAL INDEX REVIEW NOTES at 9th February 2008: 1. Review is now complete though there may be areas that need tidying. 2. Various updates have been made since 18/01/08. Eg. Extra part added to section 7 - Eight week update. 3. I implore prospective E-3 owners to READ THE MANUAL. It is a complex machine requiring high levels of understanding. 4. Those who have no access to the camera manual may download it from here. 5. My reviews are written from an experienced amateurs perspective and in them I address the issues that raised themselves in my own learning process with the equipment. My test facilities are limited so if you are searching for a laboratory review you need to look elsewhere. I adopt a common sense and 'real life' approach that may appear simplistic. But it is based on genuine study and prolific use of the equipment by an experienced user with an enquiring mind and an eye for detail.
E-3 - A BRIEF BACKGROUND: Before launching into the details of the E-3 I'm going to spend one minute of your time on E-3 development history. It was October 2003 when Olympus introduced their ground-breaking E-1, the first camera to be designed entirely from scratch as a Digital SLR. The E-1 was met with both acclaim and derision. It did not sell well though many who bought it and invested in the 4/3rds promise were rewarded with fabulous images with a rich quality that has not been repeated or beaten by any manufacturer, including Olympus. Because of this the E-1 enjoys an almost 'cult' status within Olympus user circles. Some argue the E-1 was technologically challenged from the start and there were immediate cries for an upgrade, but instead Olympus focused on their prosumer models like the E-300 and later the E-500 that repaid their research and development investments. But again, the E-300 did not meet with popularity due to its unusual shape and Porro prism viewfinder arrangements. In 2005 the camera division of the company, for the first time ever, sustained huge losses and there was a sense of inevitability that the replacement professional model would be some time coming. The E-500 that was more conservatively designed with a traditional DSLR shape complete with prism hump came to the camera division's rescue. The E-500 met with huge acclaim and sold well. Encouraged the company decided to use the E-300 design to move the technology onwards and develop the unique E-330, the first DSLR with LiveView. This innovative feature was somewhat scorned by many as being a solution waiting for a problem but suffice to say within 18 months all leading DSLR's now sport this feature. In 2006 the company developed a second generation of smaller DSLR cameras starting with the diminutive 10MP Kodak sensored E-400 without LiveView, followed shortly in early 2007 by the NMOS (Panasonic) sensored E-410 with LV and later the larger E-510 with LV and Image Stabilization (same sensor). Olympus is now in full innovative mood. By August 2007 rumours were circulating about the E-1 replacement and following a heavy Internet 'leak' most of the new E-3 specifications are known. By early November 2007 the E-3 finally arrives in the retailers. With a price tag of £1100 body only and £1699 with the new SWD12-60mm and a high spec it is aimed at the 'semi-professional and advanced amateur' segment and competes with Canon 40D, Nikon D300 and Sony A700 all of which are similarly priced and specified. Those committed to the 4/3rds system have waited over 4 years for the E-1's replacement. It appears the E-3 is selling well, which bodes well for the whole system concept. Of the many questions I ask in this review is if the new 'flagship' model truly justifies the accolade? Let's see.
NAVIGATION INDEX: This is a lengthy article (69 pages) so it's divided into 7 sections with links for ease of navigation. These are:
Please enjoy your reading and research: I hope it answers some of your questions. Don't forget to download and read your copy of the E-3 User Manual here.
SECTION I: INTRODUCTION; BOX CONTENTS; COMPARATIVE SIZE; FIRST IMPRESSION, HLD4 BATTERY GRIP.
INTRODUCTION: Like many other enthusiasts, I started saving for the E-1 replacement about two years ago when the first real rumours about the E-3 started. I have an E-1 and respect that camera tremendously for its wonderful ergonomics, handling and very special images. Whilst it is a very capable machine I understand why the professional fraternity clamoured for an upgrade of pixel count, AF/AE functionality and general operational speed. However if these aspects are no bar to your photography the E-1 is still, quite simply, a brilliant piece of picture taking ergonomic engineering, and I strongly recommend you try one. Do not let its 5MP sensor put you off, 5MP is enough for most experienced photographers; the mega-pixel race was entirely engendered by the manufacturers. Though I had most of the money for an E-3 put by, it took (for me) a 'relatively' long time to decide to buy one. I certainly did not rush out and buy one as soon as they hit the streets. However, in early December I took the plunge and laid down my money for an E-3 body. (I bought my E-3 from RGB in Middlesbrough and enjoyed some unexpected discount. Graeme Dewing offers the full range of E-system products, all at discounts that can beat web-based prices; and all the benefits of a 'real' shop. If we wish to see traditional camera and photo-lab shops in the future it's imperative we support them today. Visit the RGB webshop via this link.) This is a Pro-grade camera. Professionals use their cameras in all and any weather conditions. The E-3 body is dust and drip proof and as someone described it 'just short of waterproof'. There are gaskets and rings throughout. The pop-up flash and articulated LCD panel are fully weatherproof too. When it comes to the lenses all Pro-Grade and Top-Pro Grade lenses are weather proof too, making the E-3 capable of shooting in the most inhospitable of climates and conditions. Is this a big deal for non-Pro's? Too true. How many times have you been caught in the rain or hide your camera under your kagoul in case the rain fries the circuits? It just makes sense to have weatherproofing. Water and dust are two of the DSLR's biggest enemies and the E-3 is dust and drip proof. Olympus users have been at a great advantage from the release of the E-1 because every DSLR they manufacture has the most effective 'dust buster' in the business. Dust particles on the sensor are the bane of detachable lens digital cameras. Each time the lens is removed the sensitive sensor is prone to attracting dust to its surface. These 'dust bunnies' as they are called ruin every frame you take with their presence and it can takes hours to remove them with the cloning tool in PS afterwards. Olympus recognised this from the outset and provided the best possible (and patented) solution - SSWF. It is a filter that sits in front of the sensor which picks up the dust. The SSWF is automatically activated every time the camera is turned on, generating ultrasonic vibrations at more than 35,000 times per second or more, that shake off dust on its surface. The removed dust is then captured on an adhesive absorber at the bottom of the filter. No other device comes close to its effectiveness. Others have tried but SSWF is the leader. One further feature provided with all Olympus cameras is pixel mapping. When run this feature maps out any bad or stuck pixels from the sensor. With certain other brands you have to return the camera to the service centre to get this done. It is so easy to forget (as I did) to even think about these in-built advantages the E-3 offers. I'd like to thank Joop Nijenhuis from Holland for reminding me to emphasize these in-built features we Olympus users maybe take for granted. The box is the standard livery of two-tone silver and grey with 'chrome' E-3 markings. Contents are; camera body, BLC2 charger (boo, hiss - where's the fast BLC1?), BLM1 battery, assorted leads (power, USB and video), printed manual and CD ROM of Olympus Master 2 with trial version of Studio 2. Charger: I'm a bit miffed about the charger - this is a high/pro-spec camera aimed at 'the higher end' (whatever that means) and Olympus provide the cheaper and lower powered charger! The BLC2 unit has shipped with cameras like the C5060/C8080, E400/410 and E500/510 and takes twice as long to charge a BLM1 as the original BLC1 which shipped with the E-1. As it happens I have a BLC1 from my E-1 kit but there are those who haven't. OK, it's not a huge deal and reflects penny pinching, but it might be a deal breaker for some. Touchy feely: On unwrapping the body the first thing that struck me was its solid feel of metal. There is very little plastic here. It feels cool to touch and extremely sturdy. This is a camera built to last. It is also quite heavy; more so than I'd imagined. Weight to me is important as I have arthritis in both hands so every ounce counts. Weight may not be so critical to others. But knowing the E-3's standard lens (the ZD12-60mm SWD) is also quite heavy, I am concerned about the combined weight, especially if I plump for a free HLD4 battery holder from OlympusEuropa. It may all be simply too weighty for me. Manual: I'm pleased to see a proper printed manual. This is a refreshing change. I have already downloaded the PDF manual from the Internet to study and can see the printed manual appears the same as the downloaded version. Manuals tell you how to operate the camera and describe the various functions and how these affect the outcome. They are not technique manuals. Please read the manual fully. If you are unfamiliar with photographic terminology and/or techniques you need a different book to study, of which there is a huge choice, particularly on-line. I took some quick photographs of the E-3 etc:
COMPARATIVE PHYSICAL SIZE: Size & weight: The E-3 is physically a large camera. On paper it may only be slightly larger than the E-1 but in reality it strikes me as altogether bigger. Comparing the dimensions the E-3 is only 4.2% larger in volume than the E-1. But weight wise the E-3 is 810g making it 23% or 150g heavier. The E-1 body with its HLD-2 power grip weighs 895g whereas the combined weight of the E-3 body with its HLD-4 easily breaks the 1kg barrier. And on top you have to fit a lens. Whether weight and bulk are significant to you is for you to judge. It is a major issue for me. Four-Thirds size promise: Perhaps this is the appropriate place to mention Olympus' 4/3rds advantage 'promise' of smaller sensor, smaller lenses, smaller cameras. The E-3 is no smaller than the Canon 40D or the Nikon D300. What's brought this about? In overcoming some of the 4/3rds disadvantages such as a small screen image, an oversized prism has been fitted to the E-3. To overcome the smaller sensors predisposition to noise at higher ISO values Olympus have fitted a sensor based Image Stabilization system that in conjunction with Zuiko Digital fast aperture lenses offers users the ability to capture images in dismal conditions without cranking up the ISO. Olympus claims the IS system alone provides a 5 stop advantage. These design progessions come with a cost and the cost, in the E-3, is body weight and bulk. However the size advantage in lens design and build remains as ZD and SWD lenses from Olympus are smaller and lighter than their cropped sensor competitors who rely in the main on lenses designed for 35mm. Olympus offer three ranges of lenses grouped by brightness and performance. Its Budget range offers the lightest and smallest of any makers lenses with IQ performance that belies their 'budget' tag. Here are some comparative shots against the E-1, E-330 and the diminutive E-400:
FIRST IMPRESSIONS: The general layout of controls is as anticipated. (After all this must be one of the most discussed/leaked cameras before release, ever.) There are no surprises here. While the rear of the camera is quite sculpted the only part of the entire rear elevation of the E-3 that protrudes and risks snagging is the rubber eye-piece surround; all else blends smoothly into the body. Body handling: My abiding impression is one of sturdiness and, after a few handling sessions, of some thoughtful ergonomic and design touches and some not so. Its magnesium alloy body is finished in black paint with a textured surface. The camera feels much the same as the E-1, workman-like; professional; competent. It certainly has 'heft' no doubt. Yes, it is heavy, but it has so much more going on inside its magnesium shell than any other Olympus DSLR. The size of the new viewfinder arrangement is larger than anticipated with the prism hump sitting higher than I'd imagined. It is the dominating feature of the body. The rubber body grip coverings are nice and grippy and the controls seem well placed being restricted to three areas, left shoulder, right shoulder and right back plate with four 'system' buttons immediately below the LCD panel. The grip is more rounded than on the E-1, lacking a flat inner edge (see above illustration) and I note this makes it impossible to carry the E-3 by fingers curled lightly around the grip, as you could with the E-1. As if to compensate for this 'loss' I note there is a mini-grip style bump/raised ridge at the opposite end of the camera that naturally falls to the third finger of the left hand for more stability from that side of the camera, something lacking on the E-1 and a nice touch. Buttons, switches & knobs: The buttons immediately strike me as a tad small. The majority are round and about 6mm in diameter. Non have any tactile feedback. I also note most buttons are surrounded by a lip or are recessed to prevent accidental operation, which, on the face of it, seems like a nice touch. (And yet Olympus designers did away with the shutter button surround!) I've got mixed feelings about the smaller button surrounds. If you have largish finger tips their physical size tends to bridge the button by resting on the surround making pressing the button sitting in the centre that little bit harder. I find the review button especially annoying this way. For any photographers having to use the E-3 wearing gloves this might prove challenging. The membrane through which the buttons communicate also robs them of any 'clicky' tactile feel, especially the 4-way arrows. The ON-OFF switch and card door lock seem the wrong way round to me; I want to use my right thumb nail to open the card door by pushing against the catch, not pulling it. No doubt I'll get used to these. Though the card door is plastic it doesn't appear particularly delicate to me as some commentators have suggested (mine squeaks terribly on the hinge spring.) The same door on the E-1 is metal. Inside is a CF slot and push-rod release, an xD slot (why do Olympus persist with this horrible card?), a small sprung slide of unknown purpose and the lens gas exhaust port (5 holes). The CF release on the E-1 was famous for spitting the CF card clean out of the camera if you were too enthusiastic! (This happened to me several times); the E-3 has no such problem. Screen: The articulated LCD display has a protective side that will shield the delicate panel from impact when in the bag or on difficult shoots. I'm pleased to see and feel the screen 'clicks' in and out of position and holds firmly into place whichever way around it is turned when folded into the rear recess. Also the upper outer corner of the screen has been chamfered thus removing a sharp edge that if caught could cause it to be forcibly opened, or worse; again a thoughtful design touch.The screen folds out on a strong articulating mechanism that appears substantial enough for all but the most severe accident. However, knowing just how roughly some pro's treat their gear, this feature may be an Achilles heel. That said I dare bet the next generation of Canon and Nikon have a similar arrangement. Having used the E-3 extensively, in practice I still prefer the way the screen articulates on the E-330, C5050 and C8080 - directly in line with the lens and squarely below the viewfinder. I think anyone using the articulating screen for architecture (like a TLR screen) will find this too. Having the screen outside of the body to the left seems a little unnatural. Having said all that I am really nitpicking here as having a moveable screen makes general composition with the Live View facility outstandingly easy. To me the effectiveness of Live View is drastically reduced without an articulating screen.
I've already remarked on the small buttons. Though all the camera buttons communicate with the PCB through a membrane, the 4-way controller buttons seem additionally wobbly and lack any tactile or 'clicky' feedback. I prefer the ones used on the older E-1; but still this is a small point. The rubber eye piece VF surround is much larger than any other E-system machine and bigger even than the E-1's optional eyepiece. The actual exit pupil glass is exactly the same size as other 4/3rds cameras so allowing use of eyepiece accessories, though the final sighting pupil has a mask slightly larger on the E-3 reflecting its 1.15 magnification. The eyepiece dioptre and shutter knobs are hidden behind the large shroud of the rubber eyepiece and not immediately obvious. However, both can be operated easily and there's no absolutely need to remove the rubber shroud. The eye-piece shutter in particular works nicely with a flick of the left thumbnail.
IN MORE DETAIL: Rear of camera: The back of the camera is dominated by the large articulated screen housing (2&5/8ths x 2&1/16th) and hinge arrangement with OLYMPUS impressed into its protective 'shell' side. The actual viewing area of the screen is quite modest at 2" x 1.5" giving 2.5" across the diagonal. Screen pixel count is 230,000 and there is no mention of hyper Crystal LCD, only OLYMPUS on the viewing side. Its double articulation allows use in many positions and easily facilitates overhead and ground level shots as well as being fully useable when pointing forwards for self-portraits or just getting in the frame! I found the default setting a touch low for my use and increased it by +1 in the menu. That said the screen is exceptionally clear, displaying good contrast. As with other Olympus DSLR's I note on-screen magnification of images seems not to access any more data at above 10X zoom. Unlike the E-1 there is no clip-on screen protector on the E-3 so one of the first things I did was to install a screen protector which are readily available and inexpensive. There's no doubt, digital camera screens are subject to greasy smears from the nose and fingers; it's a good idea to always have a dedicated screen cloth in your bag. I notice the 4-way controller is slanted towards the users right thumb which is a nice ergonomic touch. Some of the exposure control buttons originally shown on earlier prototypes were fitted with tactile identifier 'nipples'; these are now just plain round flat or round domed. That's a pity, such 'nipples' would have provided feedback. At the bottom left are the main ON/OFF and CARD door mechanical switches. I can't seem to get used to these, to me they are counter-intuitive; I want to operate them the wrong way. Front of camera: The front of the camera houses the selectable WB sensor, the external synch plug and the DofF preview button with the wired remote control socket to the users left. Below and near the LCD panel hinge are placed the USB and video sockets and with mains power-in below; both have thick moulded rubber doors. Above the Image Stabilization badge is the IR remote control receiver. I'm not sure about the IS badge. Personally, I think Olympus might have been better advised to leave it off or make it less conspicuous. Bottom of camera: On the bottom plate of the camera is the metal tripod bush in line with the lens centre line, the battery compartment hinged door release and the ID plate. I note the body is 'Made in China'. Button placement and function are dealt with in section II. HLD4 BATTERY GRIP: If this section seems out of sequence bear in mind I received the grip some time after starting this review! In line with most other DSLR's Olympus offer a battery grip for use with their 'Pro-level' cameras and the E-300. The E-1 had its SHLD2 and the E-300 its HLD3 grip. For those with the E-330 modifications can be made to the HLD3 that allow fitting to the E-330, or there's a non-OEM model available. For those with the E-500 it's an after market model only. E-400/410 have no such choice available as yet, and I assume the E-510 will be provided with a non-OEM grip choice soon as it is so similar to the older E-500. The E-3 has its own dedicated grip, the HLD4. Many commentators, including me, get a little rattled that Olympus describe the E-series machines as 'system' cameras when they are clearly not. The grip is just one example. In OM days the 'equivalent' to the power grip, the winder, attached to all OM models and the more powerfull Motor Drive attached to all single digit OM models. None of the E-system grips is interchangeable. I do not know if this applies to other manufacturers systems. In addition Olympus have abandoned the large BLL1 power source of the E-1's power grip which could run (seemingly) forever on a single charge and now use twin BLM1's in the E-3 grip. In some ways I can see the logic but for those upgrading from E-1 this makes their 'system' even more redundant. I for one am sorry to see the demise of the BLL1 power supply and am sure Olympus would have been better advised to use the same set-up on the E-3. Surely it is not beyond design capabilities to offer one power grip for each of the E-series; one for top grade; E-1 & E-3 and one for mid grade; E-510, E-500 etc. Perhaps this is just me. Perhaps modern cameras are just consumer electronics after all; it is all about the most recent model, future and past considerations are irrelevant.
For all the bulk the grip adds to the already large E-3 I find it does help my handling of the camera. For example pressing the ISO button on the E-3 top plate involves some contortions with the index finger and an inevitable slight loss of grip on the body from the remaining fingers of the right hand. With the grip fitted its flat end provides a pivot point for the palm of the hand to squeeze against, thus resulting in no loss of grip/better grip. The additional contours of the battery grip provide new places for the fingers to gain purchase though the lack of a rubber for the right thumb is an omission. All in all I believe the grip is beneficial; certainly, the camera handles much better with it than without. Battery Performance: Something seems amiss. (Remember, the grip will work with only one battery). I only get the same amount of life from the grip with 2 BLM1's as I do with the camera without the grip (1 BLM1). The first time I used the grip with 2 batteries installed I was rather disappointed in its longevity. Thinking no more of it I removed the batteries for recharging. The first battery took the standard couple of hours to recharge but the second was in the charger only 10 minutes before the green light glowed. After the next low battery warning I simply changed the batteries around and continued shooting for another 300ish shots. Effectively it seems the grip is only a store for your spare BLM1 as they do not appear to be sequenced to switch between depleted and fresh. This must be a manufacturing fault with my grip, but I suspect from feedback I've already had I may not be alone!
HLD4 GRIP - ADDITIONAL POWER SOURCE: A supplied addition to the grip is an alternative power source - a plastic insert internally shaped to accept 6 AA batteries. This has caused some consternation as it appears, on the face of it, to be utterly useless. The instructions imply it can be used with AA (R6) alkaline or lithium batteries. I tried mine with 6 x AA 1.5v super alkalines (fresh out of packet) and managed 7 shots before the battery low signal appeared. And although not recommended I also tried rechargable NiMH, including Eneloops, with no success. From comments I have read elsewhere lithiums do not work either though some report with lithiums the camera will actually expose one shot before closing down. I'm wondering if this suggests rushed manufacturing (see my observations on battery life above) or shoddy/no testing. Whether this may hint of a firmware upgrade in the future to overcome the (assumed) voltage block or bad sequencing taking place, remains to be seen. (A similar issue raised its head with the compact SP310/320/350 range that required a firmware upgrade to successfully allow use of rechargeable AA's with that camera.)
On 29th January Olympus released a comprehensive firmware upgrade which includes the phrase 'Increased the number of storable still pictures by improving the battery check when the Power Battery Holder HLD-4 is attached.' I have no idea as yet whether this works as I've just put two newly charged BLM1's in the grip. I'll have to come back on this one. But I have tested the claim with the additional power source (6 x AA's) and discover that with fresh batteries loaded I managed 11 shots before I got the battery low signal. In percentile terms that's over a 50% increase - but hardly staggering in overall performance. Something is still adrift with the circuitry as this AA pack should surely last 50% as long as one BLM1, not a measly 11 shots. It's time to gather more information from other users. In fairness I did not continue after getting the low battery warning which, on reflection I should have done, as I have heard reports that the camera keeps on working satisfactorily regardless of the warning lamp.
SECTION II: BUTTON LAYOUT, EXPOSURE CONTROL, WHEELS, DISPLAY, SERVICE SCREEN, MENU.
CONTROL (BODY): The control system is roughly divided between camera function/choice/options controlled by the main menu, and exposure settings/attributes accessed via the body buttons or the Super Control Panel and controlled by front and rear wheels or 4-way buttons. Most of the exposure attributes can be accessed in multiple ways leading to a very flexible system once you are used to the way it responds. EXPOSURE BUTTONS: Buttons that give direct access to various exposure attributes are in three areas; left top plate, right top plate and rear panel (right). Below is a view of the E-3 top plate showing left and right button clusters with their purpose notated. Where button purpose is in italics indicates control via front wheel.
____________________________________________________________________________________________ REAR BUTTONS, KNOBS & LIGHTS:
____________________________________________________________________________________________ FUNCTION BUTTONS: Buttons that give direct access to camera functions such as image deletion, card formatting, noise reduction/filter etc., rather than exposure attributes are confined to the area directly beneath the rear monitor:
____________________________________________________________________________________________
EXPOSURE CONTROL BUTTONS: The control buttons that provide instant access to main exposure attributes are in 3 groups on the top plate and the camera back. Top plate group right: Shutter, ISO, EXP (exposure compensation), WB (white balance) and LIGHT (command screen light). Top plate group left: FLASH (mode and compensation), MODE (shooting mode i.e. PASM), DRIVE, and AF (mode and metering). The flash pop-up release is on the left side of the prism hump. Back plate group: AEL/AEF (customizable), FUNCTION (customizable), AF point area, IS: off, on or only vertical. OK button that always accesses the Super Control Panel. INFO button which (in shooting mode) always accesses the Super Control Panel. FUNCTION CONTROL BUTTONS: The function buttons that provide access to various camera settings are all on the back plate of the camera. REVIEW button: access to the memory card images. 4-WAY controller with OK button: provides navigation on the menu and 'super control panel' screens. Access to the 'Super Control Panel' via the OK button. (None of the 4-WAY buttons accesses any screen.) OK button initiates the magnification facility when in Live View mode. DELETE button: deletes images on the memory card. INFO button: (in review mode) riffles through the exif, histogram and highlight & shadow screens; (in taking mode) accesses the 'Super Control Panel'. MENU Button: (all modes) accesses the main menu. LV Monitor Button: (all modes) initiates the mirror and sensor for direct TTL viewing. WHEELS: There are two command wheels on the body, front and back. With HLD4 grip fitted a further 2 are provided. These are used in conjuction with most of the buttons. For some exposure attribute changes both wheels will cycle the same icon whereas for other attributes front and back wheels will cycle through different icons. Example 1: Press WB: the selection is performed by either control wheel (or 4-way buttons) Example 2: Press FLASH: the front wheel alters compensation and the rear wheel cycles flash modes. Example 3: Press AF POINT [---]: hold down button, turn front wheel to cycle pattern choice; release button, turn front wheel to cycle horizontal point; rear wheel to cycle vertical point. DISPLAY: The rear screen has two basic purposes; to review the images and to display settings and choices for change or confirmation. In REVIEW mode the user can chose from the menu either single screen for each image or displaying 4 to 25 images at once. Magnifying each image is done via the rear control wheel; RIGHT to magnify 2,3,5,7,10 & 14X and LEFT to display single, 4, 9, 12 and 25 images per screen. In addition continuing to turn the magnifying wheel to the left eventually displays the 'calendar' screen. This screen shows the current month and in the appropriate day box the image that starts that days captures. If no images were recorded on the day it remains blank. This allows the user to quickly access a months work by scrolling through the calendar to the date required and turning the rear wheel to the right. Previous/forward months can be accessed by cycling up/down the screen with the UP/DOWN button of the 4-way controller. In MENU or Super Control Panel (SCP) mode screens are displayed in monotones + yellow to highlight the position/attribute being accessed. The E-3 will display exposure attributes in 3 areas simultaneously: viewfinder, command panel and rear LCD panel. When any exposure control button is pressed the relevant icon on whichever screen you are looking at will be lit or accentuated; to alter turn one of the wheels and the icon will cycle through the choices. The LCD display on the rear of the E-3 will be either the Super Control Panel or the two additional screens designed for special purposes only, these being the AF area select screen and the IS choice screen. The E-3 will display camera function choice or change (as opposed to exposure attributes) on the rear display only (and not simultaneously in the VF or command panel) and these screens are accessed via the MENU button. So there are three areas of display; Viewfinder, Command panel, Rear LCD panel, and three types of display; exposure attribute information only, Super Control Panel (all exposure information) or Main Menu (all camera information). It may seem complex but the whole process works seamlessly particularly when adjusting the all important exposure controls. GENERAL: Once you are familiar with the E-3 exposure changes are made with buttons and/or wheels while referencing the rear panel, the top plate command screen or the viewfinder readout. This offers real flexibility for new users or those coming from existing Olympus DSLR's already familiar with its menu system. For professional users control of exposure functions without taking the eye from the viewfinder is almost a necessity. The camera control system works on various levels and may be accessed and displayed in different ways. But it all works in harmony to give the user a seamless and intuitive interface into the complex arena of camera control and exposure settings. But basically the rule is buttons and/or OK for exposure - all else via menu. For a first time user it might appear complex but with a little study and practice it soon becomes second nature. It is genuinely harder to describe than operate! CHECKING THE SERVICE SCREENS: I load a charged BLM1 and the first thing I do is check the 'hidden' screens to acertain the level of use the camera has gone through before me. It is also handy to make sure there are no outstanding fault codes registered which would mean sending the machine in for service. Screen (page) 2 tells me the shutter has had 83 activations, the flash 9 firings and the SSWF 14 occassions. Screen (page) 4 is blank indicating no fault codes. Satisfied my camera has been subject of factory testing only I am now secure in the knowledge I am its first owner! If you want to know how to check the 'hidden' screens please go to this page here. MENU: Once I'm happy with the shutter release count, I examine in detail the menu system to see how much it differs from my other Olympus DSLR's. There's usually a good reason if a menu system has altered significantly. The basic structure of the E-3 menu seems much the same as my other cameras; there's just a lot more content in the E-3 menu. The system is well structured and pretty intuitive consisting of primary, secondary and on occasions tertiary levels. The amount of control offered is immense. By far the major changes appear in Spanner 1 & 2 main menu screens, the majority of which have an additional one or two nested nested screens. I do not propose to go through all the menus and menu options here; they are dealt with in some detail the manual. As said the whole control structure and access to it is pretty intuitive. I found I had to study the set-up of the AF button in some detail before I grasped it fully and I admit to always being a tad confused by the priority release choices, but other than these the whole thing is straightforward. That said, I have been using Olympus DSLR's for nearly 4 years now so I have a level of understanding. A new user or compact migrant might struggle with some of the terminology; which is why Olympus provide a printed user manual. It really is essentail that you read your copy.
The E-3's control system with its multiple-level access can be a little daunting, but it is logical and intuitive. I had about 5 pretty lengthy sessions doing nothing but learning how the buttons and wheels interacted with the screens and was rewarded with full exposure to all the E-3's custom settings. There are hundreds of choices you can make within the menu system but to be fair once you have set many of the deep menu selections you will rarely revisit them. If you find you are diving into the menu to constantly change settings I'd advise you to set the camera up your most used set of over-rides and store it in RESET 1 or 2 or invoking the MyMode settings. For more details on both these functions and how to set them up see Andrzej Wrotniak's excellent article here. SETTINGS: I get a lot of emails asking me 'What settings do I recommend or use for such and such....' for various E-System cameras I discuss on this website. I also see this on some of the forums I occasionally visit, especially following some striking image posts. To me the great beauty of digital cameras is that most offer some level of user intervention and, generally, the more competent the machine the higher the level of control offered. This follows some basic logic in that those who want to learn about photography can start with a non-complex digi-cam with rudimentary controls to learn the basics and gently expand their knowledge and experience by progressing across the range of more complex machines. Some top of the range compacts offer the same level of user intervention as entry level DSLR's but both rely on users gaining progressively more experience with both the camera and the requirements of good photography. It might be tempting for a new user to ask an older hand their settings but will they actually know why the differences in results occurs? If not then nothing has been learned. There is a major difference between setting up some of the basic controls of a DSLR that will give you the best possible mechanical file out of your machine and applying subtle alterations to various exposure attributes to affect the aesthetics of the self same file. Whilst I have no problem with the first, I question the value of the second as it is highly unlikely that two photographers using identical cameras in similar conditions capturing similar images will ever benefit each other by sharing an exposure setting, as the moment is unlikely to ever repeat itself. There is no short-cut to experience or its application. My good friend Andrzej Wrotniak discusses how to customize the E-500, E-510, E-410 to achieve the best possible mechanical files from your machine within the predetermined limits of your preferred methodology and/or expectations, in his article here (highly recommended). Andrzej's discussion, logic and interpretation can, in some parts, apply to the E-3; but do not expect a verbatim transfer as the E-3 offers much greater levels of user intervention. RECOMMENDATIONS FOR E-3 Reflecting on all I said in the above 3 paragraphs I'd suggest you leave the E-3 on factory default settings to start with, except the following: 1. If shooting jpg increase the resolution to Super Fine (Spanner 1/G). 2. Turn NF to OFF or LOW until you are confident with other outcomes; NR is invoked only on long exposures - leave ON. 3. Change AF target to single point either small or normal until you are happy to experiment further. At the end of the day the E-3 must be 'tuned' to reflect your preferences, methodology and expectations.
ANDRZEJ WROTNIAK'S E-3 CUSTOMIZATION: My friend Andrzej has been busy again and has just posted (27th February 2008) a lengthy article on how to 'make the E-3 work for you'. This is an excellent article and I highly commend it to any E-3 owner or prospective buyer. Find Andrzej's article here.
SECTION III: VF OPTICS, DISPLAYS, COMMAND SCREEN, SUPER CONTROL PANEL, LIVE VIEW, IR.
IN THE VIEWFINDER: By far the dominating feature of the E-3 body is the new viewfinder optical arrangements. The prism hump is huge compared to any other Olympus DSLR and it needs to be to house the new viewing system. If the E-1 was not berated for a rather small viewfinder, certainly all models that followed were. Personally I had no issue with the E-1 VF and could manage to manually focus my OMZ lenses (above 40mm) with it. But the later systems that relied on Porro prism and mirror based prisms were slightly smaller and a tad more dismal, leading to the accusation that their VF's were tiny, dark and tunnel-like. I'd refute this description as being over the top, but I could see where the accusers were coming from. It was plain the design engineers needed to address this problem. The E-1 has a traditional prism but the viewfinder image is governed by both format and sensor. Somehow the engineers had to increase the size of the viewfinder image within existing constraints. It was always thought that magnifying the viewfinder image would simply make it proportionately darker; that's the nature of the physics involved. Their solution relied on enhancing traditional prism type optics by such a degree that applying some magnification does NOT degrade image brightness. They have increased the apparent size of the 4/3rds sensor format view without losing any brightness or clarity. This has been achieved by using high refractive index glass with a highly reflective silver coating. The eyepiece also uses glass lenses rather than optical plastic. All the lenses are surface coated to maintain brightness. The VF gives a 100% view but imposes a magnification of 1:1.5. It is a revelation.
It's plain from the above examples that the design engineers were successful. The viewfinder of the E-3 is very comfortable on the eye giving 15% more image on the screen with no apparent loss of brightness or clarity. The 4:3 proportions of the 4/3rds sensor are well served by the enhanced viewfinder; the user does not have to scan from side to side to see into the corners for accurate framing. Nor, with the E-3 anyway, do they need to squint to the right to see the exposure information as on each of the consumer models. I'd say this is definately JOB DONE!
11 AF POINTS: Probably the second thing you notice when you look through the E-3 viewfinder is the new 11 AF point markers. Many users of previous E-System machines have complained about the relative lack of sophistication employed by Olympus' AF systems, both in number of points, accuracy and speed. In response Oympus have brought about both their range of SWD lenses that address the accuracy and speed issues, and an increased number of AF points as well as a choice of three AF patterns to suit most users. The AF system is highly configurable both in target, pattern and sensitivity. The AF sensor array uses both vertical and horizontal sensitivities on the cross point axes that are slightly shifted for the most accurate performance. There is a dedicated processor purely for the AF function. A new method of magnifying pixel density improves AF effectiveness in low-light conditions to a luminescence range of -2 to 19 EV. I have obtained accurate focus in almost no light conditions; the new system is very impressive. The SWD lenses provide a new means of motorising the lens movements in accurate and tiny steps that is both silent and virtually instant. The incredibly fast processing power of the E-3 brings it all together. Again this is not just the makers wild claims; AF is virtually instantaneous with an SWD lens. The AF point glows red on shutter half press and soon after the camera beeps and signals AF confirmation in the viewfinder; (NOTE: red AF point illumination does NOT indicate focus). The user has the choice of enabling the pointer square to be lit or not via the Spanner menu. The user can also choose the pattern from 3 basic choices; single point, single point dynamic (cross or partial cross shape of adjacent points enabled) and all points via the AF dedicated button. There is an over-ride provided in each selection allowing the user to move the pattern left, right, up or down, again via the dedicated button/wheel. Further customization is possible by the user being able to stipulate how the patterns cycle by selecting loop or spiral in the Spanner menu as well as determining AF point sensitivity; normal or small area. I think it fair to say that as AF systems become faster and more sophisticated the number of misses inevitably increases. The original E-1 AF system though slow, was very accurate. When Olympus improved this in a later firmware upgrade I noticed the number of times false positive confirmations were indicated rose. With this in mind the new AF regime on the E-3 benefits from how quick and convenient it is to 'feather' the shutter button after initial focus confirmation (and see note below).
From my time with the E-3 to date I'm convinced I must re-learn how to better hold and aim the camera as well as being more proactive in selecting the AF point(s) pattern and sensitivity. It strikes me that the warnings in the users manual about low contrast areas (and horizontal repeating patterns from my personal experience) being difficult for the AF system to lock on, are somehow inevitably more so with the E-3. From some emails I've had it seems I'm not alone in my findings. Perhaps I was a bit 'sloppy' with the older AF system; I know I need to take more care with the new system to guarantee consistent and accurate AF lock/confirmation. In some ways Olympus have gone from the sublime to the ridiculous with their new AF system. From a rather tardy and sometimes inaccurate and simplistic system to a world beater the company has proven it is now ahead of the competition in the AF field. Just a quick note before moving on. If you press the lens lock with the camera switched on this disconnects the information flow between lens and body. The camera will no longer auto focus, confirm focus, beep focus confirmation or display aperture information. This applies to any Olympus DSLR. I assume this is to save having to switch the camera OFF when changing the lens though I believe Olympus recommends switch off.
INFORMATION DISPLAY: The E-3 maintains the proper position for the information display being along the bottom of the optical viewfinder, not to the right as with the consumer models. This is one of my biggest gripes with the triple digit E-cameras. For those who wear spectacles I'd imagine the constant squinting to the right is tiresome. The E-3 display is comprehensive having icons for all exposure attributes including ISO (missing on E-1).
Left to Right Top: FP Flash, Metering Mode, Shutter speed, Aperture, Shooting Mode, Comp +/-, Buffer, IS, Auto ISO, Battery. Left to Right Bottom: Flash ready, AF confirm, Flash comp, AE Lock, WB, Exposure, Bracket, ISO sensitivity.
When any exposure control button is pressed all lighted icons go out leaving only the one requiring change illuminated. Adjustment/selection of the attribute is done via front or back control wheel. With familiarity comes the ability to change exposure settings without taking the eye from the viewfinder. COMMAND SCREEN: The E-3 maintains the top plate command screen. This is the second means of accessing and changing exposure information.
Top Section L to R: WB Icons, Picture mode, Record (file type) mode. Mid Section L to R: Shooting mode, Exposure, Metering mode, ISO, Bracket, AF mode, Shutter speed, Aperture, IS, AF area. Low Section: L to R: Flash mode, Drive (H & L), Timer & Remote, Buffer, Battery.
Essentially this screen replicates all viewfinder information and adds more information and icons. It offers another means of controlling and/or changing exposure information without need to reference the rear Super Control Panel if this is turned inwards for protection. If the rear panel is in 'protect' position it does not respond to any button presses. There must be a miniature position sensor switch in the hinge to save power.
SUPER CONTROL PANEL (SCP): In line with other Olympus DSLR cameras the E-3 also adds the SCP to its user interface. The SCP offers slightly more information than the other information displays. It is the third means of accessing and changing exposure information.
IF the SCP responds to a button press the relevant icon lights ready for change/selection via the control wheel(s). The Super Control Panel also responds to the INFO and/or OK button (in shooting mode) when the panel is turned outmost. Navigate by using the 4-way buttons; select/change via the control wheels. Working together, the three different displays, VF Information, Command Panel and Super Control Panel serve the same purpose but offer slightly more and/or slightly different information. This wholistic approach, I believe unique to Olympus, offers users an incredible amount of flexibility. As the user gets used to the system it becomes easier to use. LIVE VIEW: The ground breaking E-330 was the first DSLR to offer a functional Live-View (LV) facility and though mocked at the time this function is now being offered by virtually every other DSLR manufacturer. It's an extremely useful aid to composition and focusing as well as enabling the user to position the camera high up, at arms length, or at ground level without having to guess the resultant framing. The unique E-330 has two LV modes, A & B. Mode A is facilitated by a secondary sensor positioned in the mirrored light path serving the viewfinder that offers the user a continuous field of view (95%) as if through the lens. This part of the LV implementation I called 'the compact killer' as it effectively offers all the benefits of the 'off the sensor' viewing of compact cameras. It replicates a TTL view and offers instant image capture with no lag at all. The downsides are that some of the normal DSLR camera adjustments, eg WB and exposure compensation, cannot be represented on the rear LCD. Mode B is a method of 'seeing' what the sensor sees directly (true TTL) and is much more convoluted in its implementation. When Mode B is selected the mirror has to flip out of the way of the light path and the shutter has to open so the image on the LCD is taken directly off the sensor - truly TTL. However, fundamental things like AF and metering cannot be undertaken because the mirror is now in the wrong position. Mode B on the E-330 offers only manual focusing. AF can be achieved by pressing the AEL button, but only as an alternative to MF; AF does not automatically occur during exposure. Thus LV Mode B on the E-330 is truly a tripod option only. When the time comes for the image to be taken the mirror has to flip back down to its pre-LV position and now the camera acts as normal - mirror flips up, shutter fires, mirror returns, image captured and then the mirror flips back up again to reinstate LV. (Phew). That's a lot of functions happening, both electronic and more pertinently, mechanical, leading to an inevitable amount of 'lag' and as explained, restricted usage. Implementing LV in the E410 & E-510, Olympus have dropped Mode A and made Mode B as functional and responsive as possible. Now all exposure influences, changes and compensations can be seen in real time on the LCD but the mirror is still required to undertake its acrobatics, so 'lag' still occurs. While LV is improved its inbuilt 'lag' rather restricts it to static tripod based shots such as landscapes and macro work on the E-410/E510. The E-3 follows this pattern of Mode B only (to the disappointment of all E-330 lovers). Its designers, aware of the 'lag' associated with other implementations, enabled the E-3 mirror to operate at much higher speeds in an effort to reduce this 'lag.' The result is an impressive reduction in LV 'lag' and though it is still a little 'clunky' it is a very useful tool to have. This improvement is welcomed though it is still not possible to use LV on the E-3 entirely like a compact camera, with experience, practice and a little care it is eminently possible to use the E-3 in LV OFF the tripod. With a small firmware upgrade to eliminate AF if in MF mode the E-3 could operate more quickly still. LV with the E-3: This is straightforward. Simply press the monitor button and the mirror/shutter do their thing and you see on the LCD screen what the sensor sees. There is a reminder 'splash screen' to tell you to close the eye-piece shutter (to stop extraneous light messing up your exposure) and this is done with a flick of the thumb nail on the small lever near the viewfinder. Changes to exposure such as compensation and WB etc., are duplicated on the screen (unlike E-330). If you wish to have the AF give you a focus press the AEL/AFL button and the mirror does its acrobatics, AF is obtained and the mirror returns to the LV position. If you require critical focus then press the OK button (centre of 4-way controller) to make the mirror flips again and a 5, 7 or 10X magnified image appears on the LCD. You can change the magnification via the control wheel. Critical focus can now be applied by manually turning the focus ring on the lens. When satisfied return to normal view by re-pressing the OK button. When happy with the composition etc., press the shutter. The mirror does its flip and the camera goes through the normal process of picture capture. To return to normal photography press the monitor button and open the eye-piece shutter. No, it is not immediate (but neither are compacts) and yes it sounds loud and clunky (so hopeless for surreptitious work), but its advantages are manifold especially if using legacy lenses and in particular legacy macro lenses. For special usage (bellows macro work etc), LV cannot be beaten. LIVE VIEW & INFRA RED: Live View is very relevant to infra-red fans of which I know there are many. IR exposures have a dreamy, almost etheral quality that I and many others find delightful. As with any photographic technique it requires knowledge and practice. I'm no IR expert and I've read the E-3 has a sensor not especially sympathetic to IR imaging so please do more research before committing to IR in a big way with this camera. Andrzej Wrotniak has written an excellent article on IR with the E-410/E510 (can also be applied to E-3) here. Highly recommended!
SECTION IV: KIT LENS; 12-60MM SPECS; COMPARED TO 14-54MM; CIRCULAR APERTURE; LENS TESTS.
ZD 12-60mm ED KIT LENS: I've prepared an information chart showing lens architecture, MTF charts and DofF scales for download here. We've been conditioned to generally associate the new ZD12-60mm lens with the E-3 as its 'kit' lens, much the same as the ZD14-54 was the 'kit' lens of the old E-1. Of course the E-3 can be used with any 4/3rds lens. When used on the E-3 the new SWD generation of lenses offers the worlds fastest AF system so it seems fitting that Olympus manufactures this new SWD lens especially for the new body. At time of writing there are 3 SWD lenses avaiable/about to be available; SWD12-60ED, SWD50-200ED, SWD14-35ED. I have mixed views on this strategy from Olympus. OK, I accept the old AF system needed improvement and this new SWD technology offers much, but the previous generation of lenses on the E-3 work much faster - in fact not 'that' much slower than the SWD's. Maybe I'm cynical, but I can't help think this move is simply another method of selling us more lenses, some of which we already have! Certainly, comparing the AF speeds of the ZD14-54 & SWD12-60 on the E-3 body the difference in speed is hardly critical and for the majority of users probably of no concern.
SWD12-60ED GENERAL: SWD lenses are recognised by a blue-chrome ring immediately in front of the manual focus ring and by a gold badge on the waist of the lens near the distance scale window. SWD lenses have mechanical manual focusing capability similar to that of the Sigma HSM range of lenses. Many 4/3rds users will breathe a sigh of relief to say goodbye to the older 'focus by wire' (FBW) as they proved less popular than the company anticipated. The benefit of SWD in normal use is that the user does not have to physically switch the lens into manual mode; the manual focus can always be operated. To me anyway, this is advantageous being more natural to simply tweak the lens focus ring without first having to enable it via a switch or even worse via the menu. Others may well differ as there is an argument that if you accidentally touch/turn the manual focus ring AFTER the camera has AF'ed (half press) there's a good chance your shot will be out of focus if you simply finish the exposure without refocusing. Yes, this could be so, especially the way zoom lenses tend to be cradled in the open left hand. My only SWD equivalent lens is the Sigma 30mm x 1.4 HSM and I find it easy and practical to use because the manual ring is always available; but on the other hand it has no zoom ring. Oh well, camera makers cannot be expected to cater for all eventualities! INSIDE THE 12-60mm: Olympus have combined outstanding ED glass and coatings, sophisticated optical design, five times zoom capability and high speed motors and communications to provide a high quality lens befitting the new flagship E-3. The company tell us the AF performance of new SWD12-60mm is the world's fastest and the lens has been specially designed to fulfill many photographers focal length needs in one superior package.
The ZD 12-60mm SWD when combined with new E-3 offers vastly improved AF computation and lens-body communication rates. SWD motors provide near silent but ultra-fast focusing speed of around 170 ms. All SWD lens' are manufactured in Japan at the companies Tatsuno Plant that has some of the worlds most sophisticated optical production technology. ZD 12-60mm - SPECIFICATION: Focal length: 12mm - 60mm Focal length: (equiv. 35mm) 24mm - 120mm Lens configuration: 14 elements in 10 groups Aspherical glass elements: 2 Aspherical glass elements 1 Aspherical ED element ED lens: 2 ED glass elements 1 super ED glass elements Lens mechanism: Inner focus with floating mechanism Angle of View: 84 - 20 ° Closest focusing distance: 0.25 m Maximum image magnification: 0.28 x / 0.56 x Number of aperture blades: 7 Circular aperture diaphragm for natural background blurring Maximum aperture: 1:2.8 - 4.0 Minimum aperture: 1:22 Filter diamater: 72 mm Dimensions: 79.5 mm Ø, 98.5 mm Weight: 575 g Compatible to Tele converter EC-14: Yes Compatible to Extension tube EX-25: Yes Lens Cap: LC-72B (72mm) Lens Hood: LH-75B SWD12-60ED FIRST IMPRESSIONS: The first thing I notice about the lens is that it is indeed made in Japan. Secondly, it has what appears to be a circular recycling icon with 10 (not 10%) inside. I have not been able to ascertain precisely what this means. Ergonomics: This is a meaty lens; heavy; chunky. Its build looks the same as all the Pro-grade lenses and its size is quite a bit bigger than the ZD14-54mm and only slightly larger that the ZD11-22mm though it weighs 15% (90g) more than the latter. It has two more elements than the ZD11-22 and I doubt these make up the total weight difference so I suspect the SWD motor is partly responsible. The major aesthetic difference is the addition of an extra 'ring' immediately behind the manual focus ring but before the twin chrome and blue ring, with lens information engraved around it. This will account for all the 6mm additional length over the ZD11-22mm. And of course there's a golden embossed badge declaring SWD on the flat ring containing the distance scale window. To me it feels the same as the other Pro-grade issues though I've heard from some commentators that it feels a little plasticky. As far as I know it is made from the same mixture of metal (brass) and engineering plastic composites as the other pro-grade lenses. I'm delighted to see the centre-pinch front cap and wish these style caps were made available for the entire ZD range of lenses. I'd also like to see Olympus spend some design effort in producing a lens hood that can be used in association with polarisers. Zoom & manual rings: Once mounted on the E-3 I try the zoom. It is no where near as smooth and silky as the ZD14-54 and when zooming in and out can be heard to make some weird groans, squeaks and clunks that I assume is the inter-reaction with the mechanical part of the SWD lens motor. However, the fact that it has a mechanical interface rather than FBW is a distinct advantage - increased noises are a small price to pay. My only concern is the almost grittily stiff, non-silky-smooth zoom ring. The zoom throw is 90 degrees and can just about be accommodated in one sweep of the wrist. As with all other Olympus digital lenses zoom movement (far to near) is anti-clockwise and unlike its FBW siblings that can be altered, the manual focus is only anti-clockwise. Having a mechanical interface also means that the camera need not be switched on to use the manual focus ring that might be advantageous to certain users. On other E-Bodies: The SWD12-60mm works perfectly satisfactorily on non-E3 bodies but is (obviously) not quite as fast as when on the E-3 as these bodies do not have improved internal processing/communications. On the E-400 the new SWD12-60mm is decidedly faster than the ZD14-54mm and on the E-330 though the difference is not quite as dramatic it is still a welcome improvement. On the E-400 its performance is not that far behind its speed when when on the E-3, so perhaps my comments about SWD technology and strategy above are a tad unfair. Unfortunately I have no means of measuring AF speed. Firmware: Whilst mounted on the E-3 I check the lens firmware set; it is version 1.0. I think I will leave it at 1.0 to see if my tests produce any issues; that way I can check the effectiveness of the firmware upgrade. According to Olympus Japan there is a firmware update for ZUIKO DIGITAL ED 12-60mm F2.8-4.0 SWD - Improved focusing precision on distant subjects when using the C-AF (continuous AF) mode. (Firmware version 1.1) Oil & grease: Before moving on I'd suggest that purchasers of the lens check the cleanliness of the front element before using. The front element on my brand new example was covered in oil/grease marks (22 in all) and not fingerprints, that took about 10 minutes to satisfactorily clean off. The marks looked like factory based contamination. Why this should be so I have no idea. I use only breath and a quality lens cloth on any lens. COMPARED TO ZD 14-54mm (E-1 standard zoom): The new lens offers a better focal length spread at both ends than its elder sibling, in fact an additional 12 degrees of cover. But this comes with some penalty. Compared to the ZD14-54 the new lens is 17% larger in volume and weighs 575g which is 25% heavier. It is 10mm longer and 6mm wider with the filter increased to 72mm from 67mm. The combination of E-3 and ZD12-60mm weighs in at 1.4kg; the older combination of E-1 + ZD14-54mm weighed 1.1kg. Size and weight is one of the various elements of a camera that the user needs reach a judgement about. Personally the new E-3 kit is marginally too heavy for me and whilst this will not stop me using it, this rather detracts from the innate enjoyment of doing so. The SWD12-60mm is slightly slower at the 60mm long end (f=4) and because its focal length spread is greater than the ZD14-54 it loses its brightness earlier when progressing across its focal lengths. Compared to the brightness of the ZD14-54mm the new lens is around 1/3 stop slower across the range, albeit it offers 12 and 13mm at f=2.8. For example you can see from the chart below that at f=3.5 the ZD14-54 is happy at 50mm whereas the SWD12-60 is just about half that at 27mm. The new lens reaches its minimum aperture proportionately earlier too at 49mm, meaning 49~60mm of focal length is at f-4; this is (obviously) slower than the ZD14-54's performance which, at the long end, provides 50~54mm at f=3.5.
Missing from the ZD14-54mm was the inclusion of ED (Extra Dispersion) elements. As we know the SWD12-60 includes such elements and this new glass promises higher levels of sharpness and better control of aberration. Without doubt ED glass has made a huge difference to the new range of 'budget' zooms for the E-4/510 machines, as I can personally testify; the new (tiny) ZD14-42mm gives the old ZD14-54mm an optical run for its money! I'd like to think the new ZD12-60mm will outshine both these lenses by some margin bearing in mind the price ticket attached to the lens of £699 in UK. Will the slower transitional brightness performance of the SWD12-60 have a significant impact or does the fact that the E-3 has better ISO performance simply balance this out? And also remember that most lenses do not perform at their best optical level wide open and most Olympus Pro-grade offerings have a 'sweet spot' at around f=5.6~8.0. If the SWD12-60mm sweet spot is demonstably at slightly lower f numbers than the ZD14-54mm the difference is going to be minimal in any case. Knowing the ZD14-54mm was not the most consistent in resolution terms (my example in particular) I'm hoping the E-3's new 'standard' lens will provide significantly better sharpness and rendition. Does any of this mean I'll purchase the new lens? At its current retail price it has a lot of convincing to do! CIRCULAR APERTURE BLADE DESIGN: The new lens has a seven bladed aperture (nothing different here) but it has a true circular aperture diaphragm. Some of the ZD Top Pro-grade lenses also have this attribute which is supposed to add to the quality of the defocused area or 'bokeh' as it is sometimes called, in open aperture atmospheric shots. Olympus have been perfecting a true circular aperture for some time now and it looks as though all new lenes will benefit from this development. (The ZD14-42mm has a better 'bokeh' than its sibling the ZD14-45mm.) Close examination of the aperture is difficult but it can be seen to indeed be perfectly round; not a 'circular shaped hole' made up of seven almost straight edges that looks like a 20pence piece! How we assess if the circular aperture does give a more pleasant bokeh is somewhat subjective; I think we all know what 'bad bokeh' looks like but whether we all agree on what constitutes a creamy smooth defocused area remains to be seen. At risk of repeating myself, I would like to see some sort of 'indent' in the lens hood (ala ZD35-100mm) that allows the user to revolve a fitted polarizing lens when the hood is fitted. After all the hood is mounted externally via the outer bayonet rings. This seems to be such a simple request I cannot understand why Olympus cannot deliver such a design on the smaller petal hoods.
SECTION V: FOCUS TEST; LENS TESTS; SWD12-60MM Vs ZD14-54MM & SIGMA 30mm; FIRMWARE UPGRADE(S): AF.
SWD12-60mm & FOCUS: I've seen some debate on the forums about focus issues with the new lens. I also noted earlier that I must sharpen up my own act when using the new focus system as, frankly, it seems easier to make fundamental errors with this sophisticated focus regime. It's been my experience that many of the issues I've come across when reviewing lenses and bodies have been down to me, either not appreciating the best setup or method or failing to do the test properly. This is particularly relevant with the E-3 as it offers new technologies far different from any previous E-Camera. It is too easy to blame the machine. All that said it seemed fitting before I start my humble testing to make sure that the new lens does not suffer from some basic flaw, such as front or back focus. Therefore, I repeat the tests I did when I (wrongly) suspected the Sigma 30mm x 1.4 might have a back focus issue here. To be honest I had no suspicions about the SWD12-60mm during my period of familiarisation (OK messing about), but for the sake of a further quarter of an hour I would undertake Tim Jackson's test detailed at this site www.focustestchart.com, aimed at Nikon but can be used to test any lens/camera. It's not complex by any means and only takes a little time and thought to get it right. Here is the result following the downloaded PDF instructions as accurately as possible.
OBSERVATIONS: As you can see the lens as tested shows no front or back focus tendency. The in-focus plane is not exactly centre (biased toward back focus) in relation to the FOCUS HERE line on the chart. However this may be the result of a slightly inaccurate 45° angle (the angle is critical). I've asked the designer of the test and chart for his observations and am awaiting his reply. In the mean time I've decided to run the test again with the camera at EXACTLY 45° to the table top. Here is the result:
The second test should clear up any misgivings. The lens tested is free of any back/front focus issues. Let's proceed with the remaining tests and see how good, or otherwise, the new lens performs. SWD12-60mm LENS TESTING - METHOD: I try and maintain some consistency in my methodology; not that it needs much explanation nor is it complex. The camera is mounted on a tripod that does not move between shots. The tripod position is marked so I can repeat the test from exactly the same place over time. Any apparent optical differences observed in the results for different lenses is down to lens position on the mount and internal configuration as the tripod head is completely static for each series of shots. The camera is switched off for each lens change. I used the hood as it was raining lightly. For this series of test shots I used the following: * E-3 body mounted on tripod and shutter activated by RM1. * The settings on my E-3 are reset to default for these tests except: * Camera (basic) settings: ISO 200; LF; WB=AUTO, ESP, SAF+MF, * I do not use RAW; highest quality JPG's seem the most appropriate output file. * The results posted below are straight from the camera and not altered other than cropping and re-sizing for the web. TEST ONE: SWD 12-60mm versus ZD14-54mm wide open: The object of the test is to show how good (or bad) each of the accepted 'kit' lenses are against my standard target of the stone pillar with the small stone sign that reads DRAYCOTT HALL. Distance to target from tripod is approx 180 ft. Today is cloudy and overcast but reasonably bright. It was raining lightly when I started but this petered out later. The lighting did not change.
Observations on SET 1: Looking across the crops from the SWD12-60mm wide open there seems to be a glitch of some sort at 25mm. Other than that these shots show the lens capable of resolving the house sign at 60mm, 50mm and 35mm but not any wider. This is pretty typical for this test. Looking across the crops from the ZD14-54mm wide open there is a consistent loss of detail as the lens is zoomed out with no particular focal length suffering. The lens will resolve the house sign at 54mm, 50mm and 35mm but not any wider. The best result is from the SWD12-60mm lens at 60mm - what you might expect, with the ZD14-54mm at 54mm a close second. When the focal lengths equal out on each lens there's markedly better performance from the SWD12-60mm at 18mm. Other than that there's little to choose between the results - each lens slightly being better or slightly worse that the other across the range of focal lengths. There's not much in it at all. SET 2:
Observations on SET 2: Looking across the crops from the SWD12-60mm set to f=5.6 there's a consistent loss of detail between each crop as the focal length diminishes. The consistency is better than the crops of the lens wide open with no one crop appearing out of place. At f=5.6 the SWD12-60 lens can resolve the house sign at 60, 50, & 35mm with the crop at 25mm almost resolving the sign. Wider than this the sign is just a blur. Comparing the lens set at f-5.6 and wide open there is a definite improvement. Looking across the crops from the ZD14-54mm set to f=5.6 there's a consistent loss of detail between each crop as the focal length diminishes. Again, the consistent loss of detail diminishes equally as the lens is zoomed out with no particular focal length suffering. At f=5.6 the ZD14-54mm lens will easily resolve the sign at 54, 50 & 35mm with the crop at 25mm almost resolving the sign. At wider lengths than 35mm the sign is a blur. Comparing the F=5.6 result against the lens wide open there's a definite improvement. The best result must go to the ZD14-54mm lens as it seems a tad sharper (consistently) across the crops than the SWD12-60mm at f=5.6. Now that surprises me. SET 3:
Observations on SET 3: Looking across the crops from the SWD12-60mm set to f=8, again there's a consistent loss of detail between each crop as the focal length diminishes. I see little to no difference between the results at f=8 than those at f=5.6. At f=8 the SWD12-60mm lens can resolve the house sign at 60, 50, & 35mm with the crop at 25mm almost resolving the sign. Wider than this the sign is just a blur. Looking across the crops from the ZD14-54mm set to f=5.6, again there's a consistent loss of detail between each crop as the focal length diminishes. Once again I see little to no difference between the results at f=8 than those at f=5.6. At f=8 the ZD14-54mm lens can resolve the house sign at 60, 50, & 35mm with the crop at 25mm almost resolving the sign. Wider than this the sign is just a blur. The best result of the crops at f=8 must go to the ZD14-54mm lens as it seems a tad sharper (consistently) across the crops than the SWD12-60mm at f=8. SET 4:
Observations on SET 4: Looking across the crops from the SWD12-60mm set to f=11, the loss of detail is more pronounced. At f=11 the SWD12-60mm lens can resolve only the house sign at 60 & 50mm; 35mm is really struggling for a sharp edge and wider still the sign is just a blur. Looking across the crops from the ZD14-54mm set to f=11, the loss of detail is more pronounced. At f=11 the ZD14-54mm lens can resolve only the house sign at 54mm & 50mm; 35mm is struggling for resolution and wider still the sign is just a blur. The best result of the crops at f=11 must go to the SWD12-60mm lens (by a fraction) as it seems just a tad sharper across the longest focal length crops. It seems pretty obvious that diffraction has started to kick in already and I can confirm the series I took with both lenses set at f=16 were pretty poor. My findings with this simple test have surprised me. I genuinely expected the new SWD12-60mm lens to significantly improve the results over the older ZD14-54mm, especially as I've always considered my example of the ZD14-54mm to be less than optimum. Certainly, these results show virtually no difference between the lenses, in fact the ZD at 54mm is capable of more resolution than the SWD at 60mm given the same aperture. It seems the sweet spot for both lenses is f=5.6 and diffraction kicks in around f=10, surprisingly early. This does not bode well for much higher density sensors for the 4/3rds system. I shall upgrade the firmware on the SWD12-60mm to version 1.1 and repeat these tests on a similar day. Personally I do not see an issue with long distance AF on the lens, but obviously I must upgrade the firmware. RESULTS FROM SIGMA 30mm: Before we leave this section I'm going to show the results from my Sigma 30mm set at f=2.8, 5.6, 8.0, 11 & 16 for perusal. I've always considered this lens as being pretty sharp, though not critically so. I suppose I use the Sigma 30mm as a 'control' lens because the results are predictable and to ensure I don't make some silly mistakes with other lenses.
In this series of five exposures you can see the sharpness lies inbetween the 35 & 25mm of both the Olympus lenses tested above. You can also quite clearly see diffraction setting in, again at around f=8 to f=10. It also shows that stopping the lens down does not sharpen it up, even at larger apertures. In my experience this lens is best at around f=4. UPGRADED FIRMWARE: At a much later date I undertook some further testing with ZD14-54mm, SWD12-60mm (FW upgraded) and as a point of interest the OMZ 50mm x f=1.2. The first crops from the corner shows better performance by the SWD against the ZD14-54, especially in the corners, and appears to be a mixture of slightly better sharpness and better contrast interpretation. The second set of crops shows little difference between the lenses as far as chromatic aberration goes by the SWD 12-60 over the other two lenses. No processing other than re-sizing for web. Whether the difference is worth the additional cost is for you to judge. This is the original target followed by six crops at 100%.
CRITIQUE: Having undertaken this test I've got to admit the SWD offers slightly better performance in terms of sharpness than the ZD 14-54mm. And, of course, the new lens has a nicer (more usable) spread though is a tad slower across the range. That said I was amazed at how well the old OMZ 50mm did which, apart from a yellowish cast delivered more sharpness than I possibly imagined with very good control over CA. I believe this performance reflects the very accurate metering in the new E-3. The yellowish tint must be the result of an imbalance in coatings as the 50mm f=1.2 was not made with 'earth elements' as far as I know.
TEST FOUR - BARREL AND PINCUSHION: METHOD: My facilities are limited; the target is set on a tripod and levelled. The E-3 is tripod mounted and levelled. I use LV to assure best compostion. I set the frame edges just on the edge of the paper. Using the RM-1 the shot is recorded. The blue line is on the target and the black lines are achieved afterwards in PS to show the difference.
CRITIQUE: I've got little to add to the above results and comments. Yes, the SWD12-60mm suffers from barrel at its widest, but are we really surprised considering (a) its wide capabilities, (b) it is a zoom and (c) it is the wide end of a 5X zoom. Though not shown I tested the lens at 35mm also and was pleased to see the amount of barrel diminish significantly, to the point where its effect would hardly be noticed even in architectural work. The result at the long end is most satisfactory.
FIRMWARE UPGRADE: The weather has improved a little and I have now some long distance images before and after the firmware upgrade with and without the EC14. I believe they speak for themselves.
OPINION: The shots taken before the firmware upgrade appeared fine to me but I did not go pixel peeping. Even if I had the results are about the same as my ZD14-54mm anyway. It is only when you see the results after the upgrade do you realise that Olympus have made a difference to the lens long distance performance. The new firmware has sharpened the image and slightly improved the contrast (yes, probably both), not dramatically but enough to see the difference. And that's what matters - seeing the difference.
But, and I'm being completely honest here, I thought the SWD12-60 was just fine before the upgrade! FIRMWARE UPDATE FOR E-3 BODY: Olympus Japan, have just (29th January 2008) released this update (1.1) for the E-3 which: 1. Enables use of the Image Stabilization function with non-Four Thirds System interchangeable lenses by inputting a specific focal length. For details on operations see this chart:
2. Matched the rotation of the dial on the rear of the Power Battery Holder HLD-4 and the movement direction of the AF target. 3. Increased the number of storable still pictures by improving the battery check when the Power Battery Holder HLD-4 is attached. 4. Focusing now stops immediately when the AF start button (AEL/AFL or Fn button) is released. 5. Corrected the phenomenon where the flash control caused an under exposure while using bounce flash at short distances with the FL-50R or FL-36R Electronic Flash. 6. Improved selection and prioritization of the central 5 ranging points when shooting in C-AF mode and Dynamic-single Target mode. OBSERVATIONS: That's some firmware upgrade (8mb in total). IS is now available for non-ZD lenses; the screen now offers the ability to enter the focal length of manual lenses from 8mm to 1000mm and not only OMZ focal lengths. This is comprehensive and thoughtful and I for one thank the company for making the E-3 so much more of a better camera for having this facility. I have given IS with the OMZ 90mm Macro lens a try and can report it works just fine; seemingly exactly the same as with ZD and SWD lenses except there's no focus confirmation by beep or green lamp. Lots more to come on this great update to the E-3! I have quickly tried the dynamic mode improvements but it seems the central point (still) only lights regardless of the point in focus - that's a pity. But more work needed from me on this. I shall study the other improvements as soon as I have time but I'm pleased to see Olympus have done something about the HLD4 battery issue I've been whinging about. We'll also see if the HLD4 will accept AA's now. IMPORTANT: The firmware upgrade re-sets all your settings back to default - be warned. AF TEST: As said, I've read some stirrings in the forums about AF failure in certain circumstances. I haven't been able to specifically repeat the AF problems some users are reporting. But I do know my copy E-3 with SWD12-60mm does not like low contrast, low detail subjects on which to focus. For example the cupboard doors in my study are a light creamy-brown beech grain (typical modern finish). Fill the viewfinder with the grain and AF will not lock. As soon as I place a door edge or handle in the frame and (if the AF is to all points or dynamic) it nails the focus in one. Do I want images of my cupboard doors - of course not, but as an example of AF defeat it serves a useful purpose. In all fairness Olympus warns of this issue in the manual. I pointed out earlier in this review the quicker and more sophisticated the AF process the more care we have to take in use. However, I cannot say if there is an AF issue with the E-3; I can only report on what I find with the one I am testing. And yes, I can make it refuse to AF lock in certain circumstances, (see * below) but I have no suspicion that the AF is routinely or even occasionally failing by either not locking on, beeping confirmation or displaying the green lamp when it is not focused. So what does this actually mean to me in everyday use? It means if I see those circumstances arise it may cause AF problems, so use my head, adjust the camera or my expectations. But, and this is a big BUT, I do know one experienced photographer has AF problems with his E-3 and long ZD lenses; I sympathize with him. After doing more research and reading folks concerns I set up this test scenario in my study, lit by artificial light. The front edge of the lens box is exactly 2 feet in front of the wall chart. With the E-3 on a tripod and using my ZD50-200 first version lens set to 200mm, I tried out the various AF focus points and patterns. I've marked the image below with a vertical red oblong that represents my focus point tracks up and down.
OBSERVATIONS DURING TEST: I set the camera to S-AF, AF point to centre, normal sensitivity and placed the centre point on the box in a vertical line shown by the right hand line and tried several AF's vertically. I recieved focus beep and green lamp on every occasion. Next I placed the centre point on the edge of the box in the middle of the two vertical red lines. I got the same result. Next I placed the centre point on the wall chart in a vertical line shown by the left hand red line. I received focus beep and green lamp BUT the box was in focus, not the wall. When I moved the placement of the centre AF point to the left of the vertical red line I got an AF fail (hunted in and out) because the area focused on has no contrast - just like my cupboard doors. Providing I kept the placement of the centre point any where along the centre of the two horizontal red lines running left of the vertical box I got no AF lock. I repeated the test running the opposite way with the same results. I changed only the AF point to 11, rest as was. I then repeated the placements of the centre point exactly as above. This time I received the focus beep and green lamp as long as one of the 11 points remained to the right of the vertical red line on the left of the box (even though the extreme right hand focus point was beyond the edge of the box). But as soon as the far right focus point was to the left of the left hand vertical red line I received focus beep and green lamp from one of the other 11 points that was now positioned over the edge of the deep grey line (or near to it), thus confirming positive and accurate AF. I repeated the test running the opposite way with the same results. Next I tried small sensitivity with centre and 11 points and saw no discernable difference. Next I tried the dynamic pattern and again found little difference to the result but do not understand why the focus point giving the confirmation does not light, only the centre point - this aspect of the mode is most confusing and could lead the user to 'believe' there is a AF fault. (I stopped using this pattern for this reason and not only for simple testing). I also have the Fn button set for AF home; this cycles between 11 point and whatever you set as your preferred AF point mode. I find this very useful especially as I no longer use the dynamic pattern. In dynamic pattern it was very easy to assume I had found an issue with AF, but on more repeat tests I am confident in saying it is the refusal to light the 'in-focus' point that leads to confusion and not a discrepancy of this mode, hence my refusal to use it. This arises from the fact that only the centre point lights leading you to think you are in single point mode; thinking this and then obtaining an AF lock well outside the centre point immediately, but wrongly, raises doubts as to AF efficacy as the dynamic mode is producing the AF pattern it should. CONCLUSIONS: To be honest, this is what I expected; the AF has behaved as it should. There is a ring running round each AF point larger than the point itself that is sensitive to the AF feedback (the area of this ring can be varied, hence sensitivity setting choice of small or normal) which means that your selected AF point can be slightly 'off target' but still find a lock and indicate that lock on the AF point nearest to it by lighting it up. The red vertical oblong represents this area covered by AF even though the points are just outside the marked area. In addition the refusal of AF to lock in test one (single point) was immediately corrected by test two that employs all 11 points. This confirms it was the nature of the target, not the AF mechanism, that caused the AF to fail. Is this not the way it is supposed to work? If single point fails to lock due to low contrast/low detail then switch to 11 points to give the sysytem better chance of obtaining a lock. If both fail then use the manual ring. My general advice is to avoid dynamic mode and set the Fn button preference to AF HOME which gives instant access to switch between single point and 11 point AF in one press. Leave it like this until you are happy that you fully understand how the AF system works in difficult situations before re-deploying dynamic mode just to avoid confusion while you get used to the system. AF IN REAL LIFE: On a not too bright Monday afternoon I watched some collared doves visiting the bird table outside my kitchen window and decided to try some test shots. It struck me that the birds plumage was not far away from the colour and texture of my study doors and with single point AF this may prove challenging for the camera. Now while these birds seem to flutter and fly slowly I found it impossible to follow them in flight to and from the table, so had to use a different method. When three birds were feeding I focused on the nearest and with both eyes open waited to see the fourth arrive. As soon as it entered my field of view I squeezed the shutter for a burst of 4 or five shots. I didn't use 11 points as I wanted the main focus to be the birds on the table; had they been out of focus as well as the incoming bird the shot would have been binned. These moments pass so quickly it was impossible to track the bird on the table as it was moving about as well, so once I had framed it was a matter of squeezing the shutter and letting the AF do its work whatever wandered in front of it. Hand-held, IS on, ISO 400, F4 at 1/380th. Here's the results:
CRITIQUE: Given the subject and the conditions being less than ideal plus I was shooting through glass these turned out not so bad I think. At ISO 400 and -0.7 compensation I still had insufficient shutter speed to stop the wingbeat and there's a little movement blur on the bird in flight head. However I could have tried all afternoon and got nothing like this had I tried to focus on the incoming bird - they are simply too quick. The point I'm making is that the AF nailed the subject (closest bird) which was also squirming about on the table and I relied on a shallow depth of field to put the incoming bird into reasonable focus. It's no show winner that's for sure but I got the sequence. Whether the AF on the E-3 would have nailed focus on a bird in flight in these conditions is largely irrelevant because I tried a couple of times and decided disappointment lay that way, so I chose to work within the limits of the conditions, the camera and myself and got something half decent.
SECTION VI: ISO NOISE; IN-CAMERA SETTINGS; IMAGE STABILIZATION; CLOSE-UP; FILE SIZES & WRITE SPEEDS.
SENSOR GENERAL COMMENT: Because 4/3rd sensors are slightly smaller than APS (or other such cropped sensors) and one quarter the size of the full-frame sensor, they inevitably suffer from proportionately more noise. It is a fact of life and if you are looking for clean ISO6400 or above, you need to look to others than Olympus. 4/3rds is a compromise (as all cameras are) and whether the compromises the Olympus designers have chosen for the whole system suits you, or you can live with, is entirely up to you. Do your research, speak to folks who own/access two camera systems, look at your output requirements and above all do not listen to camera (box) salesmen! When Olympus went with the CMOS sensor it was for 2 reasons - to enable Live View and for better high ISO results. While Kodak improved the noise output on the 10MP CCD fitted to the E-400 it is generally accepted that the CMOS sensor fitted to the E-410/E-510 is superior as far as noise is concerned. So how does the E-3 perform? Certainly all the images from the Internet have demonstrated virtually no noise at ISO800, acceptable levels at ISO1600 and even 'usable' levels at top ISO setting of 3200. Generally I don't use high ISO rarely exceeding ISO800, and I suspect many other 'amateur' users don't either, but I do see the importance of high ISO performance for the professional. ISO PERFORMANCE TEST 1 INDOORS: METHOD: The table test is of my normal ceramic, artificially lit with the ISO cranked up 1 stop between shots. The crops are taken straight from the originals, re-sized only and put together for ease of comparison; there's been no processing whatsoever. Yes, the E-3 NR is set to OFF. I've especailly chosen to do this in artificial light because generally high ISO's are needed in interior circumstances with dismal amounts of other lights (theatres, boxing rings etc).
CRITIQUE (INSIDE): Yes, there is noise starting at around ISO1000 but it is well controlled. ISO1600 is perfectly usable though had I compensated for the overexposure there would have been slightly more noise, still, this is a good result. The same goes for top ISO result and the level and type of noise are well within my acceptance tolerances but your opinion may differ. If you shoot RAW most developers have a reasonable NR feature in built; if you shoot jpg then software such as Noise Ninja (recommended) will easily remove this without impinging too much on resolution. There is a slight loss of detail but it is marginal. I have not sampled with NR set to ON. We know this in-camera processing is a compromise between lessening the impact of noise at the expense of sharpness, and inevitably sharpness loses out. From past experience and where required on noisy images, I use post processing NR software where the user has some input into how far this compromise is pushed. However, I've got to say that NR on the E-3 is very conservative and the best suggestion I can make is you test it yourself and reach a view. ISO PERFORMANCE TEST 2 OUTDOORS: METHOD: In test 2 (now the weather is a little better) I use the summerhouse as a target that is sufficiently far away to be focused at infinity. From this series of shots at ISO 100, 200, 400, 800, 1600, 3200 I crop out areas from the predominantly lightest and darkest areas of the image to see the impact of noise at each end of the spectrum. The images are straight from the camera with no post processing other than re-sizing and cropping. Camera settings: Aperture Priority, Picture Mode=Natural (with all at default), WB=Cloudy, f=5.6, shutter AE determined, Comp= -0.3, NR set to OFF. Again no adjustments were made to the series during shooting.
CRITIQUE (OUTSIDE): These results show how important exposure and light and shade make to the results. In exposure terms the white of the window surround is over exposed and the deep shadows are under exposed. This is reflected in ISO noise; the lighter the area the less prone to noise and vice versa. When shooting at high ISO be aware of the undue noise that will show in the darker areas of the image and, where possible balance this out by compensating. Of course there will be times when you cannot do this and will need to rely on noise reduction in post processing. This brings me neatly to in-camera noise reduction (filtering). NOISE FILTERING: The E-3 has four choices for noise filtering; Off, Low, Standard, High. Whether OFF is actually 'off' is subject of some debate; I'd imagine off means noise filtering is taking place albeit at a very low and discreet level. As I said earlier I believe it's best to leave these set to OFF until you are familiar with the effects. Using the same target as the ISO tests above, I set the E-3 to ISO 1600 and took four consecutive images with the Noise Filter set to each of the four choices to see the impact on the image, sharpness and detail. I used the darkest area as choice for the crops as this suffers most from intrusive noise.
CRITIQUE (NOISE FILTERING): It's clear to see from the above crops (100%) the noise filter when applied does quite a respectable job. You can see for example the shape of the door handle emerging from the noise. Personally I think the impact on sharpness is acceptable (for this type of non-critical image), provides you detail previously partially obscurred and gives you the opportunity of applying your own regime of applied sharpening in post processing. I believe the levels applied by the camera settings are quite conservative yet very effective. However, I strongly recommend you do your own analysis before applying the NF function. IN-CAMERA SHARPENING: The E-3 has five choices for sharpening; -2, -1, 0 +1, +2. Using the same set-up as above I set the E-3 to ISO400 and took three consecutive shots with in-camera sharpening set to -2, 0, +2 to study the effects and to judge what settings are right for my use. It's imperative we all do this sort of test so we know what to expect out of our sophisticated machine. Here's the results:
CRITIQUE (IN-CAMERA SHARPENING): It's plain to me the in-camera settings on the E-3 are slightly more conservative than the 'prosumer' grade offerings. I have my E-400 set to -2 for example. The result from the E-3 at +2 is too highly sharpened for my taste and I'm not keen on the unsharp look of -2. The default setting looks OK to me though I'll probably notch it down to -1. IN-CAMERA SETTINGS: I said earlier new users of the E-3 might be best advised to keep most things on factory default until they are more familiar with the camera. That's true but I also think it is the first area you need to study and set up to match your personal expectations or shooting preferences. This is particularly important if you shoot predominantly jpg's. Getting the settings just right 'for you' will save you time when post processing. The E-3 offers six Picture Modes, four for COLOUR, one for MONOTONE and one CUSTOM. (Camera 1/Picture Mode). VIVID, NATURAL, MUTED, PORTRAIT; Each of these are pre-determined by the camera to produce the colour tone curves suggested by their names. (And each is set to a default level of 0 for each attribute). But each also offers you the choice to override and set up the individual attributes of CONTRAST, SHARPNESS and SATURATION for each colour Picture Mode by adjusting each parameter between -2 & +2 (5 levels). That means there are 125 different settings you could apply to each colour Picture mode. For example if you consider the output from VIVID is not vivid enough for your requirements then adjust the levels of CONTRAST & SATURATION above the default levels and store this as your VIVID mode (you can always set it back to default by performing a RESET at any time). MONOTONE: Allows you to set levels of CONTRAST and SHARPNESS -2 to +2, a series of Black and White filters (neutral, yellow, orange, green & red) and under PICTURE TONE, output tones of neutral, sepia, blue, purple and green. CUSTOM: offers you the choice of any of the four PICTURE MODES as the basis for your custom setting followed by setting your required levels in CONTRAST, SHARPNESS & SATURATION and finally your choice of the level of GRADATION you wish to apply to your CUSTOM setting, either AUTO, NORMAL, HIGH or LOW KEY. GRADATION (AKA SHADOW ADJUSTMENT TECHNOLOGY): Gradation 'enhancements' are quite subtle, comprising of gently lifting shadows and subduing highlights. I'm still not convinced I want the camera to do this for me as a pre-set, particularly if it overrides other settings. This feature works only with jpg images, it has no effect on RAW data; the adjustments offered in-camera can also be applied to RAW images in Olympus Master RAW developer if required. In other RAW developers gradation effects can be duplicated by using the 'Fill Light' slider. In the E-3 the settings under GRADATION are AUTO, NORMAL, HIGH KEY, LOW KEY. It is recommended that for day to day photography set gradation to NORMAL which, as far as I can see from an exposure point of view (and presumably software too) is OFF. For example, a fixed scene with constant light will meter in A mode f=2.8 @ 100th in NORMAL gradation.
In AUTO mode the in-camera software performs simple zoning with curves applied to zoned areas to enhance brightness. So far I haven't been able to deduce whether in HIGH & LOW KEY the camera is simply manipulating exposure or if there is in-camera software at work too. In each mode except NORMAL contrast adjustments (overrides) are not applied. This being so leads me to think in-camera software is at work in all modes except NORMAL. That being so and where you have applied your personal contrast settings to your Picture Modes this one setting is going to override those applied changes (unless I'm completely mistaken). This is a further reason why care should be taken applying any gradation setting other than NORMAL. IMAGE STABILIZATION: This function is provided in-camera as opposed to in-lens. This means that with all 4/3rds lenses (Zuiko Digital or otherwise) IS will work seamlessly due to the communication routines between the chip in the lens and the processors in the body. If you use legacy lenses (non-4/3rds standard) which are not 'smart' (i.e. chip-less) the IS function will not work. I believe there is no overwhelming technological reason for this; Olympus have chosen not to enable it. However, the new and larger viewfinder on the E-3 translates into better manual focusing when using most legacy lenses. The E-3 offers Image Stabilization on three levels; OFF, ON (both axes) and ON (horizontal axis). The sensor mount has gyroscopic sensors fitted that measure the amount of movement caused by hand-shake etc and to compensate (it is far more complex than this). The best analogy I can visualise is a helicopter that would roll, pitch and yaw but for the skillful pilot who can keep the machine absolutely still by counteracting each/all of the forces. The gyro's do that for the sensor. WHEN TO USE: For everyday use I'd suggest you leave IS in the OFF position. There is a lot of electronic and mechanical activity happening when it is switched ON that doesn't need to be draining power and wearing out if the camera is being held steady anyway. There's an old 35mm maxim of 'shutter speed equalling focal length stops shake' (one over the focal length) that is a good guide to enabling IS. In essence it means the longer the lens the higher the shutter speed required to prevent shake. Thus if the focal length is 150mm (on a 4/3rds lens) the shutter speed needs to be: (150 x 2) 300mm = 300th of a second or higher. If the ambient light is insufficient to achieve the shutter speed required by this maxim then switch ON the IS. In addition, if the camera is mounted on a sturdy tripod I'd suggest the IS be switched OFF. Of course there will be occasions when these guide lines should be ignored; that's why we think and why we practice. TEST METHOD: First off I have no equipment with which to test the claims made by Olympus of a full 5 stops advantage. And secondly nearly every test I've read on IS receives criticism that it lacks credibility, either in logic or science. Andrzej Wrotniak undertook a detailed appraisal of the IS capability of his E-510 which makes a lot of sense to me; you can read his findings here (highly recommended). I'm sure Andrzej will admit that was a lot of work and I simply haven't got the time to reproduce it here so I'm going to keep my IS experiment simple and the results to a minimum. All I've done is take some shots of a large chart on my office wall using the same focus point and the edge of the chart as a vertical guide, from a distance of about eleven feet. I'm using the SWD12-60 at the long end to see by how much I can reduce the shutter speed before I get apparent camera shake. I'm reasonably confident I can hand hold a shot zoomed to 60mm at around 1/25th second. I am sitting down (an advantage), using the viewfinder (called head stabilization) and keeping my elbows tucked in to my body. The E-3 shutter is delightful to use as it allows the most delicate of 'squeezes'. However, there are so many variables in this scenario it is impossible to suggest it is anything but a 'rough guide' to IS performance in this particular set of circumstances only. And you'll just have to take my word that I didn't cheat - what would be the point! Below is an image of part of the wall chart. You can see the crops of are taken from the far right of the full image, below the centre line
CRITIQUE: There you have it. Make of it what you will. There's little doubt IS on the E-3 works but I have no way of telling you how well it works or if Olympus are justified in their 'advantage' claims. My personal take is the IS delivers and certainly offers you some advantage. I dare bet that there are circumstances when the IS will deliver a stunning image against the odds but, on the other hand there will be times you might do better with the older 'hand-held' stabilization techniques. I do not consider for a moment IS is any substitute for a tripod. It can be good, but it's not that good! That said it is a great tool to have in your armoury and in my opinion better than having to constantly pay for lens based IS. The downside from the users point of view is you cannot 'see' IS working on the E-3 (and E-510) as you can with lens based systems. And on this you have to simply trust the sensor gyro's are doing their job. SEEING IS WORK: It is possible to demonstrate IS to yourself by mounting a long lens, switching to LV, selecting a target, focusing thereon and pressing OK which magnifies the target 5, 7 or 10x. See how much it is swaying as you try to hold the camera steady. Now press the IS button and select IS 1. The result is (can be) dramatic. This simple procedure, demonstarted by Olympus technicians, will alay any doubts that the technology is working. CLOSE-UP WORK: I am particularly pleased with the SWD12-60mm performance close-up. In the following series of shots I set the lens about 50mm (yes, correct, 50mm) above the target and used LV and manual focus to achieve what I consider is a cracking result. I left the E-3 in A mode and let it calculate the exposure. Can you remember what it was like obtaining this type of image in film days?
CRITIQUE: I cannot really express how impressed I am with this lens' close-up ability. This is simply stunning for a 'kit' lens, albeit an expensive one. Close focus ability is best of any of the ZD zoom lenses I've tested so far and the resolution it delivers is on a par with the ZD35mm Macro. At 50mm from the target you need to be careful with your lighting and of course the flash cannot be used. The distance from the focus point (blue crayon, centre) to the flat surface of the bank note is 3mm so you can see how shallow the DofF is with the lens at f=4. It does sharpen up well at f=8 and I cannot see (at full size anyway) any evidence of diffraction in the f=16 rendering. Looking at the final image, that from the ZD35mm macro lens (an absolute bargain by the way) the SWD12-60mm does very well and provides sharp enough images to allow you to cropping out to between 1:4 or 1:2 before significant loss of detail. With capability like this do you need a dedicated macro lens? I may do some further tesing to compare the output from the SWD12-60mm (and ZD35mm Macro) against what I consider to be the best Macro lens made, the OMZ90mm x 2.0 and it's smaller sibling the OMZ 50mm x 3.5; but that's for a later time. Judging by these results the OMZ's have a lot to do!
DYNAMIC RANGE: I have no means of measuring dynamic range, only my eyes. I went out to look for a shot that might stretch the sensors DR. I found this bridge in deep shadow on my side with bright sunlight streaming through from the other with the river flowing from almost black to white foam. This is the E-3 rendering:
FILE SIZES, FRAME RATE, BUFFER & CARD WRITE SPEEDS: FILE SIZES: The E-3 offers a range of file sizes; no longer do Olympus have the SHQ and HQ designations but rather a more understandable regime. Basically the 9 choices are: RAW/LSF/LN/MN/SN/RAW+LFN/RAW+LN/RAW+MN/RAW+SN. The registerable compression ratios are L(arge), M(iddle) and S(mall) in S(uper), F(ine), N(ormal) and B(ase) levels. It is also possible to set the dpi output per file; by default it is 314dpi from a total output of 3648 x 2736 pixels producing an image approximately 11.6" x 8.75". This is useful if you require a particular image size output without needing to adjust the parameters in PS. RAW files, like the E-410 enjoy a lossless compression and give an average file size of around 10mb. Large jpg's enjoy a compression ratio of LSF = 1:2.7, LF = 1:4; there are more selectable levels but I'm assuming E-3 users will shoot RAW or high quality/low compression jpg's. FRAME RATE: The E-3 gives the choice of SINGLE frame, HIGH & LOW. High is the highest frame rate supported by the camera/sensor and is 5 fps. Low is determined by the user and is selectable between 1 & 4fps. Tests I have undertaken confirm that given manual focus and high shutter speed the camera delivers 5fps in jpg and RAW. BUFFER: The buffer on the E-3 is 128mb of fast RAM. The cameras rapid processing engines mean that with a SanDisk Extreme lV CF card it can write a burst of 5 RAW's in around 4.5 seconds; that's mighty quick. Extreme lll was slightly slower at about 6 seconds. In fact continuous shooting with a SanDisk Extreme lV hardly slowed down after the initial 5 frames and simply continued buffering at about 3.5 or more fps. I cannot think anyone will be critical of these speeds. Internal speed is on top of the task and I don't propose to do any further speed testing - I can guarantee you will not be disappointed. Compare the write speed I have just measured to the write times of the nimblest of the E-series cameras prior to the E-3, the E-400: E-400 Write: SD Extreme III: RAW 5 sequential shots from pressing shutter to red light out = 11 seconds (E-3 = 6 seconds). E-400 Write: SD Extreme IV: RAW 5 sequential shots from pressing shutter to red light out = 9 seconds (E-3 = 4.5 seconds). Rapid processing also means the E-3 is very responsive in essential areas like image review and acess to the menu and Super Control Panel. The extreme swiftness of the E-3 just shows how far things have come as regards internal processing from the E-1 days. In another 4 years will we be thinking of the E-3 as a bit tardy and dated - I hope so!
SECTION VII: LIKES & DISLIKES; CONCLUSION; 8 WEEK UPDATE; PRICE; FINAL WORD.
LIKES/DISLIKES: I've been asked by many readers to provide a resume towards the end. (That's OK as long as you don't simply come straight here and ignore the rest of my hard work!) This list is inevitably influenced by personal preferences that may be insignificant to others. I've restricted the list to 'Five a Side' to focus my mind. With all this in mind please read on: I LIKE: The design effort expended to reach this level from scratch in 2003 with the E-1. Olympus have overcome huge obstacles. The new viewfinder; this alone is worth upgrading from any other E-System camera (and INFO at base of screen.) Inherent strength, indestructable feel; use of high quality materials. Speed and agility from AF to processing; great colours, great IQ and good ISO performance. Level of user intervention it offers; the E-3 can be set to satisfy anyone and still offer choice.
I DON'T LIKE: Bulk and weight. Not a true "system" machine; screen change by Olympus only; no shared grip; non-universal external power. Button size - too small for me and see the recently added 8 week update below. Price; I think Olympus need to drop this to sub £1000. No one in the target market likes spending +£1000 on a camera body. The same comment goes for the SWD12-60mm. Shave a little off the price and it will sell in bucket loads. CONCLUSION: It's taken quite a while to feel at one with the camera and there are still times when I stand and say to myself 'now how do I change such and such' (it can be a little counter-intuitive) but I suppose this is a matter of use, practice and familiarity with the various button/menu systems. Its performance is amazing. Technically, it is streets ahead of anything else I have (E1, E500, E330, E400) and the sheer level of user input is incredible. I personally doubted Olympus could beat the IQ pumped out by the E-1, but the E-3 excels in IQ and its files are the best so far. Yes, it beats the C8080 too. I do not know how the E-3 compares with its main rivals but comparing it with my other E-Cameras it is technically the best machine from Olympus so far. (NOTE: I do not have the new E-510 so cannot draw a comparison). 8 WEEK UPDATE: I've been using the E-3 for eight weeks and while I've updated this report with more image examples, some semi-technical issues and reader feedback I've not had chance to review my own thoughts. The E-3, like any other camera, is a tool for taking photographs. With use any tool becomes more familiar. It is the greatest compliment to tool design when it simply becomes an extension of the workman. There's also a subtle difference between 'getting used to' and 'second nature'. In the process of 'getting used' to anything we make allowances for things that don't feel right or don't work exactly as we want. On the other hand something becomes 'second nature' because we don't have to make many allowances, the tool simply works as it is. The more allowances we make the less likely the tool will become second nature. Try as I will, the camera simply refuses to integrate with me and seems out of balance. It is nothing major, no single point that prevents this; just a few small (and to some users perhaps insignificant) things that combine to make the camera seem ill at ease with itself. In other words I have made a lot of allowances. If the E-3 simply has to be as large and bulky as it is, it should handle perfectly or else its size becomes more of an issue. When I hold the E-3 (without battery grip) firmly in both hands with the right and left index fingers free to flex and access the various buttons and wheels I expect to reach all those controls comfortably. And this is where it goes wrong. Right hand index finger: The front control wheel is too low, I have to move my other fingers downwards to spin the wheel comfortably. LIGHT button is unreachable without significantly moving your grip on the camera; WB button is OK; Compensation button is hard to feel sitting in a deep recess; ISO button is not reachable without unwrapping your three grip fingers off the grip to move them to the front radial edge of the grip. Right hand thumb: AEL/AFL button OK; Fn and AF point buttons impossible to reach without relinquishing front three fingers from front grip (try doing this one-handed to see effect); IS button virtually impossible to press without releasing other fingers from front. Left hand index finger: Flash release OK; Flash button OK; Mode OK (sort of); AF button is not reachable without allowing other fingers to slide up the front edge of the camera; BKT with two fingers is impossible to work without completely releasing other fingers. When I hold the E-3 with the battery grip fitted it is easier to operate the Fn and AF point buttons on the right and all the buttons on the left hand top plate. This is because the grip effectively extends the sides of the camera downwards giving the ball of each thumb something to press against and act as a counter-balance. Ironically the grip, while adding both bulk and weight, serves as an antidote to some of the basic handling issues above. It is the necessary and frequent slackening of my grip to allow my index finger to reach the controls that creates this feeling of imbalance. As a consequence of all this additional movement on the camera I find it difficult to use the controls when looking through the viewfinder. It is just not intuitive. It is also true that some of these observations/criticisms can be levelled at other E-cameras; but it is the E-3's weight and bulk that exacerbate these issues to the point when they become tiresome in regular use. I have made the buttons sticky and experimented with various re-assignments of command functions (I have COMP on the rear wheel for example) but, to me anyway, the E-3's handling requires some forgiveness. Interestingly, I just spoke to Andrzej Wrotniak. Without giving anything away from his forthcoming technical review (and with his consent to quote) his abiding impression of E-3 is "...... a committee design, ...... not that of an inspired individual."
PRICE: As at January 2008 UK street price is holding steady at £1099 + £599 for the SWD12-60mm though I have seen the body at £999 and the lens at £525. I have no doubt it will soon be offered at (street price) £1449 - £1499 for the pair - it has to be otherwise it will not sell. Olympus camera division has a lot of R&D investment riding on the E-3; it must succeed. Now the first tranche of Olympus E-1 upgraders and E-System stalwarts have bought the E-3 it must stand on its own merits against the competition from Canon, Nikon, Sony et alia, and the first criteria many folk automatically compare is price. FINAL WORD: When I started this review many weeks ago I asked if the E-3 deserved its accolade as 'the flagship Olympus'. I believe I've already answered that question many times. It is receiving excellent reviews in the magazines, on the Internet and has has high acclaim from some top professional photographers. It was recently included in a UK magazine review of the ultimate top class machines costing 3 to 5 times the price and achieved 89%. This is a reflection of how highly the E-3 is perceived as a brilliantly specified, equipped and capable DSLR. There are a few issues but overall I believe it certainly deserves its accolade.
NOTE: This article seeks nothing other than to inform. Only you can decide what equipment you want/need for your use. I own most of these cameras/lenses, out of my own pocket; I have nothing to gain or lose by publishing this article, photographs, examples or opinion.
| ||||||||||||||||||||||||||||||||||||||||||||||||||||||||||||||||||||||||||||
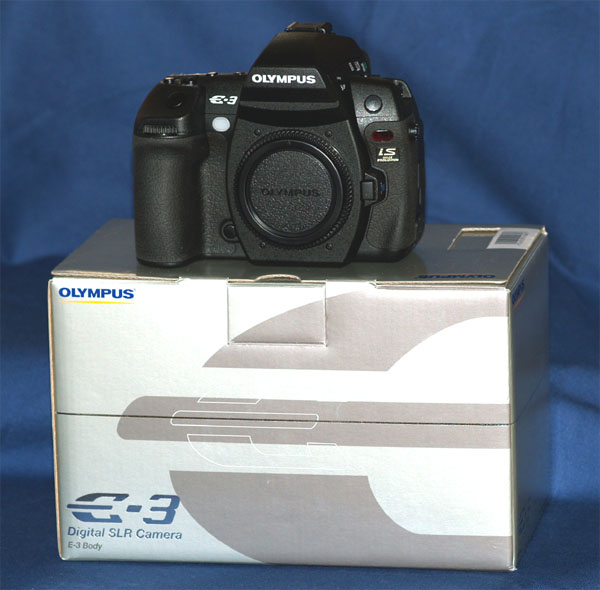
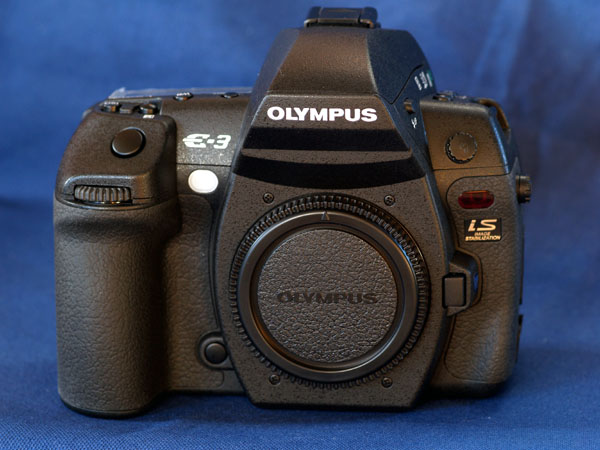
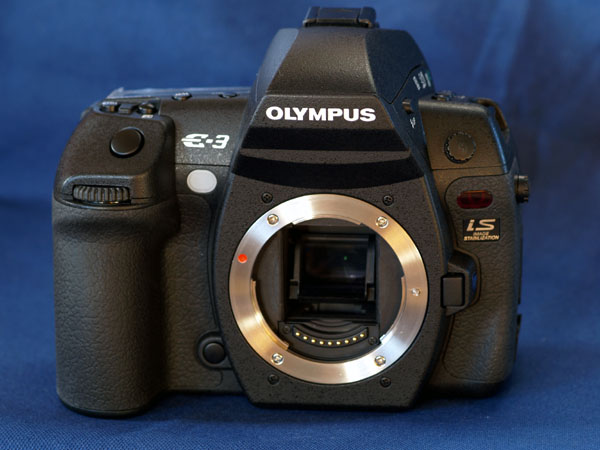
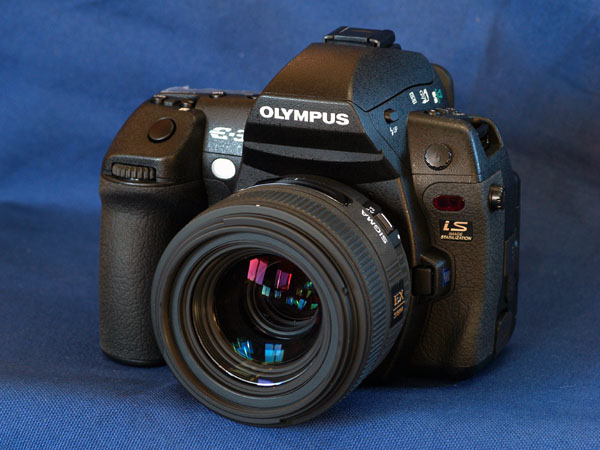
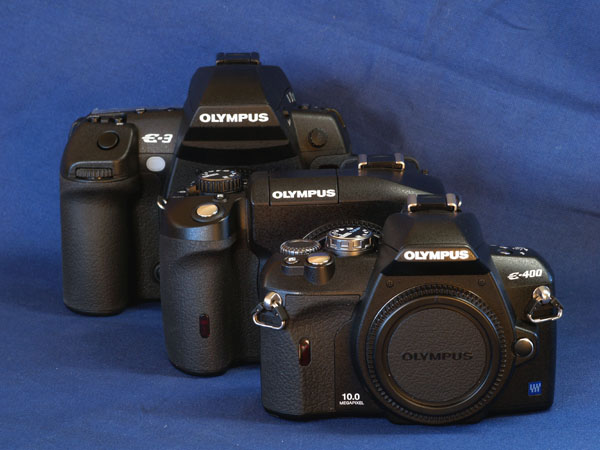
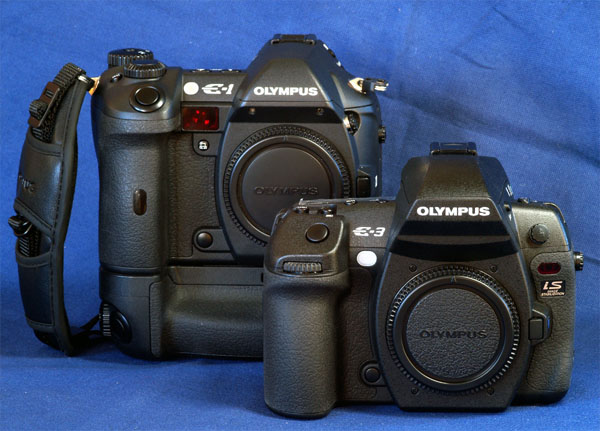
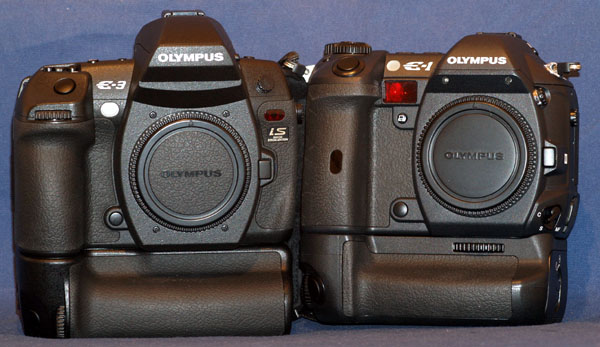

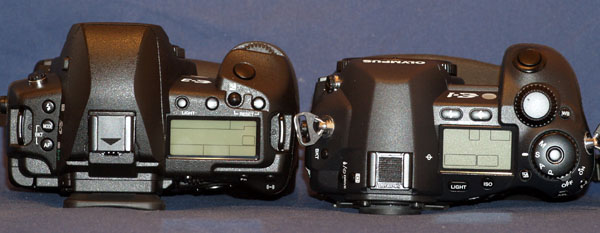
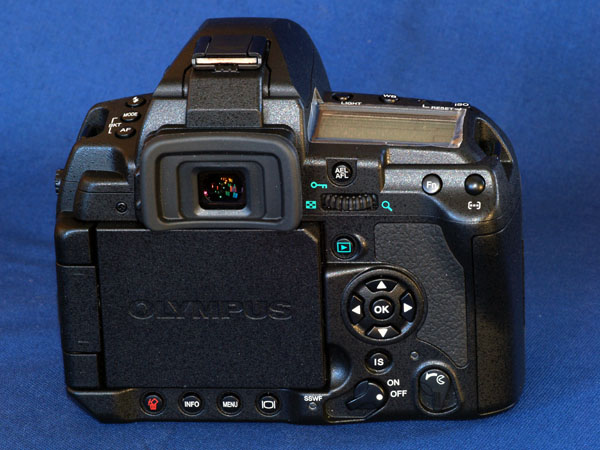
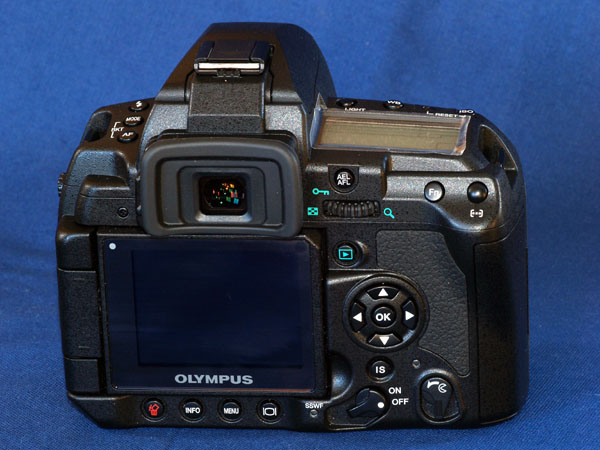
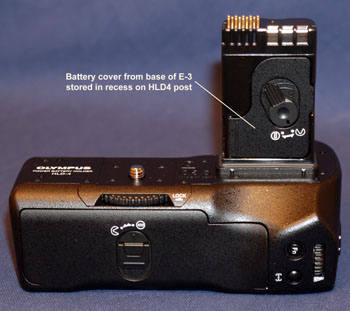
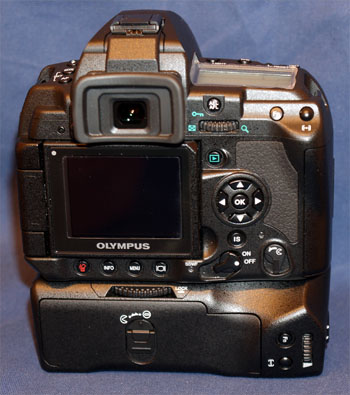
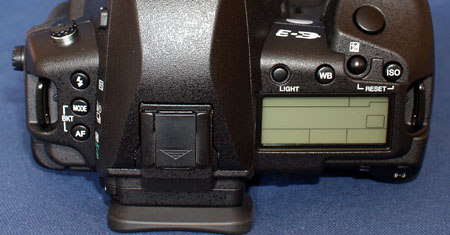
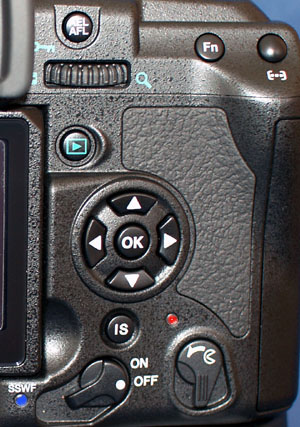
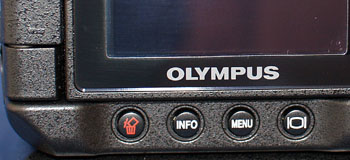
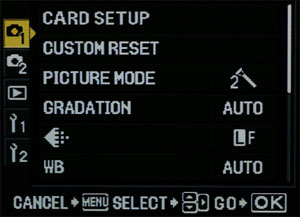
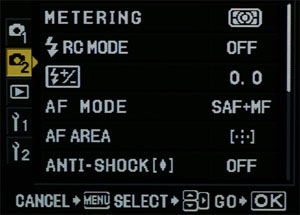
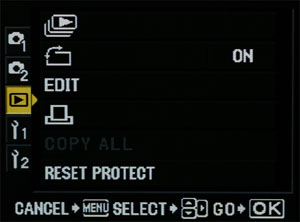
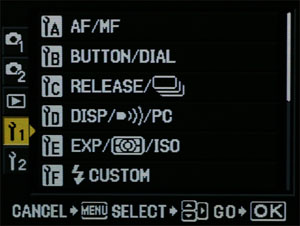
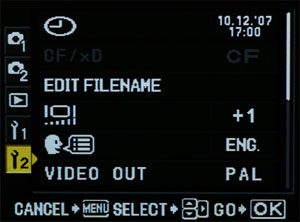
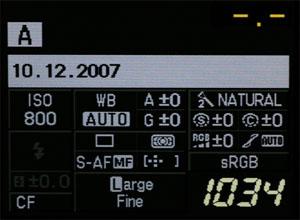
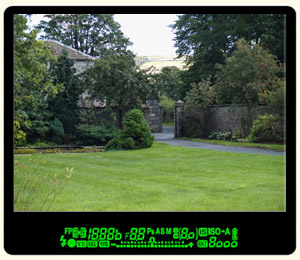

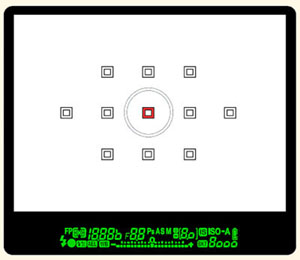
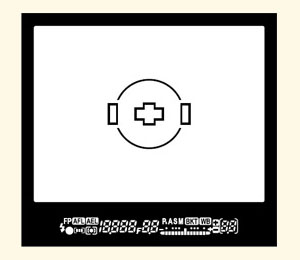

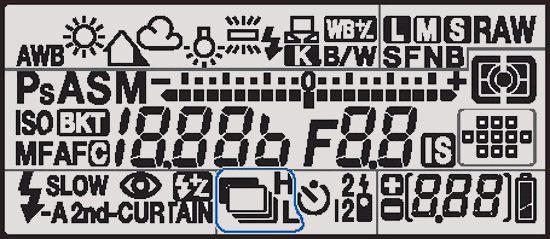

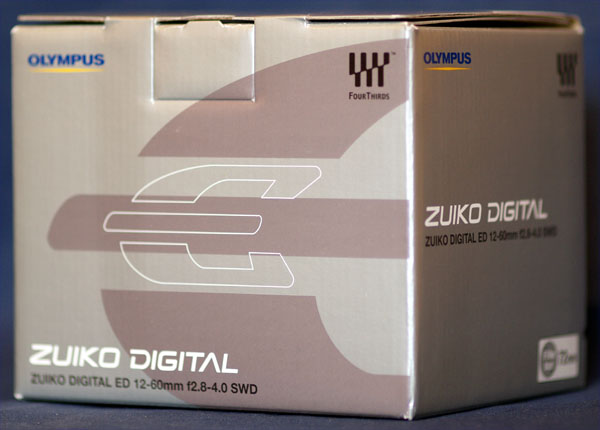
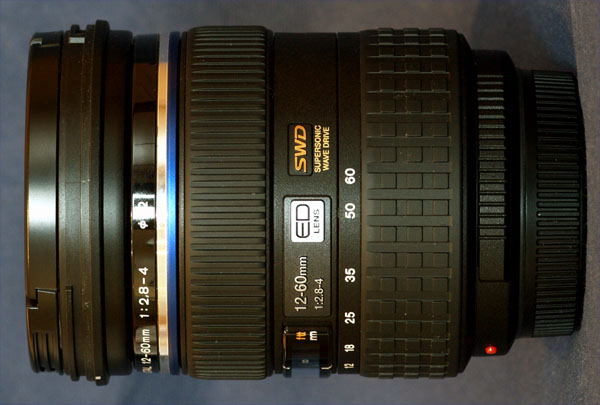
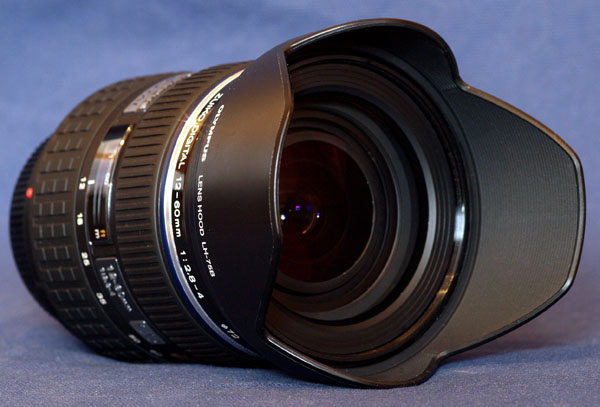
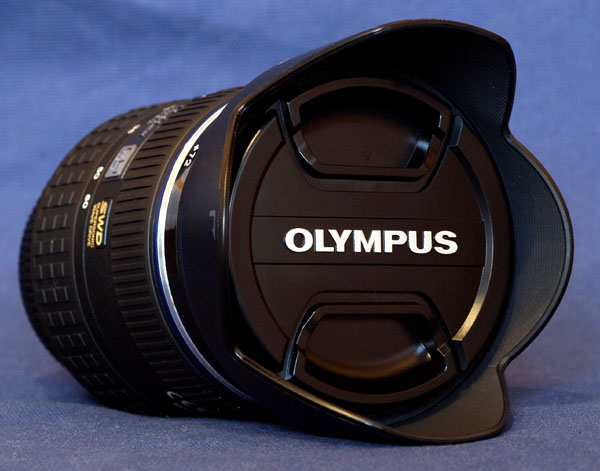
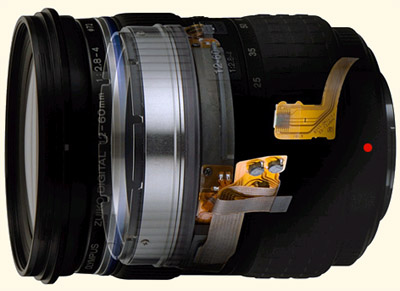
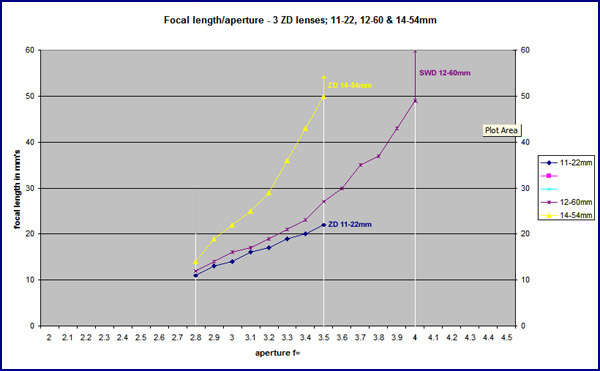
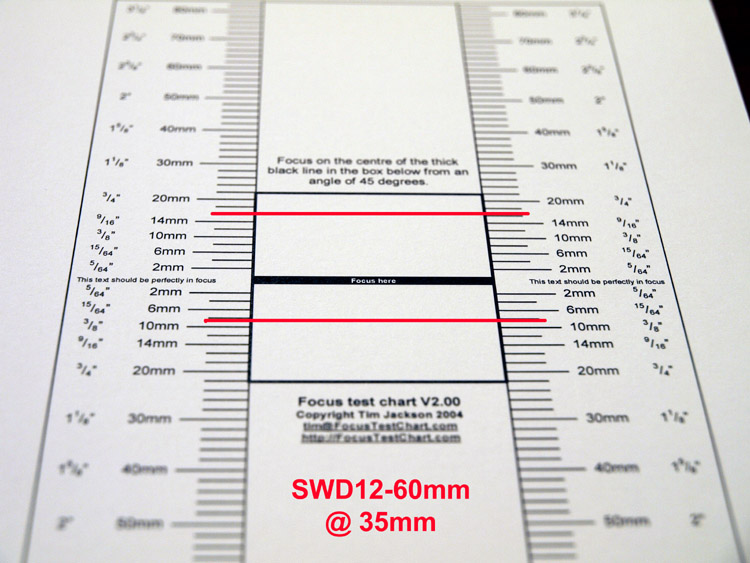
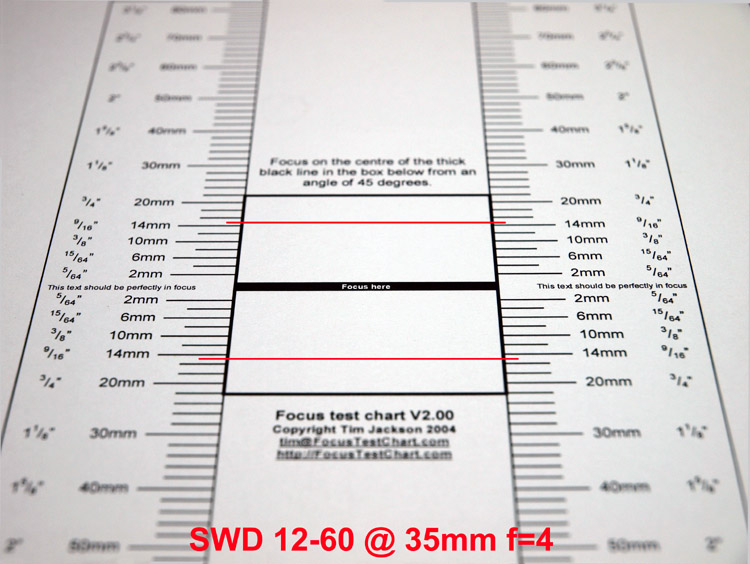
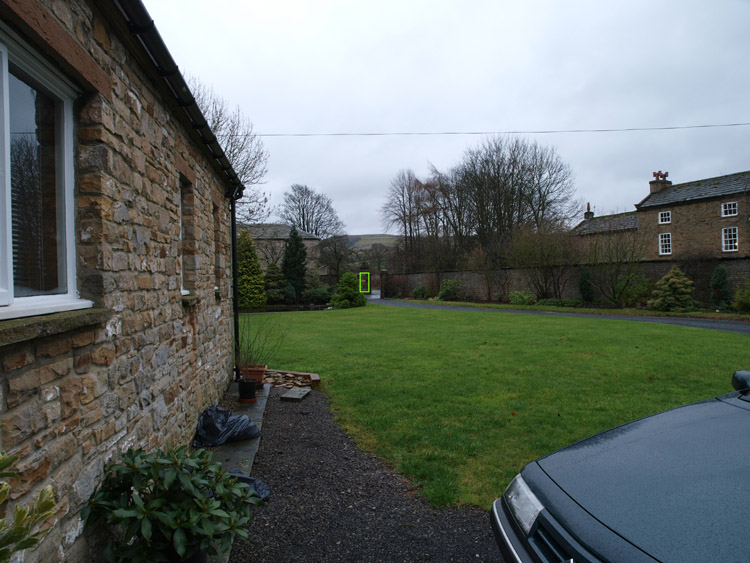
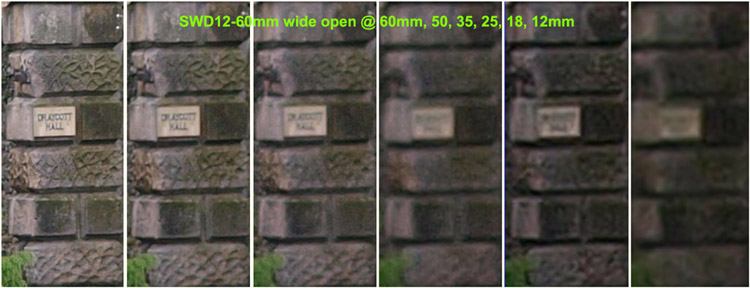
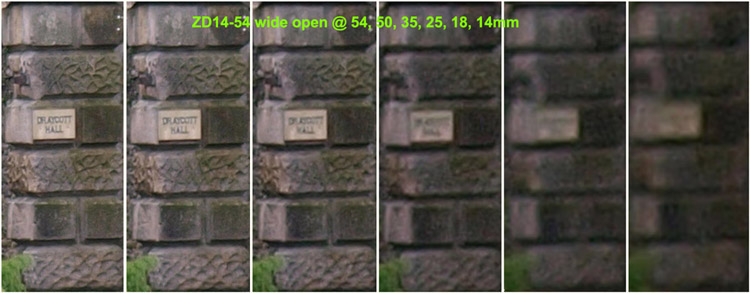
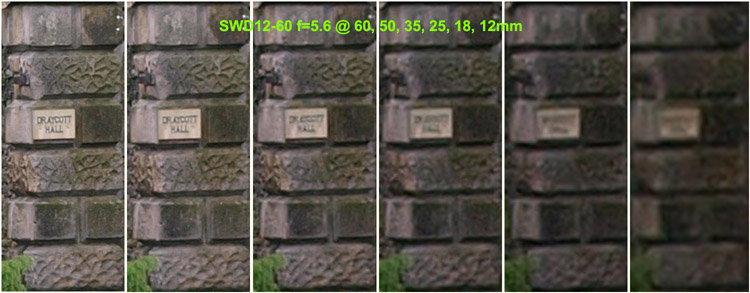

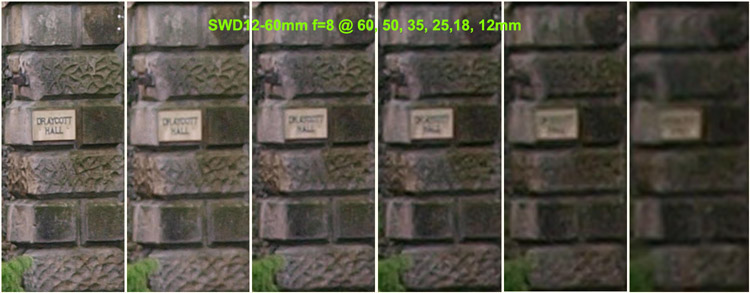
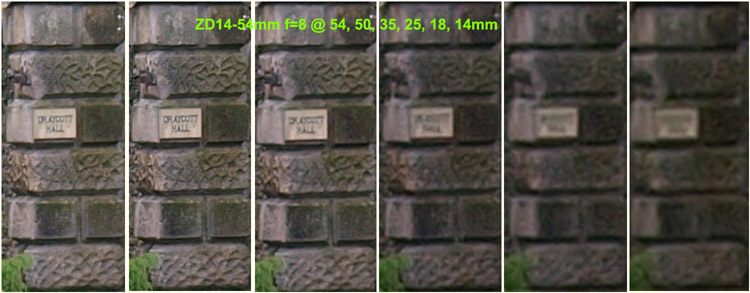
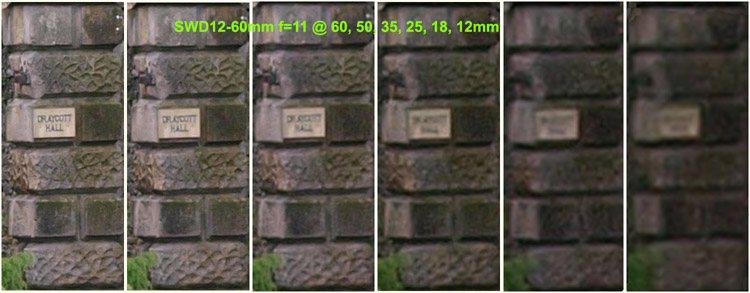
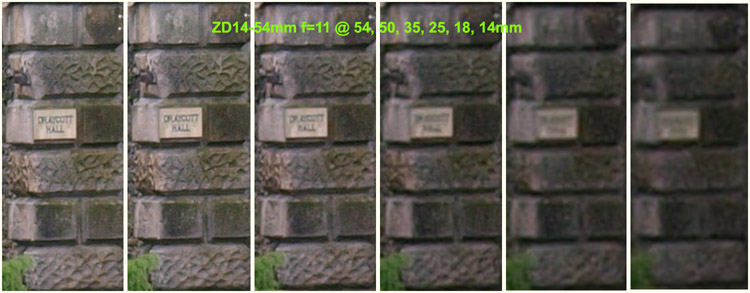
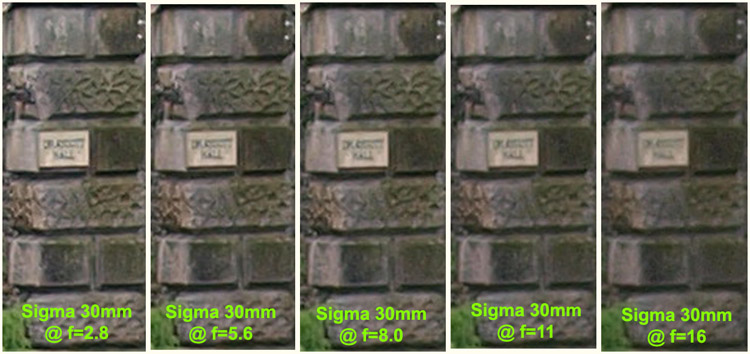
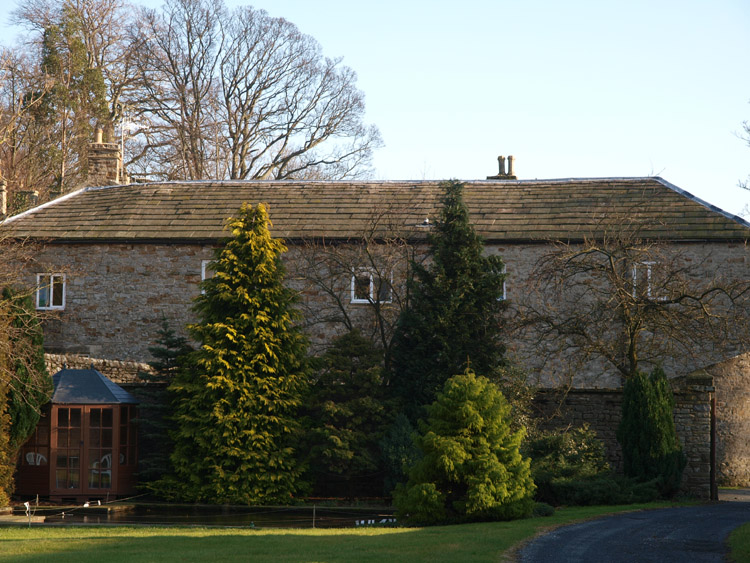
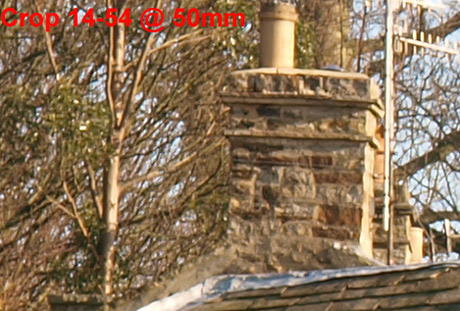
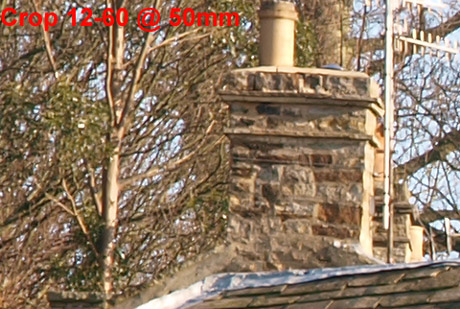
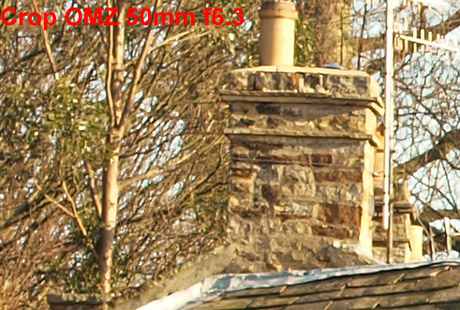
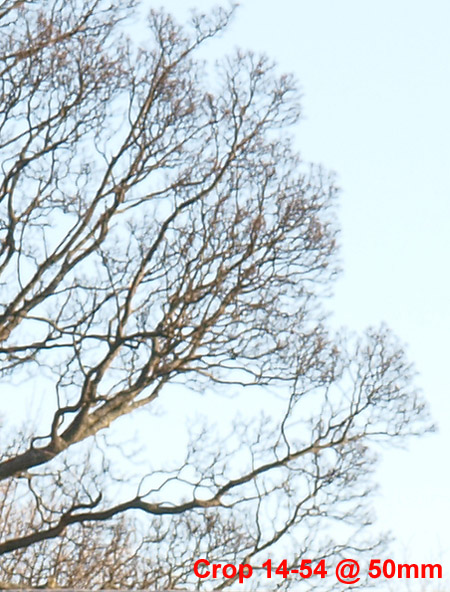
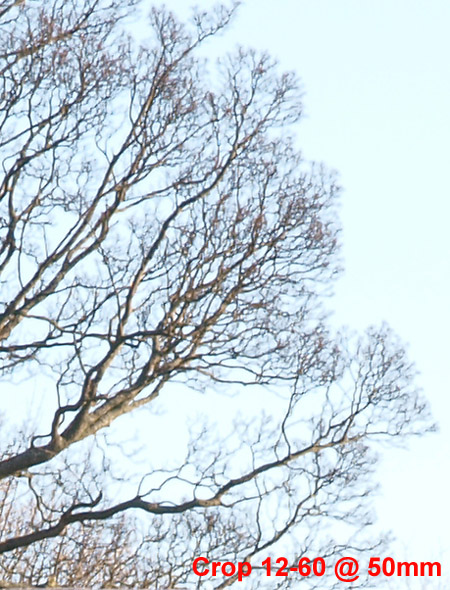
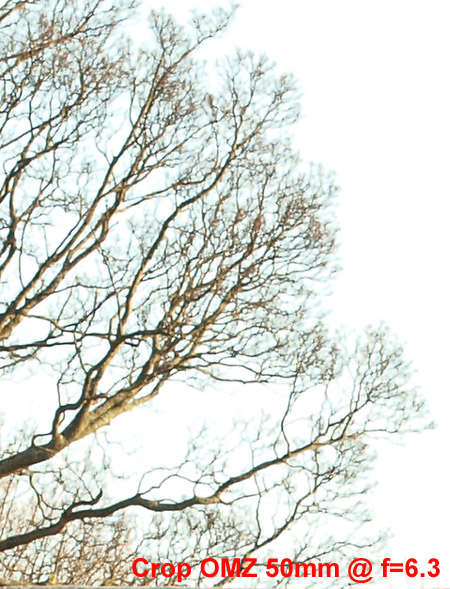
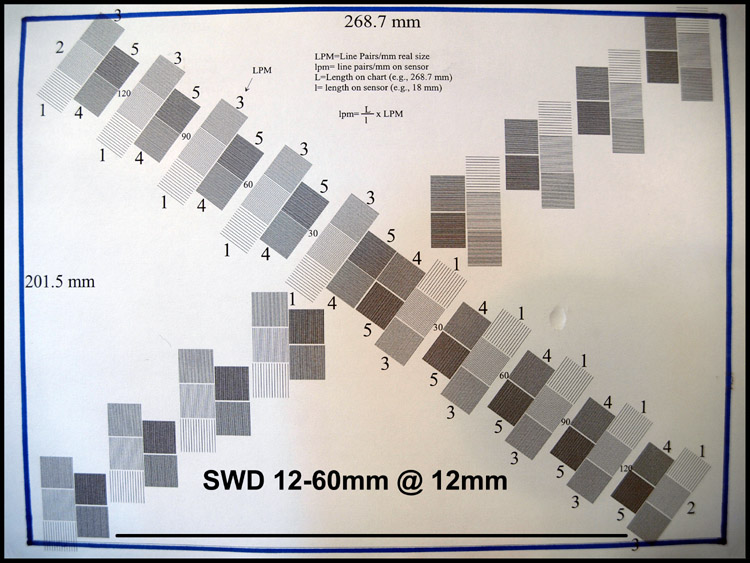
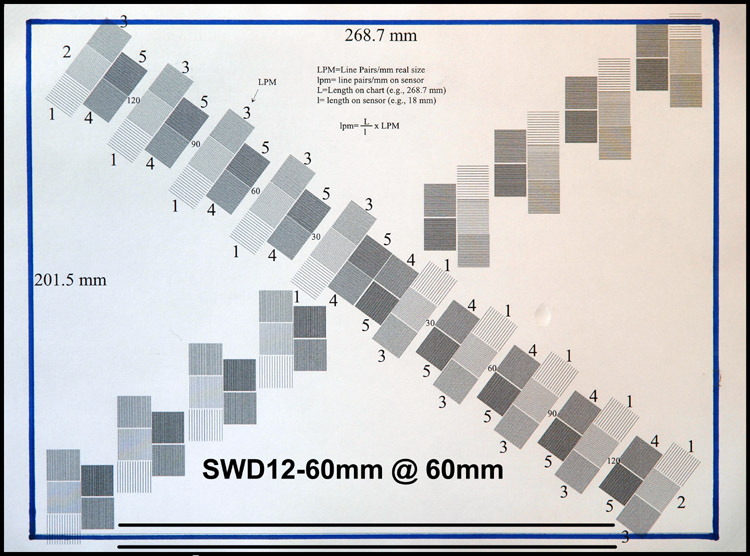
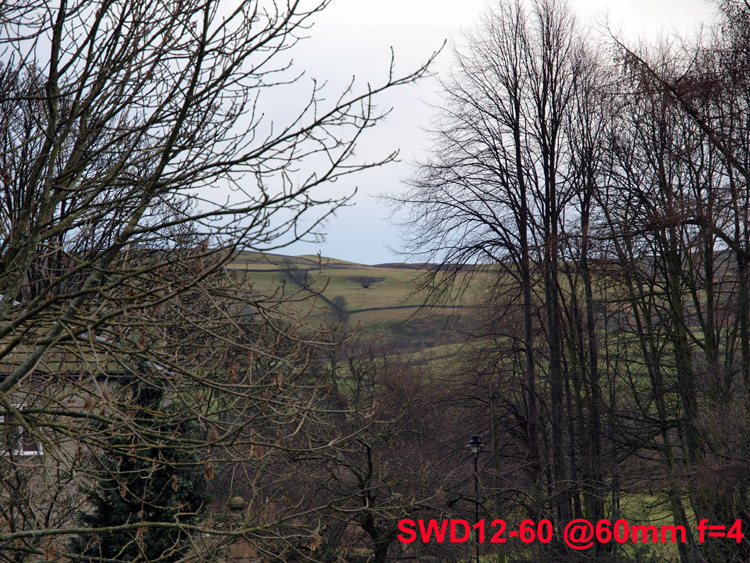
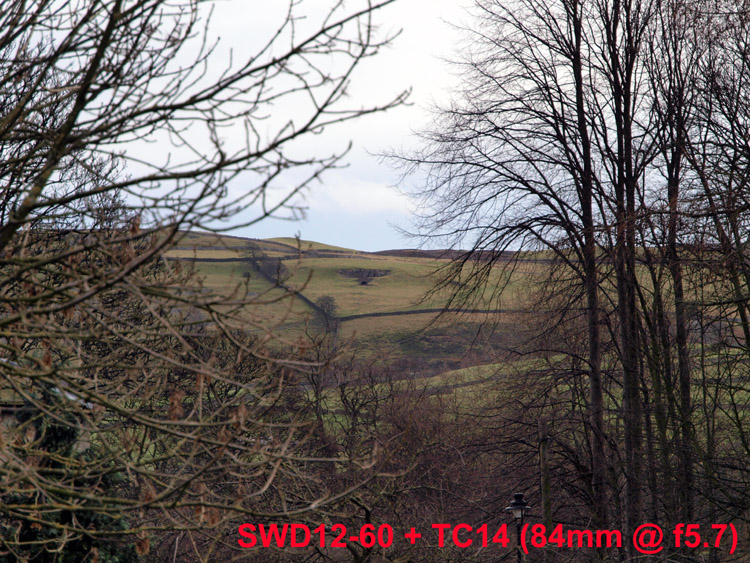
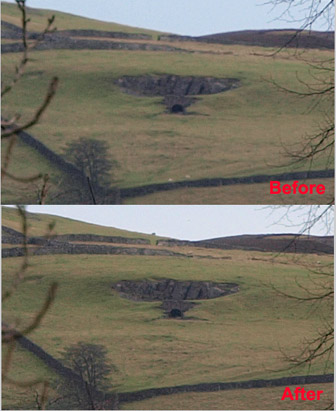
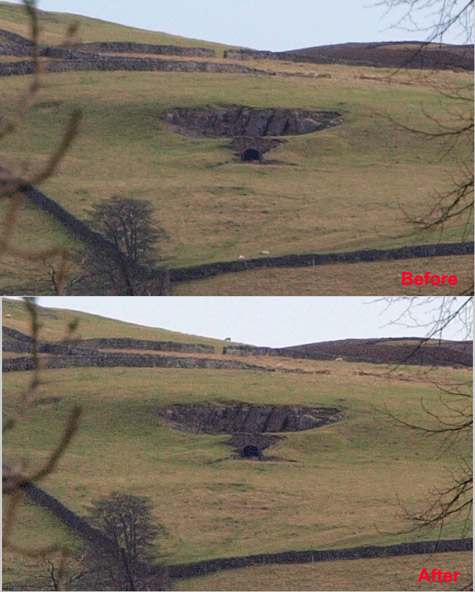
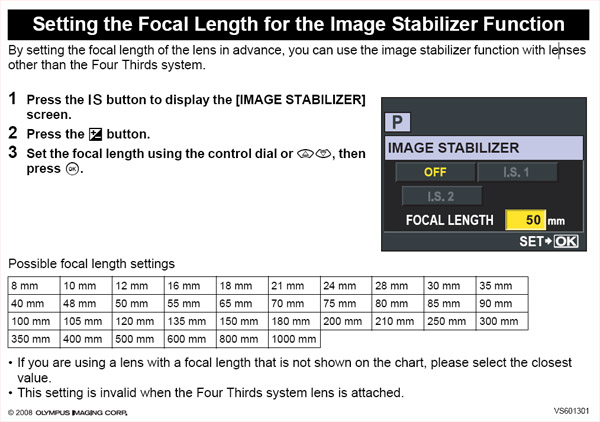
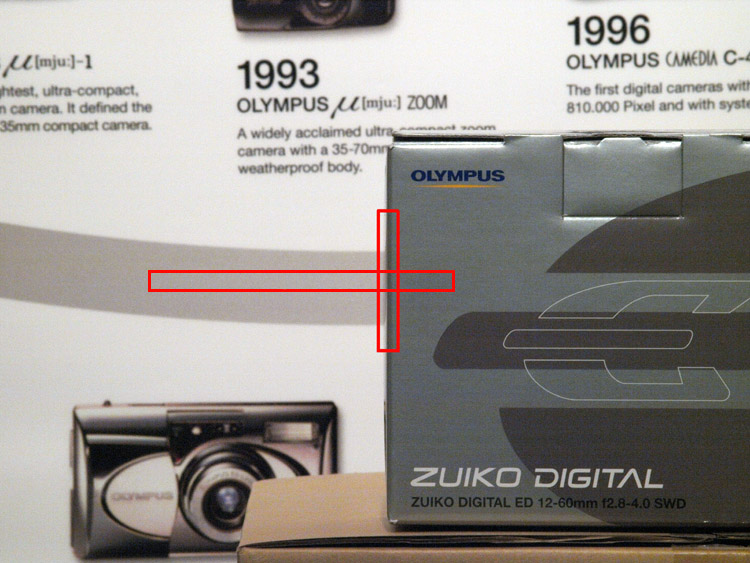
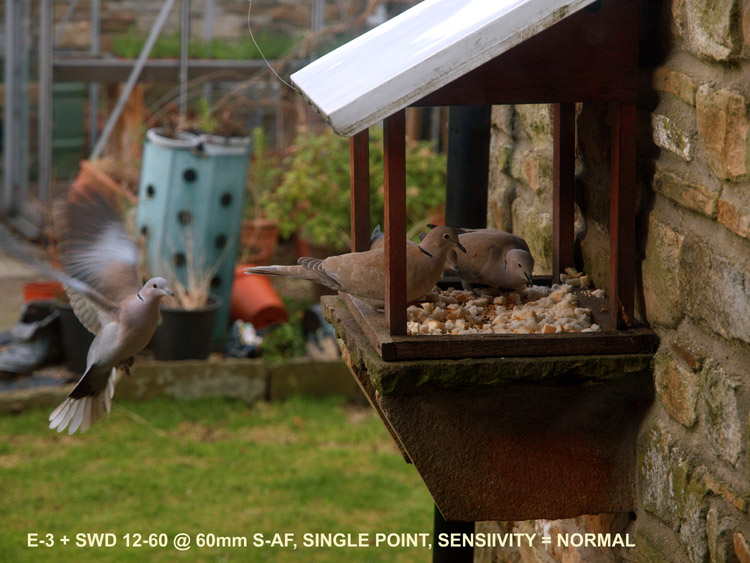
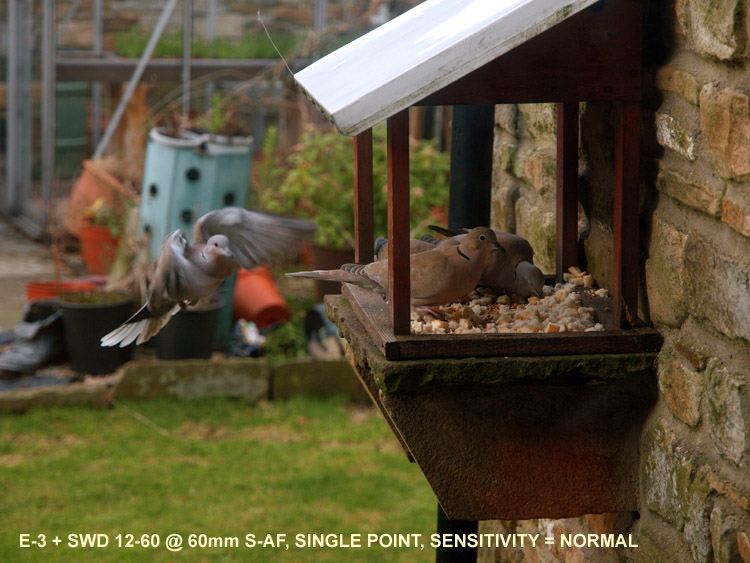
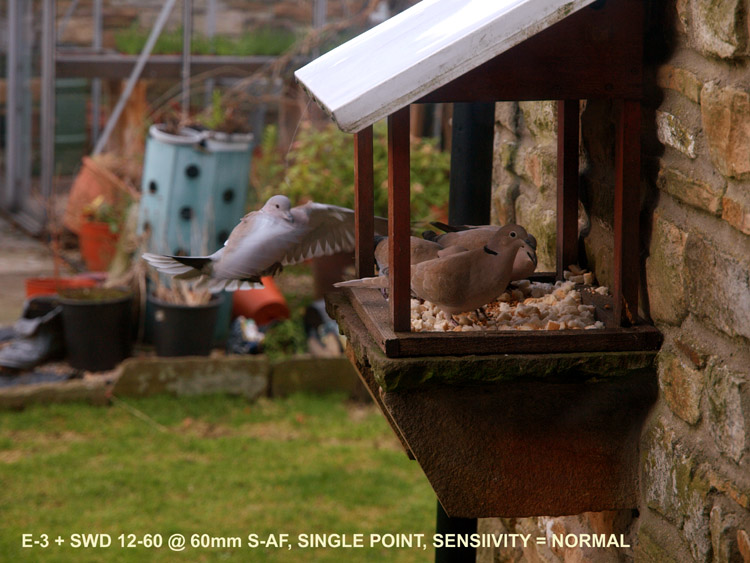
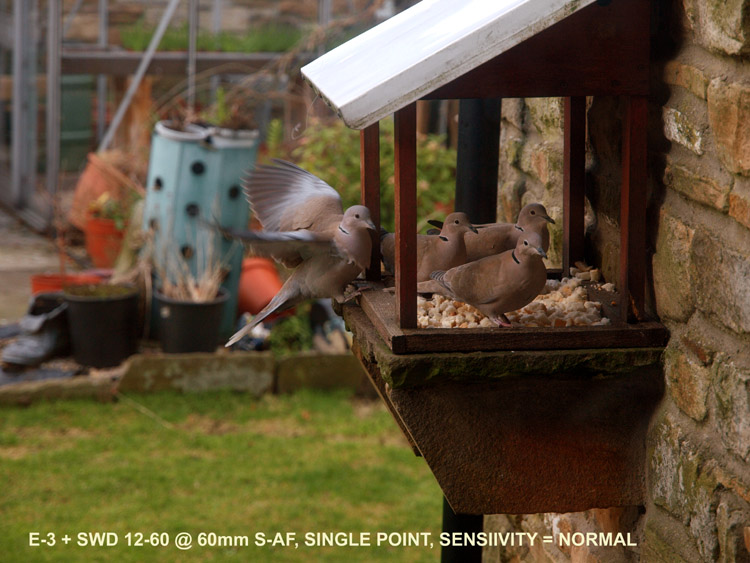
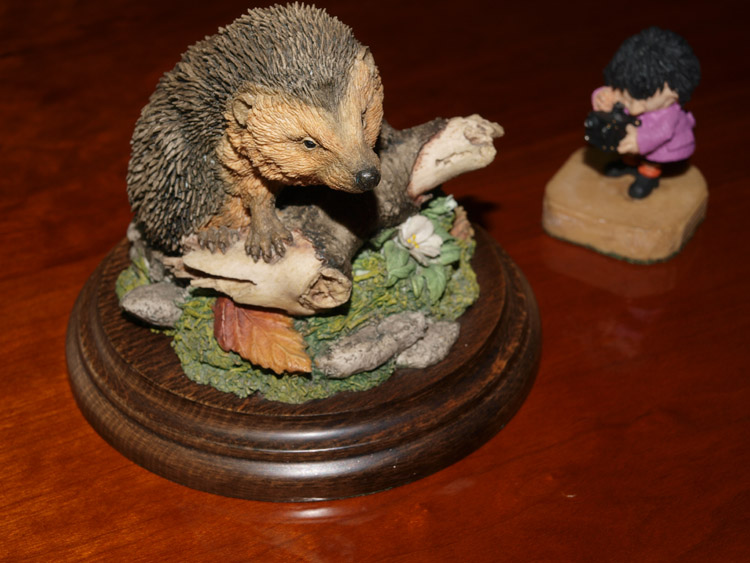
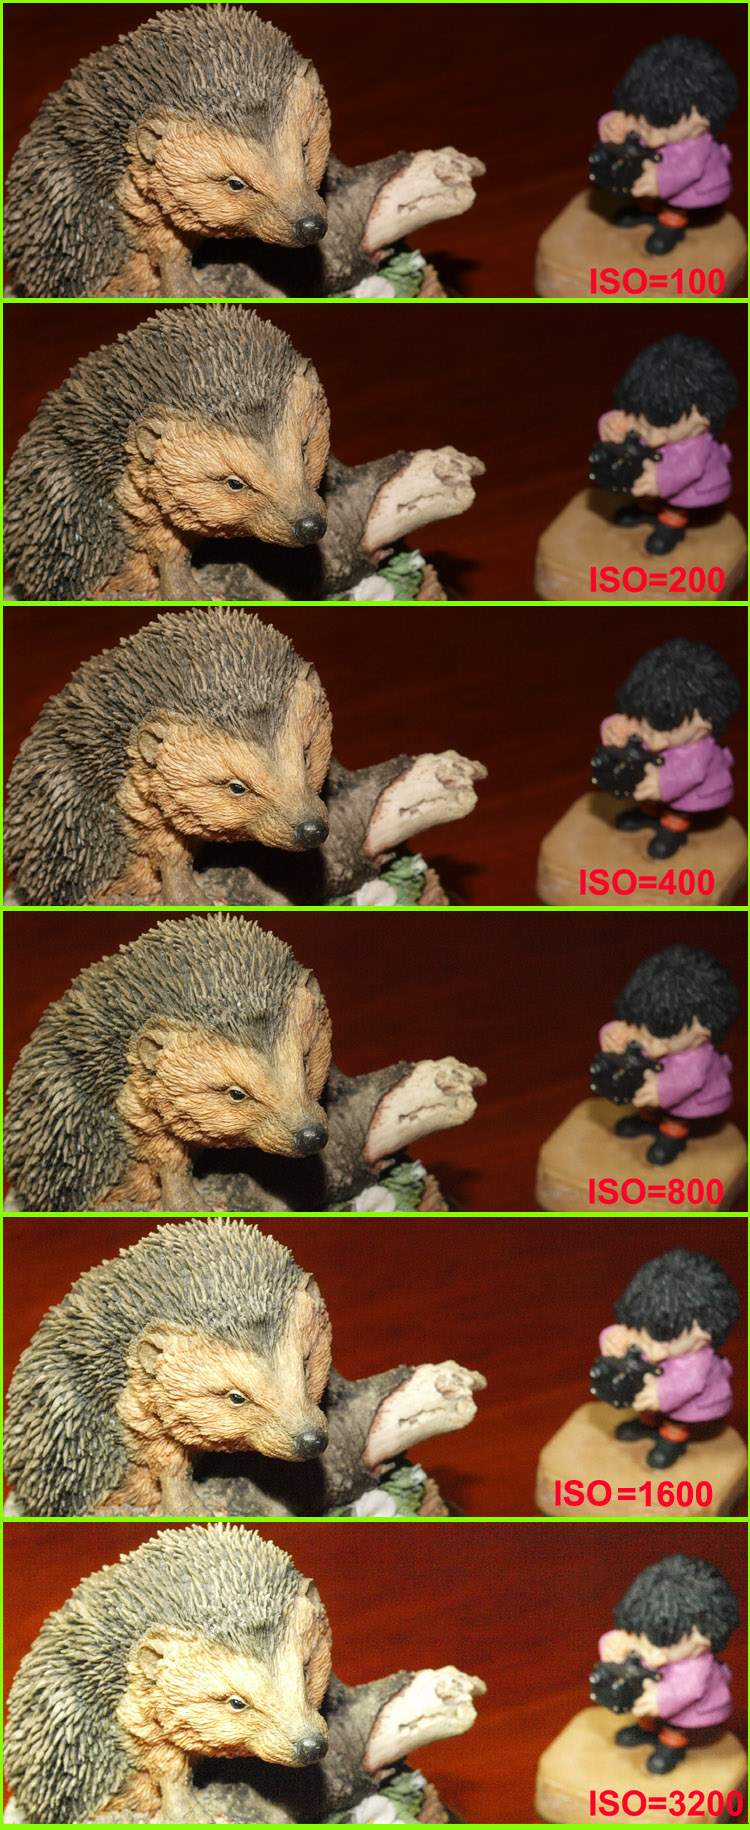

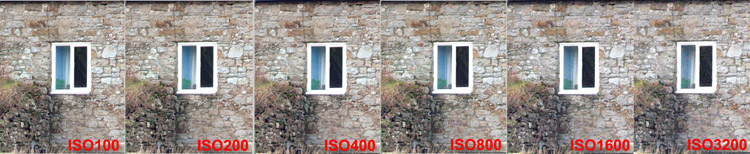
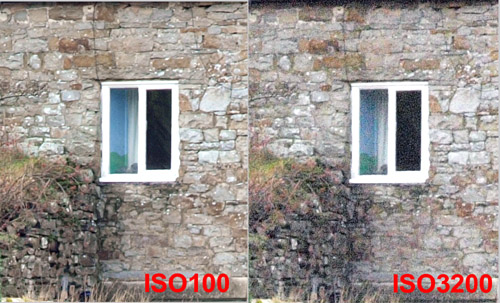

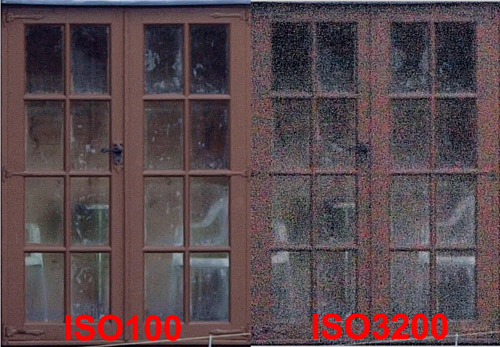
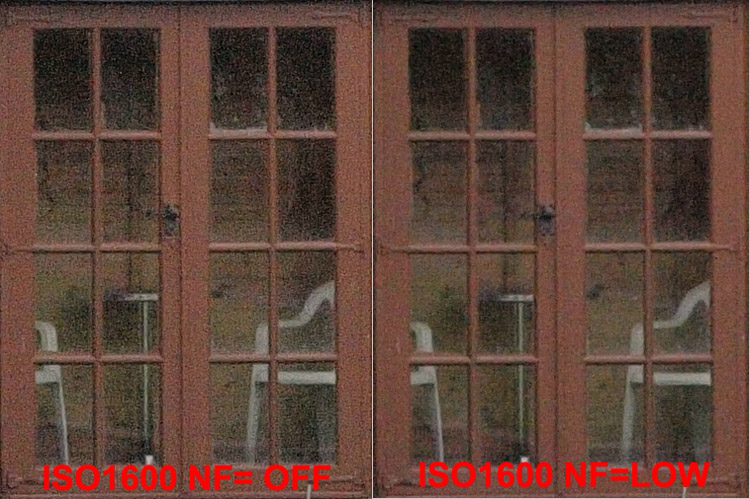
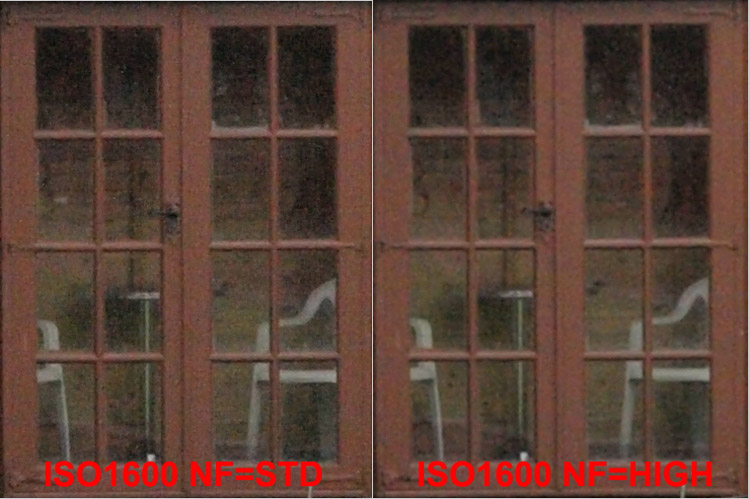
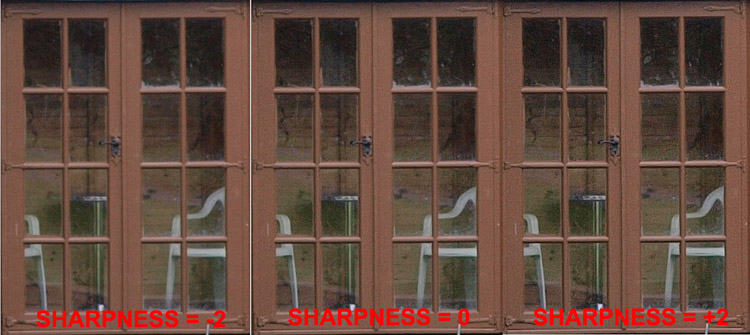
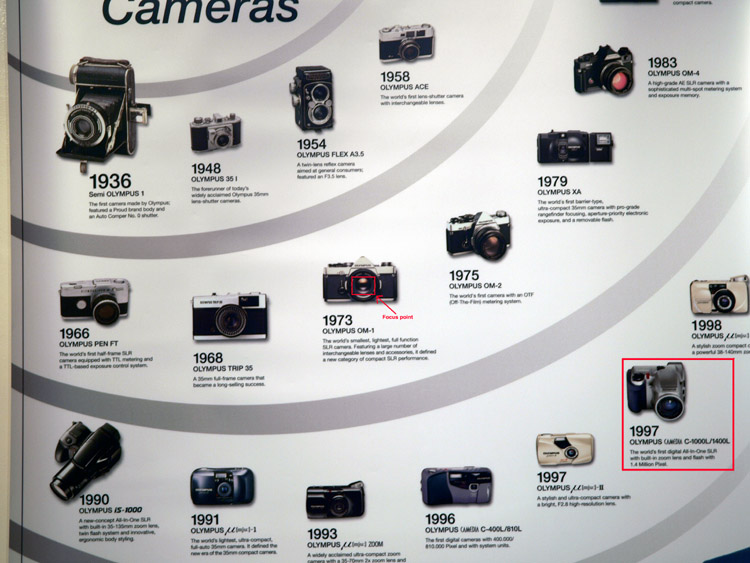
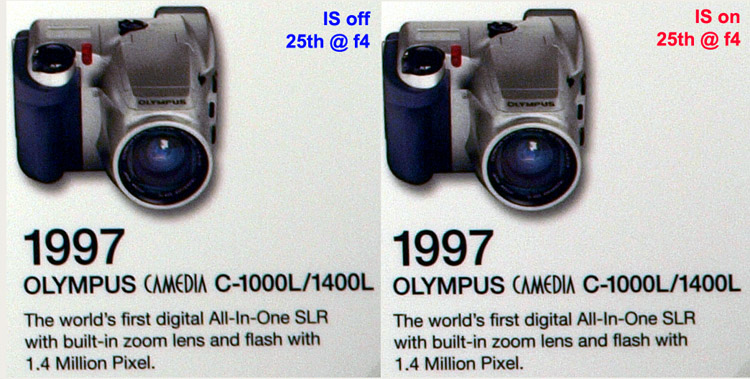

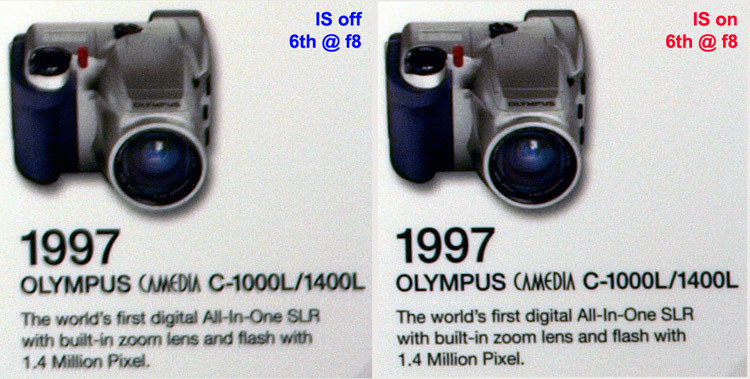
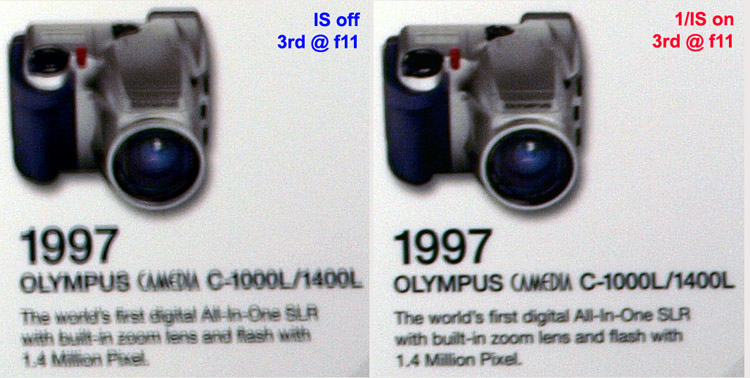


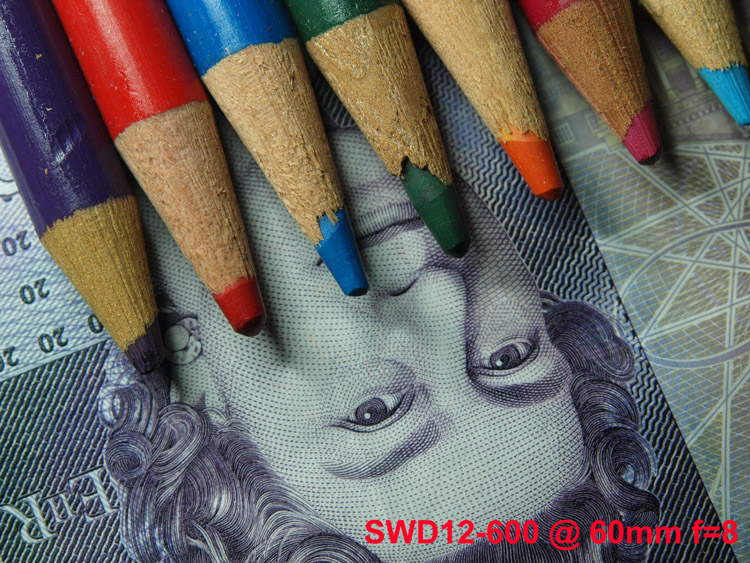
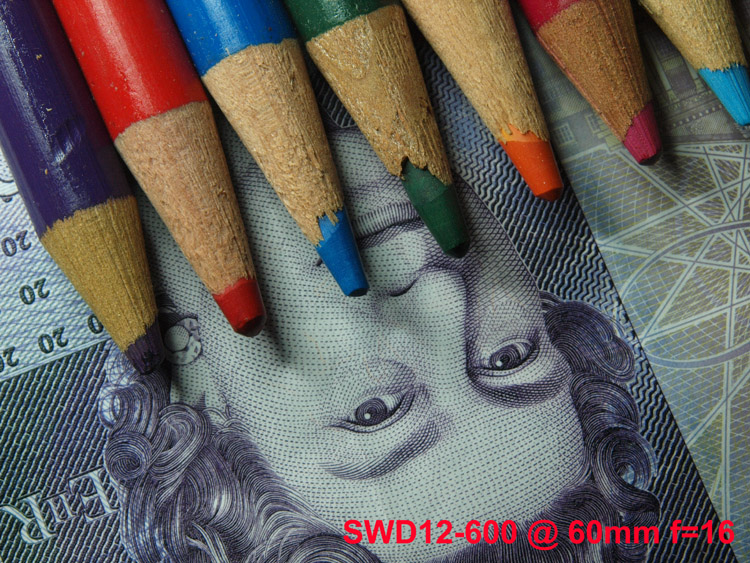
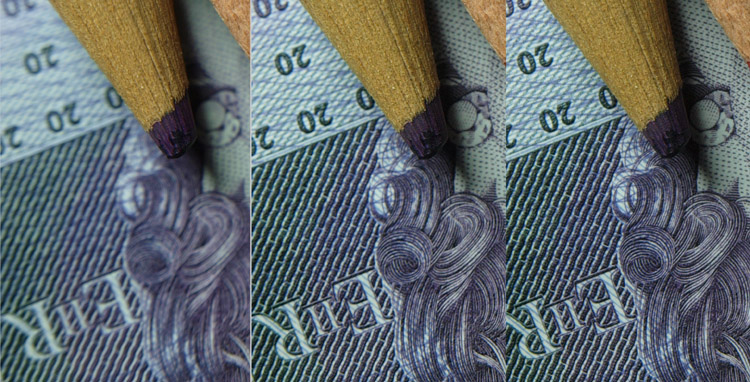
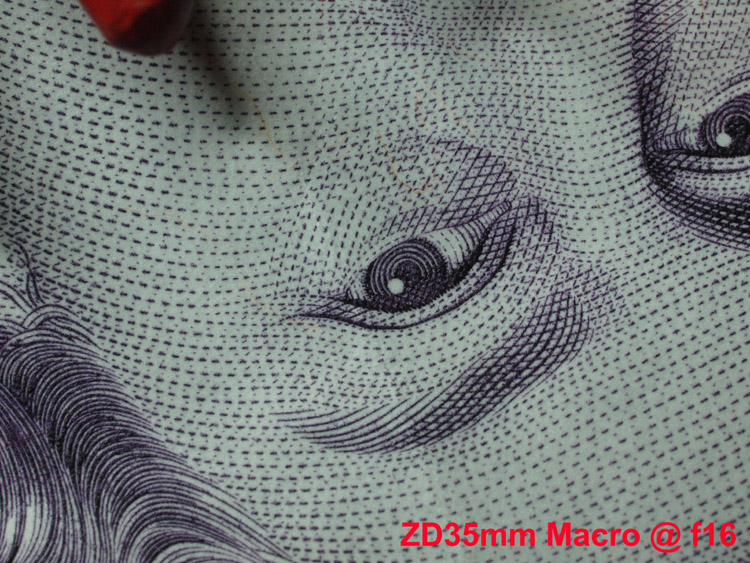

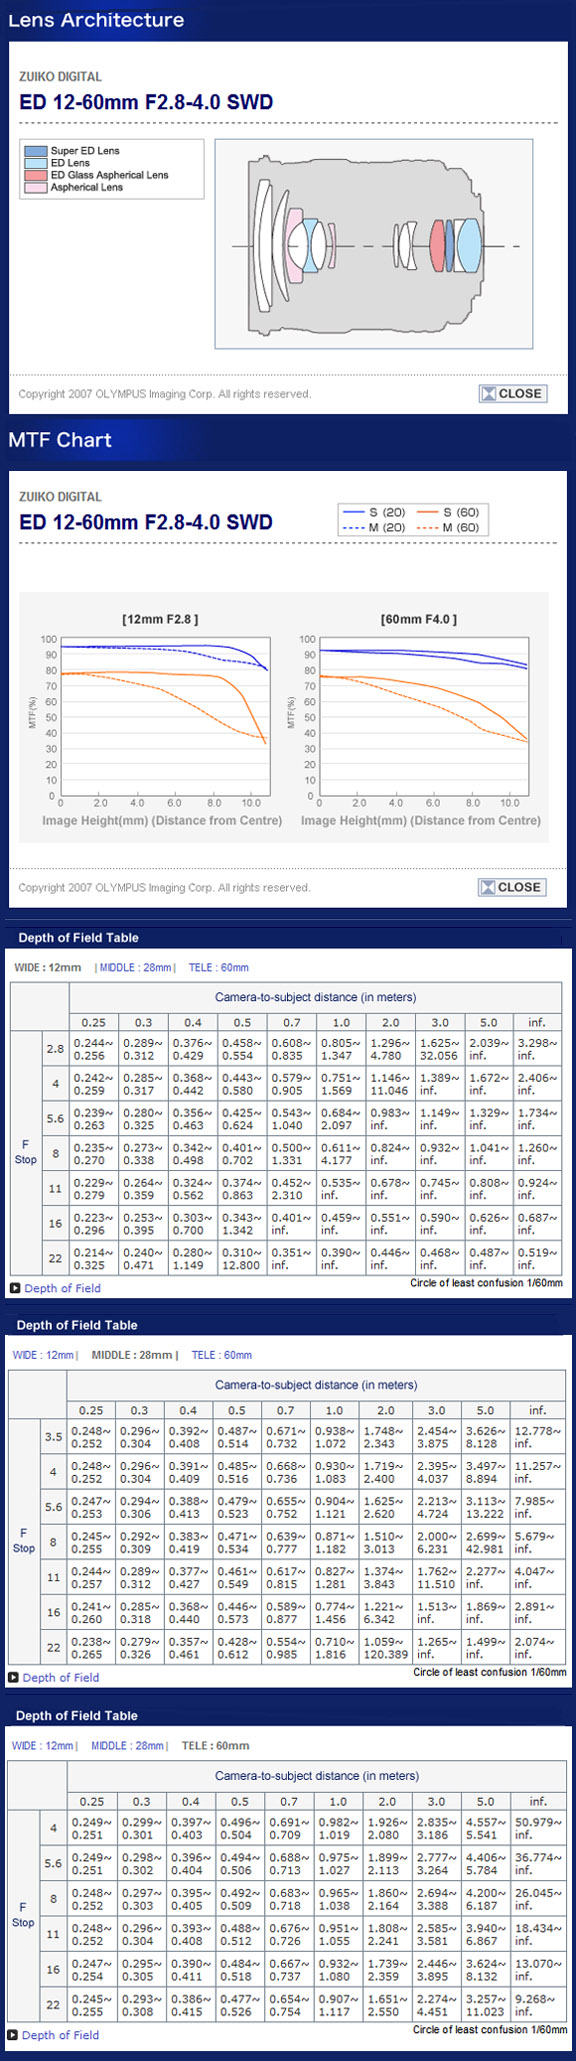