OLYMPUS MICROFOURTHIRDS
E-P2 PEN REVIEW
|
OLYMPUS MICROFOURTHIRDS
E-P2 PEN REVIEW |
|
Please Note: Any RAW files I provide can be manipulated with Olympus Master 2.2 or Studio version 2.3. If your current Olympus software is outdated the upgrade(s) can be obtained from within the software itself through HELP/UPGRADE SOFTWARE tab while connected to the Internet.
Having tried several RAW developer softwares I prefer Olympus Studio even though it can be slow and lacks some sophistication. I use Studio for all my RAW manipulating needs; I believe it gives the best results for colour rendition and general tweaking. However, as regards sharpening and noise reduction, there are better softwares out there.
Updates 12/02/10. Please refresh your browser.
E-P2 CAMERA MANUAL You can download a pdf version of the official E-P2 manual (14.2MB) here .
BACKGROUND I had some experience with the E-P1 in June 2009 at the Berlin release; read about it here , if you wish. Whilst I had no real beef with the E-P1 I just couldn't get used to not having a viewfinder of any description and find composing off the back screen alien. I know I'm not alone. Many folks have expressed their disappointment and, to be fair to Olympus, they did state the E-P1 was the first incarnation of a new breed of camera and they were working on a solution. Not too long ago Olympus announced the E-P2 with an additional communications port designed to allow the use of an Electronic Viewfinder (EVF) called the VF-2 and other accessories. The EVF was developed by Epson and is a high specification device boasting an optical specification of 1440k resolution providing 1.15 x magnification; 100% coverage with bright and high contrast to more effectively see the view. The E-P2 has been slow to arrive in the UK and I received mine a little while ago. This review is based on a production E-P2 just the same as you might buy from a retailer. NOTE 1: There are several aspects of the camera I'd like to further explore and report on later. I will be adding to this review over the next few weeks. NOTE 2: I do not pretend to be versed in video/movies; nor do I have any more than a passing knowledge about making and processing video. For now I am reviewing the E-P2 as a stills camera. Video is something I will have to come to terms with! There are many reviews on the Internet that discuss the pro's and con's of video making with the E-P2.
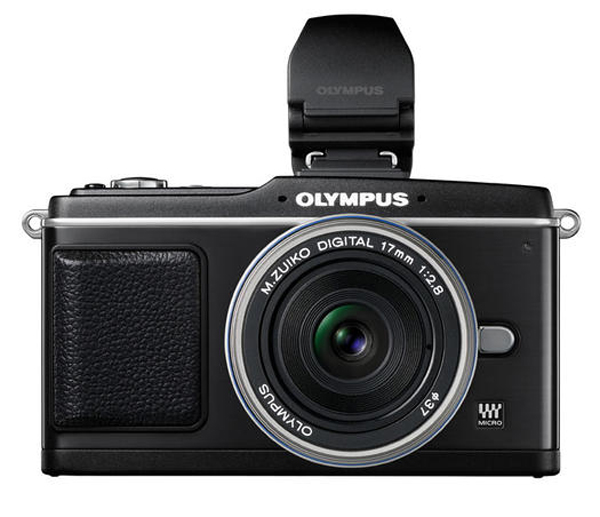
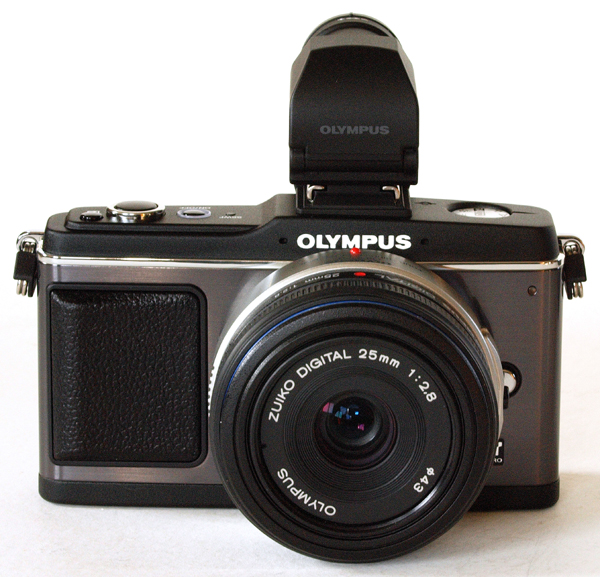
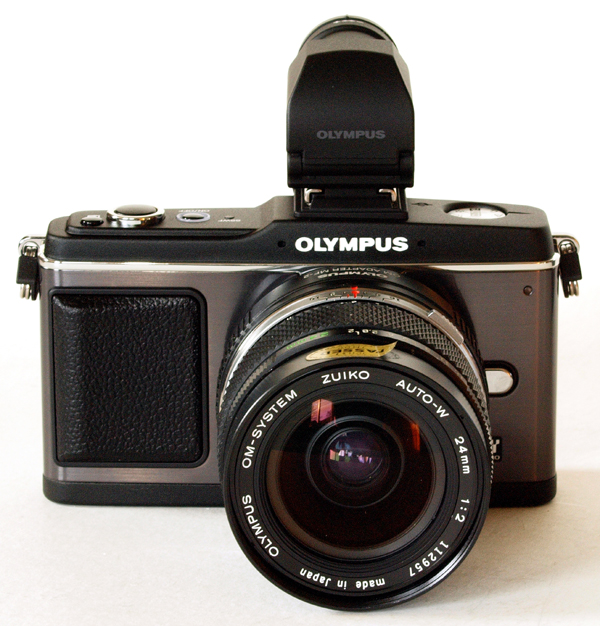
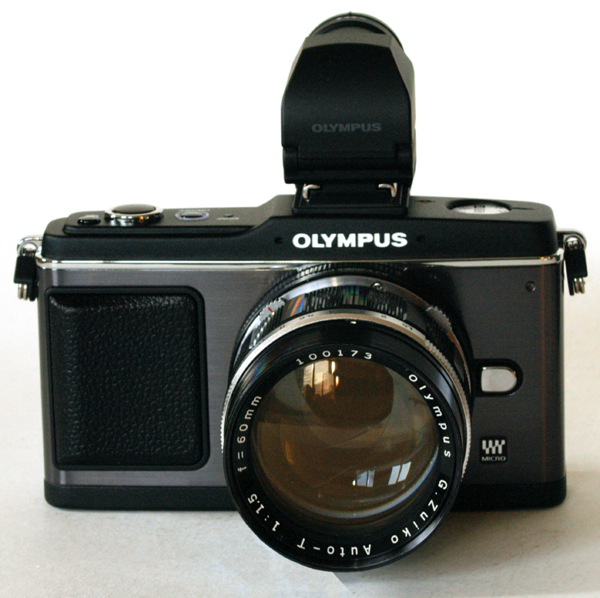
E-P2 FULL FRONTAL
E-P2 FEATURES IN BRIEF (Those in RED Italic are new to E-P2): A stylish black metal body with a retro (Pen FT black) look. A small 12.3MP interchangeable lens camera with in-body Image Stabilization, advanced high-speed imager AF and Live View. With the high-quality still images of a DSLR with High Definition (HD) video, stereo Linear PCM audio recording and in-camera creativity (Art Filters). The E-P2 has an accessory port which accommodates the included VF-2 EVF or optional external microphone adapter (SEMA-1). The VF-2 EVF slides into the camera's accessory port and hot shoe to provide 1.15x magnification for a 100% field of view. It also rotates up 90 degrees. There is a dioptre and the brightness & contrast is adjustable in-camera. New C-AF (Continuous Autofocus) algorithms and Tracking and AF Target Registration locks the subject into focus, and constant adjustment of both focus and brightness. The E-P2 has iEnhance that automatically selects the correct exposure settings for subjects such as close-ups, sports and action, landscapes, portraits and night scenes, while shooting in iAuto. The E-P2 has an optional HDMI cable to connect with an HDTV. A manual movie mode of 30fps and 720p allows for independent control of aperture and shutter for expanded creative control. Eight in-camera art filters including the new Diorama and Cross Process filters. Two optional methods of manual focus; Magnified Focus (MF) and Assist Function and Magnification Display. Its 12.3 MP Live MOS image sensor is complemented by a next generation TruePic V Image Processor; improved dynamic range, more accurate color fidelity, fine image details in all highlight and shadow areas, up to 6400 ISO, and reduced noise. The Live View AF system displays the subject in complete focus on the new bright LCD on shutter half-press. Image Stabilization to 4EV with any lens. 3 IS settings; Mode 1 for general shooting, Mode 2 for creative high-speed horizontal capture, and Mode 3 for high-speed vertical capture. In the Movie Modes electronic IS tracks the images both vertically and horizontally. SSWF - the best Dust Reduction/Removal System. Multiple Exposure: multiple images can be captured and combined. Multiple Format: 4:3; 6:6; 3:2; 16:9 can be selected. Scene Modes and Face Detection: 19 scene modes, ePortrait Mode softens shadows and smooths out facial features, the Face Detection function captures up to eight faces. Shadow Adjustment Technology corrects for extreme light variations. Audio recording capabilities; in stills or video. With its built-in or optional accessory microphones. Enhanced user interface: several ways to access the cameras basic shooting parameters. Adapters allow use of E-System 4/3rds lenses or those from OM system. Non-OEM adapters allow use of virtually any 135 format lens from the last 60 years.
SOME THOUGHTS ON OLYMPUS' m4/3rds COMPROMISES TO DATE The E-P2 is the second incarnation of Olympus' mirrorless Electronic Viewfinder, Interchangable Lens 'EVIL' camera. It is exploiting the ambitions of many digital camera users, both compact and DSLR. Compact users have long wished for DSLR results without the weight/size penalty of the larger machines. DSLR users wish for smaller more compact machines with no IQ penalty for downsizing. And both sets of users have expressed the desire for HQ movie capture. Both sets of new users will have to make adjustments - compact users will have to get used to a DSLR like interface with all its complexities; DSLR users lose some speed and their beloved optical viewfinder. Both sets face no on-board flash with the Olympus E-P1/2. The new Pen range of machines are not DSLR replacements, nor a simple compact upgrade. They are a new breed of camera to which both sets of users will have to aspire. But this technology is new, as are the design challenges. It won't be long before the list of compromises is pared down considerably. Let's look at the compromises:
1. Optional/Removable EVF: Olympus acknowledge this ommission by providing the VF-2 as part of the new kit. I suspect the majority of E-P2 buyers will use it extensively, if not continually. If you are happy with the LCD for composition, buy the E-P1. 2. No On-board Flash: I suspect compact users will miss this more. Some DSLR's such as the E-1 have no on-board flash anyway. Many folk abhor using flash. Raised ISO performance: To compensate for no flash the E-P1/2 offer ISO 6400. While on the face of it this seems reasonable many will argue low-light portraits look better with some assistance from flash than a noisy ISO 6400. 2a. No flash with VF-2 fitted; Those who rely on the VF-2 will dislike having to remove it to use any flash. 2b. External Olympus flash(es) not fully compatible: The E-P1/2 do not offer AF assist illumination when using flashes with AF assist lamp. Many criticise E-System cameras for having strobing on board flash as their focus assist. In low light conditions which is worse - no AF lock or strobing flash? I know what I'll take. 2c. The new FL14 flash is design before function: The flash is very near the lens making anti red-eye strobing more necessary and less effective. Other more conventional (taller) Olympus flash guns will give better results. In my opinion the FL20 is a better choice. 3. Absent Remote shutter control: Both sets of users will miss this feature. A space saving compromise. You can use the self timer feature or buy an aftermarket USB plug-in solution. 4. Restricted lens choice: MFT lenses are currently 8, two from Olympus (more promised 2010) & six from Panasonic. The Olympus offerings are more in keeping with the ethos of the E-P1 being very compact. Some Panasonic offerings duplicate the IS function so are slightly larger and more expensive. 4a. Software (in-camera) compensation for distortion and some chromatic aberration: some purists may find this unacceptable and others will welcome the feature. Largely a matter of opinion/perception. 4b. 4/3rds Adapter: Olympus 4/3rds lenses work (to a greater or lesser degree) via the adapter on the E-P1/2. Contrast detect enabled ZD lenses work as well as the M Zuiko MFT lenses; all other 4/3rds lenses work around 2X slower to achieve CDAF. 4c. Using 'normal' 4/3rds lenses: To some folk, using the larger 4/3rds lenses on the svelte E-P1/2 seems counter to all the E-P1/2 represents. Olympus promise more M Zuiko lens choice but by inference they will be small (and probably slow too). It's unlikely Olympus will offer sub-f2 or f2 for any forthcoming primes. 4d. Adopting E-P1/2 duplicates lenses: This is true only if you currently use the 4/3rds system cameras. 5. Slow AF function: At the moment the E-P1/2 AF is about as fast as most good compacts but slower than the Panasonic G1 etc. This will improve over time with new models. Acceptance depends on your perceived usage and willingness to compromise. Current compact users will notice little difference but DSLR users used to phase-detect systems will. Contrast detect AF speed will be slower than phase detect for some time yet.
FIRMWARE UPDATES FOR E-P2; SOFTWARE UPDATES FOR MASTER/STUDIO As of 1st February there are no firmware updates for the E-P2 body or the kit lens MZD14-42mm. This suggests the latest firmware update for the E-P1 (version 1.2 - CDAF function) is as a result of E-P2 development. The E-P1 I have is still version 1.1 and when I compare the CDAF speed between the cameras I cannot see any significant difference though the E-P2 may be slightly faster. I have no means of quantifying this so my observation is entirely subjective. Olympus Master 2.3 is available for download from Olympus Japan or via the software and the upgrade includes the two new Art Filters Diorama and Cross Process. Studio has not yet been updated and is currently version 2.2 with only 6 Art Filters.
THE E-P2 KITS & LENSES The basic kit is either a body with VF-2 or body with VF-2 + standard kit 14-42mm zoom or 17mm x f3.5. In UK the E-P2 is only available in black though I understand Olympus offers a choice of colour (silver) in Japan. Box Contents: (dependent) E-P2, Lens choice plus front and back caps, VF-2, BLS-1 (Lithium-Ion Battery), BCS-1 (Battery Charger for BLS-1), Micro Four Thirds body cap (BC-2), Shoulder Strap, CB-USB6 (USB Cable), CB-VC2 (Video Cable), OLYMPUS Master 2 (Software CD-ROM), Operating Instructions, Warranty Card. Other Olympus produced accessories are immediately available; the new FL14 flash, an optical finder to match the 17mm pancake (if required), body cases (bottom only) plus straps and two lens adapters referred above - one for 4/3rds lenses and one for OM lenses. There are two more MZD zooms coming later in 2010; the 9-18mm wide angle zoom and the 14-150mm superzoom. Remember too that the current selection of Panasonic (PanLeica) lenses work pefectly on the Olympus bodies (but not the other way around).
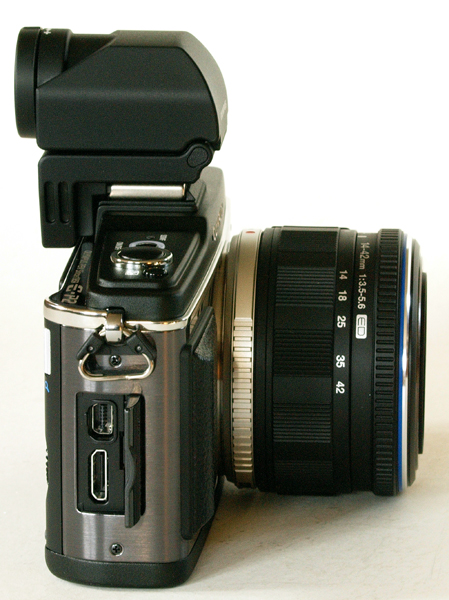
STANDARD ZOOM MZD14-42 & 17mm LENSES The standard zoom MZ 14-42mm has a clever way of becoming even smaller. The zoom barrel collapses into the main lens body by twisting the zoom ring while pressing the lock button - neat! This reduces the lens by about half its normal length. If the lens is in its closed position when you switch on the camera there's a warning on the screen/EVF. As soon as you unlock the lens the Live View is instantly displayed on LCD or in VF-2 (depends on your setting). This is another way of preserving battery power. The MZ 17mm pancake is only about 21mm deep making the combination of E-P2 and Panacke and VF-2, 'just' pocketable but only in a large coat or cargo pants pocket. The EVF does protrude about 1.5" above the camera top plate making pocket carrying difficult. I'm not sure I'd like to be constantly fitting and removing the VF-2 for fear of it becoming lose in the port. Perhaps the best way to carry the E-P2 is in a small camera bag.
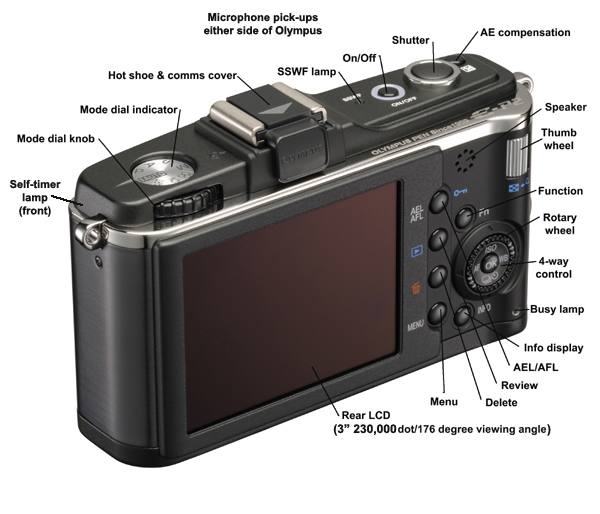
E-P2 BODY LEGEND
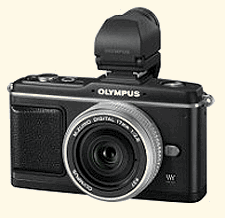
FIRST IMPRESSION The E-P2 is aesthetically beautiful. Its black finish is, surprisingly, two fold. The top and bottom plate as well as the back plate are finished in a deep semi-matt black painted finish that is slightly 'orange-peel' in finish. The front plate that holds the finger grip and wraps itself around the left side of the camera is a dark grey smooth and very shiny anoidised aluminium material that does not match the rest of the finish. In consequence the camera appears to be 'two-tone'. The anodised aluminium body sheet will scratch/ding easily. I think the leatherette body covers available from Aki-Asahi, in Japan, here would be an excellent choice for more protection. At the advertised price of $16 + postage they are a bargain. VF-2; the box contains a small material bag that hold the VF-2. This bag can be attached to the end of the strap near the camera. The VF-2 is almost the same finish as the painted areas of the camera. It is smaller than I'd imagined from the various photo's I've seen. It has a blanking piece which protects the communications port plug by sliding thereon. The dioptre is built into the exit pupil. The top pivots forward to 90 degrees and locks in the closed position with a tiny catch. The E-P2's hotshoe cover is redesigned to include a cover for the communications port at the rear. The VF-2 simply slides into the hotshoe and comms port. Once fitted it appears quite secure and the combined camera/VF-2 reminds me very much of a Leica 3G with Vidom finder. It looks like a 1950's precision 35mm camera.
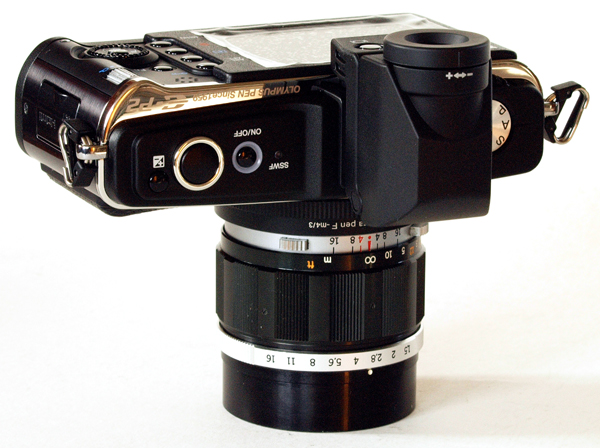
BODY CONTROLS, KNOBS & DIALS On the top plate the black shutter button lies within a raised chromed ring and the near by (AE) compensation button is also raised above the surface. The rest of the top plate is smooth with a gentle upward sculpting leading to the hot shoe. I note there is a raised lip around the shoe area that serves to protect the black painted top plate from scratches when mounting accessories in the shoe. At the opposite end of the top plate the chrome mode dial is deeply recessed and controlled by a knurled knob set through an indent in the top plate. The black ON/OFF button has an opaque surround that glows green when powered on. This is quite bright and is a little intrusive if the surroundings are poorly lit. When you switch the camera on there is a slight pause as the SSWF sequences and its lamp glows and the rear screen may show (depending if you locked the zoom lens) a warning about the lens lock (see later). Unlock the lens and all is well. If you have the VF-2 fitted you will see the switch on its rear aspect that flips the feed from the sensor (i.e. the TTL view) to VF-2 or LCD. You choose either LCD or EVF display; all Live View and Menu display choices will appear in the EVF just as they do on the rear screen, including reviewing images. In certain situations, such as reviewing my shots, I found this constant changing a little tiresome. It's a pity Olympus did not incorporate a 'smart-switch' in the VF-2 that recognises the human eye and switches the feed appropriately. On the rear and falling to the right thumb is the horizontally designed single control wheel (smooth and clicky) to which I took an instant liking providing a larger surface area than those of the E-Series. The general access buttons are familiar to any E-System user with no surprises. Image Stabilization (IS) has no direct button, being accessed through the menu. This made sense for the E-P1 as the user is relying on the LCD panel for composition and will benefit from IS. Because the E-P2 has an EVF (and hence some degree of head support for the camera during exposure) this interface choice is not so clear cut. Personally I'd like to see the choice of mapping (say) the Fn button to IS on the E-P2. Around the 4-way control dial is a second control 'ring wheel' providing fast scrolling through the options. Personally I found this particularly fiddly to use, much preferring the larger vertical wheel. However, compact users will love this. To the left side is the sunken mode dial control wheel protruding through the back plate very reminiscent of the Pen film camera advance wheel. Its position makes a lot of sense as you don't constantly alter the mode dial. The bottom plate has the usual battery and card compartment. EP-2 uses the BLMS-1 battery (ala E-4XX and E-6XX) and the SD (and SDHC) card. At last Olympus are using a sensible card to replace the almost defunct/slow xD. There is no room for CF dual slot. The battery compartment door hinge looks rather delicate and might be a weak spot when open. There is a further I/O compartment on the right. The tripod bush is not centralised to the lens - apparently there was no room inside - so it is moved toward the battery compartment. The front plate is graciously free of MP count and IS icons. The grip is square and grippy, quite large and wedge shaped covering most of the that side. There are two microphone pick-ups indents either side of the "OLYMPUS" engraving. In general the rear control buttons are well laid out but are small. Using the E-P2 wearing gloves will be virtually impossible. The bottom plate is black painted thin aluminium. The battery compartment holds the BLS-1 and the SD card. The battery slides in with contacts downwards and frontwards; it is held in place by a small sprung latch. The SD card is 'spring fit'. On the right edge of the camera is the comms compartment with combined AV & USB and HDMI plugs.
ACCESSING THE SUPER CONTROL PANEL, MENU & OTHER FUNCTIONS The E-System range of DSLR's provides two main points of access to control the camera, other than the direct or customized buttons. There's the main menu and the super control panel. The E-P1/2 adds a further dimension as Olympus have implemented a half-way house towards the super control panel ala CASIO etc. With a press of the OK button, a vertical box pops up showing various major functions then a horizontal box for settings; you use the 4-way control to cycle up & down the vertical box and the ring around the 4-way to cycle through the horizontal box. This is quick and intuitive and pleasant to use. However, I found this option kept disappearing in P, A, S, M. I had to turn the mode dial to Scene or Art to re-instate it. This was frustrating and it rather spoiled my first impression. But this is probably my fault and there will, no doubt, be a simple way to access it! Of course you can use the normal super control panel if you wish. As I'm used to 'traditional' 4/3rds DSLR's I found myself using the SCP mostly. But I can see compact users being already familiar with the LV control panel.
There are direct control buttons for ISO, AF, DRIVE & WB around the 4-way switch as well as a customizable Fn button and switchable functions for the AEL/AFL button. The EV compensation button is next to the shutter, there is a vertical bank of buttons next to the rear LCD of AEL/AFL; Review; Delete and Menu with the INFO button underneath the 4-way control. The new mode dial control wheel is easy to use and is positioned so as not to be changed accidentally. Obviously the dial turns with the wheel. Furthermore, when you change the mode dial (PASM etc) a box pops up to tell you what mode you are in - nifty. The E-P1/2 is quite a complex machine with many user configurable settings. I'm hoping to produce a users guide on how to set up the camera at some future point so please keep looking. This will take some time.
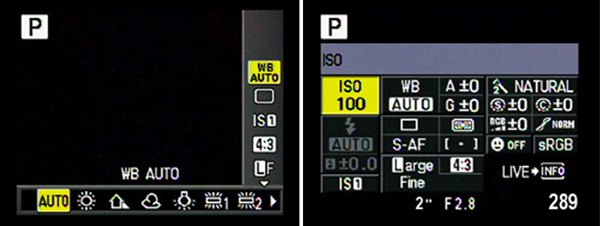
QUICK SETTINGS Before setting off I had a quick look through the menu and changed a few basic parameters - SAT set to NORMAL (off) and NR to LOW; Picture mode to Natural with 0 sharpness and contrast. I turned down the brightness and contrast of the EVF too. I record my shots in LF JPEG + RAW. I will fine tune my camera a little later.
VF-2 & REAR LCD IN USE Switching the VF-2 on, I try out the AF system (CDAF) and find it is pretty responsive but (unsurprisingly) not as quick as PDAF. Once AF is found the shutter is quick with none of the annoying mirror flip and inherent delay you get with E-System camera in LV mode. But, I suspect that the CDAF technology has some way to go yet. It just feels tardy and far from being 'instantaneous'. Once locked there is a tiny amount of shutter lag, but nothing to be concerned about. I believe the Panasonic G1 CDAF is much faster; they must be using different AF algorithms. The shutter is light and positive and creates some noise. It's not especially loud, I suppose I was expecting it to be almost silent - it's not. The VF-2 screen is delightful (and I'm no lover of EVF's). In most normal outside conditions it is clear and bright with virtually no pixelation and accurate colour reproduction. It is almost like looking through my E-3 (yes, it is that good). In very bright sunlight the screen tended to darken and I noticed stray light entering from around my eye because the VF-2 has a flat round rubber eye-piece. In these conditions I had to shield the eye-piece with my left hand which immediately remedied the problem. Indoors it remains very good though there is some fine refresh pixelation when you move the camera across the scene. As the ambient light falls the amount of EVF 'gain' increases as does your impression of an electronically generated scene; pixelation and noise increase but not to an unbearable degree at all - you are simply aware this is an EVF. In all but the dimmest of conditions I found I could pretty easily manually focus and only occasionally required the magnified screen. When ambient light levels drop further (when almost dark) the amount of 'gain' turns the EVF view into a mass of coloured vertical streaks that is quite unpleasant. At these light levels the camera cannot auto-focus anyway. All that said, generally I was very impressed. The LCD screen is large and bright enough with good contrast and a delightful 'clarity' for most usage though it was difficult to use in bright sunlight. In certain back-lit conditions I was simply pointing and guessing the framing as the screen was virtually washed out. I doubt even higher resolution screens could deliver a good image in bright sunlight from behind. Using the LCD screen as an alternative to the VF-2 is there, if you need it. I doubt my LCD will see much use other than for review.
SOME DISLIKES I do have some issues with the ergonomics; the buttons are too small and I do not like the second control wheel around the 4-way switch - it is too easily disturbed and before you know what's happened you have altered a basic setting. I realise the 4-way can be disabled but this seems a waste. Perhaps the wheel can be disabled? - that may be a better option. Gloved use of the E-P2 is impossible because of the lack of real estate on the rear panel. Having to constantly turn the VF-2 off/on is a pain. I do not like altering parameters or menu diving with the EVF. Because the tripod bush is off centre this means you cannot remove battery or card without dismounting the camera from the tripod - very annoying. I miss having no IR remote control - surely this can be easily fixed? I am used to Olympus menu systems but can see why some new users might find it a nightmare.
BATTERY PERFORMANCE With the additional electronic VF-2 demanding more power, battery life does suffer. In general the BLS-1 battery in the E-620 delivers about 300 images (with review and GUI access) when using the OVF. It seems the E-P2 has dropped this to about 230 images when using the EVF for 80% of the time. To date my time has been mainly spent looking through the menu's, messing around with the various functions and filters and using the VF-2 for manual focus experiments and reviewing shots. I suppose I'm using the camera for 4-6 hours per day. At this rate the BLS-1 battery lasts 1 day only. It will pay you to purchase a spare battery.
E-P2 WITH MZD 14-42mm KIT ZOOM The standard MZD kit zoom is a good all round performer; the results I obtained were just as good as the ZD kit zoom. It has a film equivalent zoom spread of 28-84mm though is a little slow (f3.5~5.6). Remember to twist out the inner barrel from its locked position to avoid the LCD warning, and you are ready to go. The zoom ring operates smoothly enough with a turn of less than 30 degrees across the range, and in manual focus the fly-by-wire arrangement works fine. In manual focus with any MZD or ZD lens, as soon as the focus ring is touched, the camera switches to a close-up version of the scene to allow critical focus. Leave go of the MF ring for a second and the camera switches back - very clever and a better system than the E-P1 which stops in magnified view until you press the OK button. Obviously this does not work with legacy film lenses as they do not communicate with the body. But the magnified view is available by pressing the OK button when in the appropriate LV mode (green box). I did notice with my machine that AF focus confirm 'beep' was a touch premature when using the VF-2. This caused me no problems; I simply kept noticing it! It did not appear to be the same if using the LCD for composition.
AF function is achieved in about 1-1.5 seconds and confirmed by the beep and the solid green circle. This is as quick as my zippy Casio Z850 compact. The AF algorithm tracks through the entire contrast range each time the shutter button is pressed slowing the process down rather than having a 'live' memory of its last focus point. Auto Focus is a two stage focus process of 'zeeep-zeeeeeep!' and takes as long as it does to say! I have no doubt that Olympus will improve this to compete with Panasonic AF performance. For most photographic work other than sports, kids and dogs this will be fine. If your photography concentrates on fast moving objects and you are entirely reliant on Auto-Focus, the E-P1/2 is really not for you. There are ways around this; with a MZD/ZD lens in manual focus mode or with film legacy lenses the AF delay doesn't occur so with careful pre-focus and/or use of hyper-focal distance you can happily and unobtrusively 'street shoot' with no electronic lag. Panasonic 4/3rds machines are certainly quicker than the E-P2 in AF, but remember they are not as quick as an ordinary phase detect AF DSLR. No camera fits all sizes; it's a matter of horses for courses.
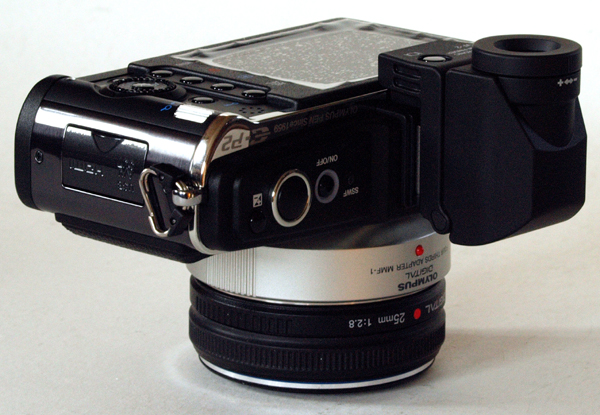
E-P2 WITH 4/3RDS LENSES USING THE ADAPTER MMF-1 I have a good selection of Olympus 'traditional' 4/3rds E-System lenses. Some are CDAF compatible, some not, some are HG and others SHG. And I have one non-Olympus (Sigma) 4/3rds lens. I undertook my testing indoors with average to poor artificial lighting. Here's what I found: CDAF Compatible 4/3rds (25mm Pancake): This lens auto-focused in about the same time as the MZD kit lens. AF confirmed with solid green circle. Non-CDAF 4/3rds lens (12-60mm): AF with this lens took about twice as long with much motor stepping. AF confirmed with green doughnut. Non-Olympus 4/3rds lens (Sigma 30mm): AF with this lens was a tad slower and noisier than a non-CDAF Olympus lens. AF confirmed with green doughnut. With ZD EC-14 converter: I repeated the sequence with the same lenses as above with the EC-14. AF Results, including AF confirmation, are as above. NOTE: I have no accurate way of measuring the AF period so my observations are subjective. In general, it was only when the indoor ambient light reached levels which strained my eyes did I observe the AF function stuttering. At this point an E-System camera would use the strobing flash as an AF assist lamp; however, the Pen has no such command to any attached compatible flash unit. Nor is the camera provided with an independent AF assist lamp. I'm afraid I cannot see the rationale of not having a menu command to strobe an attached flash for AF assist. However, that said, it is good to know that all my 4/3rds lenses work in all but the poorest of light with the Pen. This extends my repertoire of AF capable lenses to include focal lengths from 7mm to 300mm plus the EC-14.
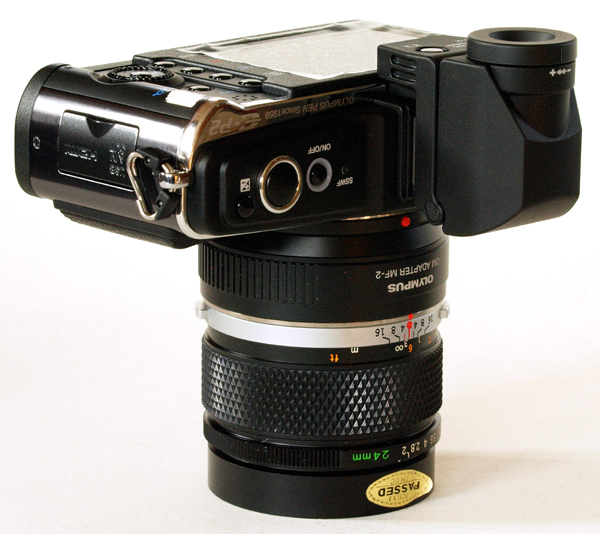
E-P2 AND OM LEGACY LENSES USING THE ADAPTER MF-2 Micro FourThirds brings the opportunity mount and use just about any 135 format lens (with the appropriate adapter). The VF-2 offers the user a two fold bonus; a superb electronic viewfinder of a similar size as the E-3 and (just as importantly) a place to steady the camera (against your head), thus improving camera stability and avoiding shake. And, of course, you can see the 7 & 10 times magnification in the viewfinder for totally accurate manual focus. While legacy lenses can be just as easily fitted to the E-P1, their use is somewhat limited by having to compose and manually focus on the back screen away from the body with the camera some 12-18" in front of you. This causes camera shake and makes the physical act of focusing accurately almost impossible unless the camera is tripod mounted. The VF-2 replicates a DSLR's optical viewfinder and will find favour with lovers of manual focus lenses. Some folks may query the use of manual legacy lenses but for specialist uses such as macro photography many experienced users prefer manual focus even with thier AF capable lenses. One of my most used lenses is the OMZ 90mm Macro for table top and illustrative work. The VF-2 on the E-P2 simply extends its usability. My legacy lens collection is restricted to OM and Pen F/FT/FV series with the odd M42 screw mount. The results from using OM lenses on E-System cameras has improved since the E-1 with superior metering and better exposure box design. Even the OM wide-angle lenses can produce half decent results on the E-3. But the shorter registration distance and lack of a mirror/exposure box of m4/3rds promises better results. OM LENSES ON E-P1: I undertook some detailed testing of just about all my range of OMZ lenses 8mm through 600mm on the E-P1 (tripod mounted) that you can read about here if you wish. NOTE: Dandelion focus confirm adapters do not work on the E-P1/2.
I have already provided a large report on the use of OM lenses on the E-P1 here so I'm not going to repeat that exercise as the only difference arises from the VF-2's affect on camera stability. I will discuss the ease of focusing OM lenses with the VF-2 later in this article.
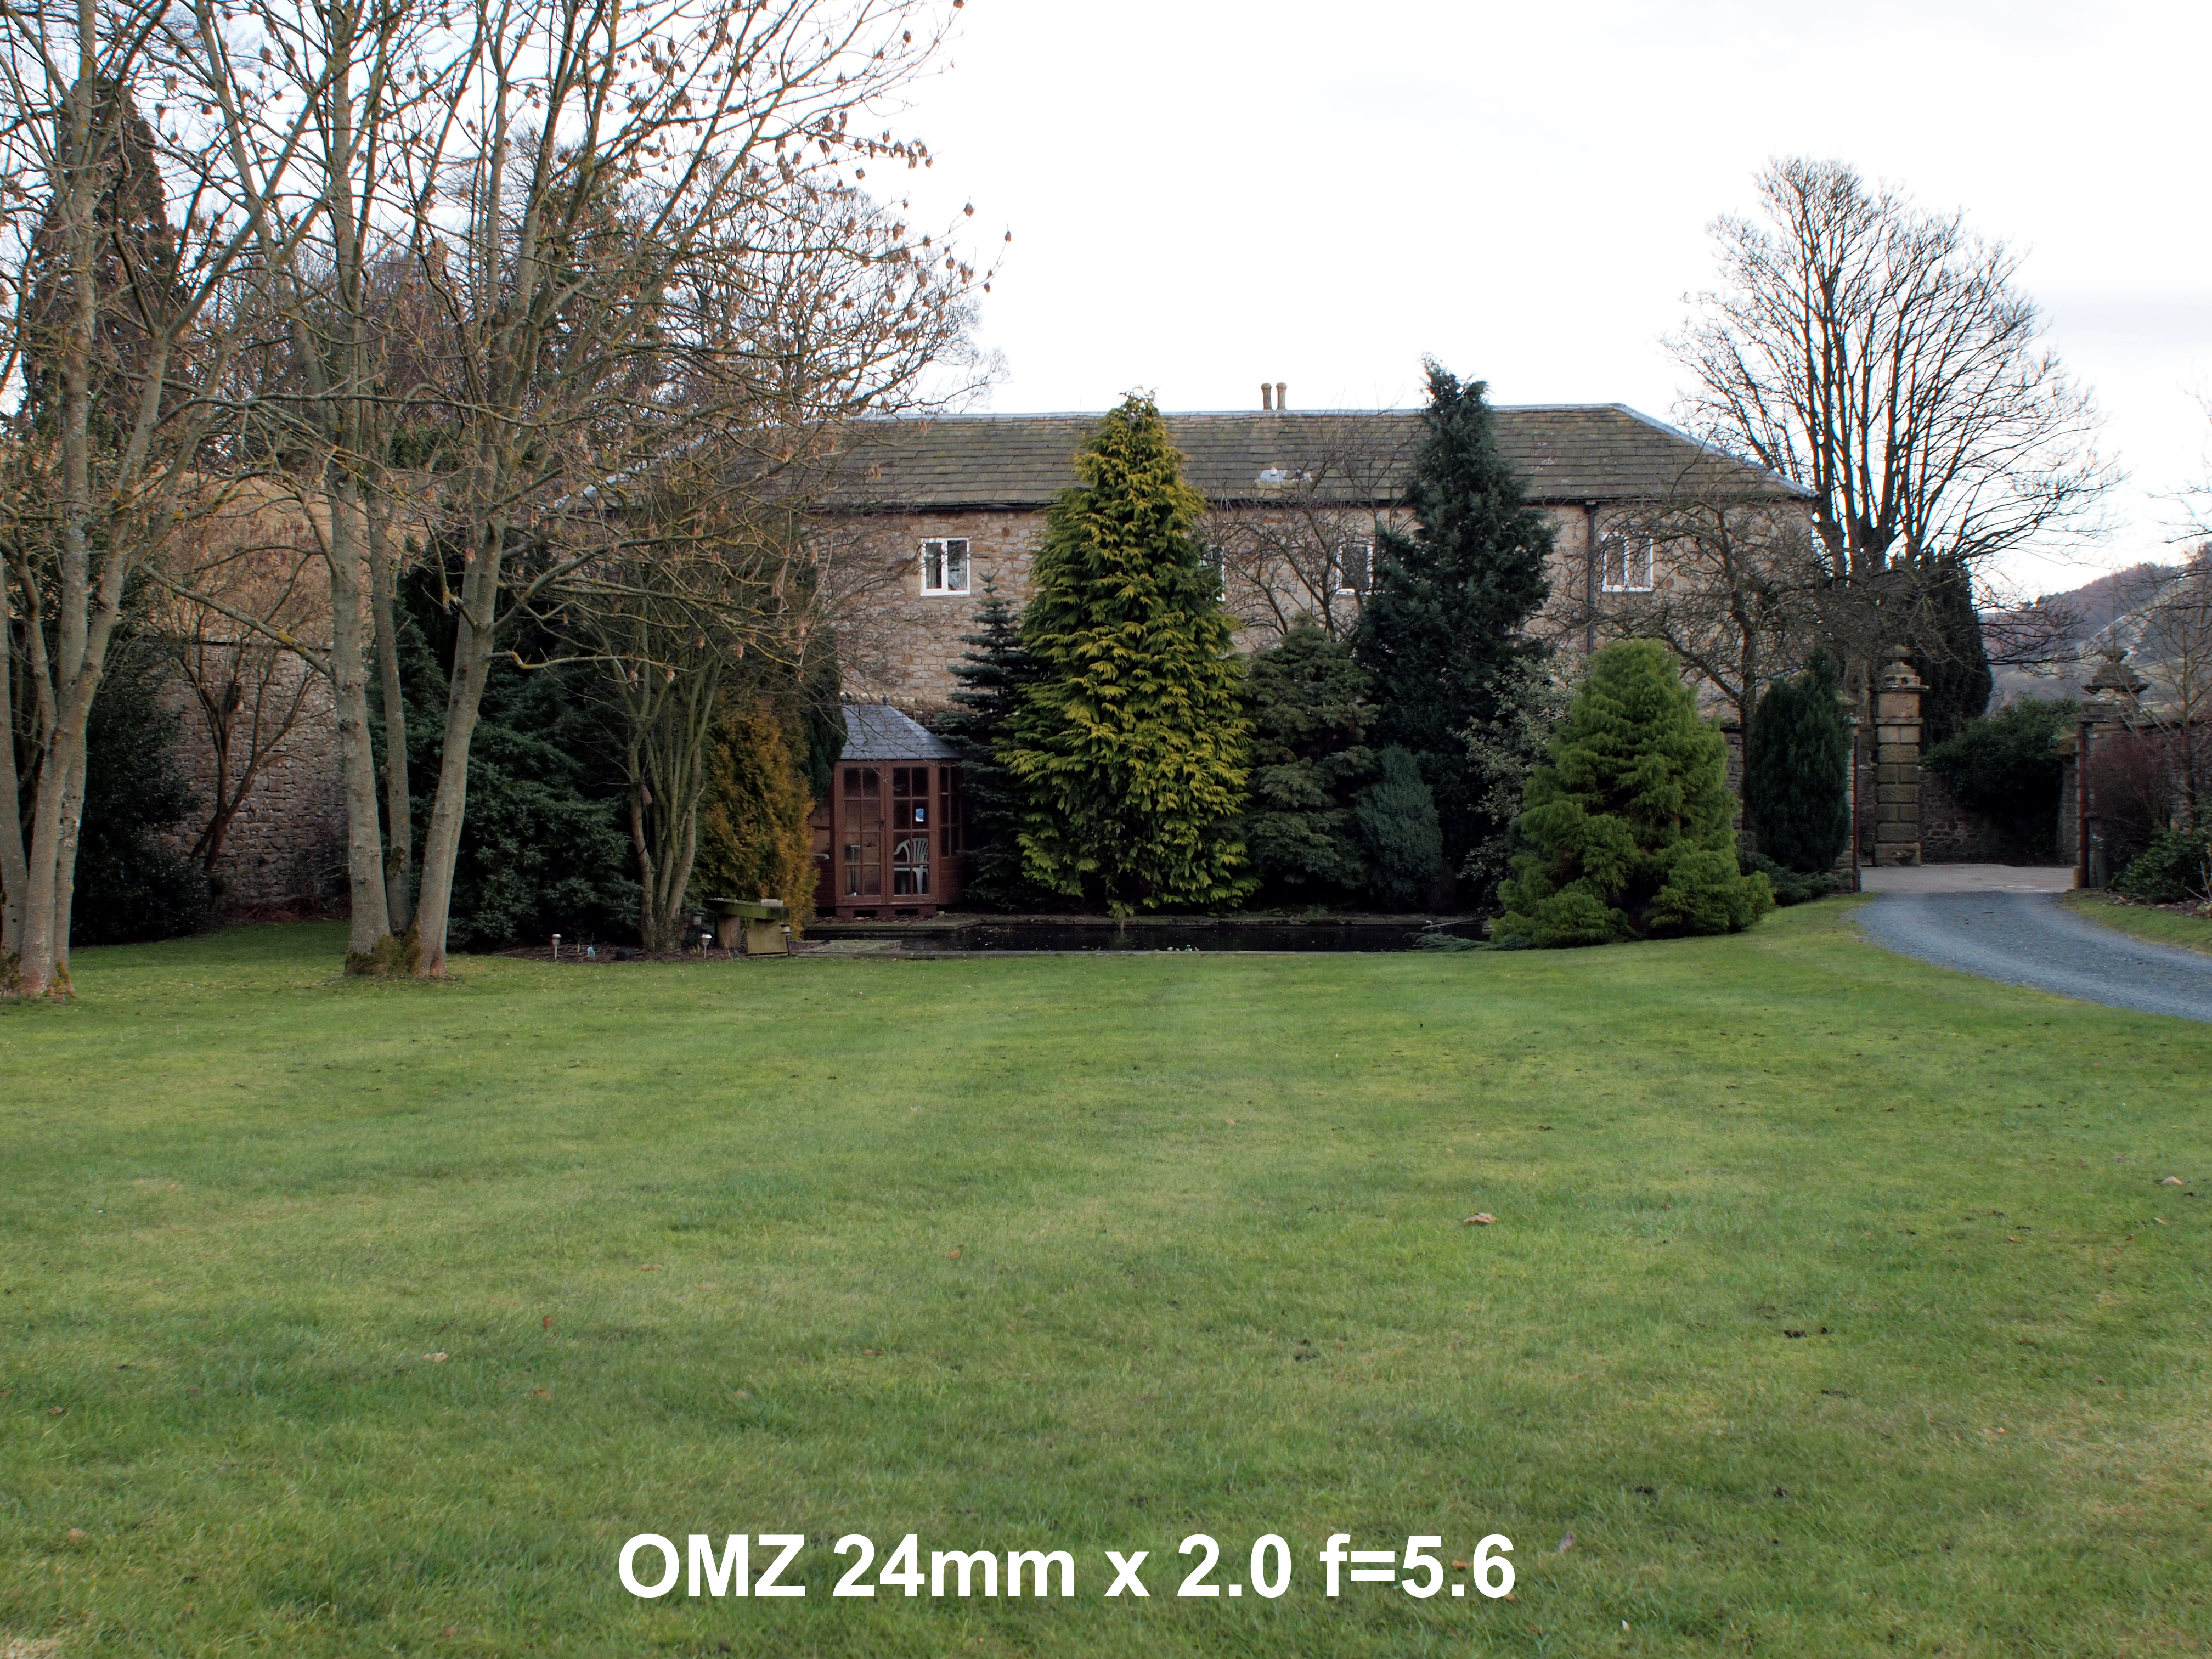
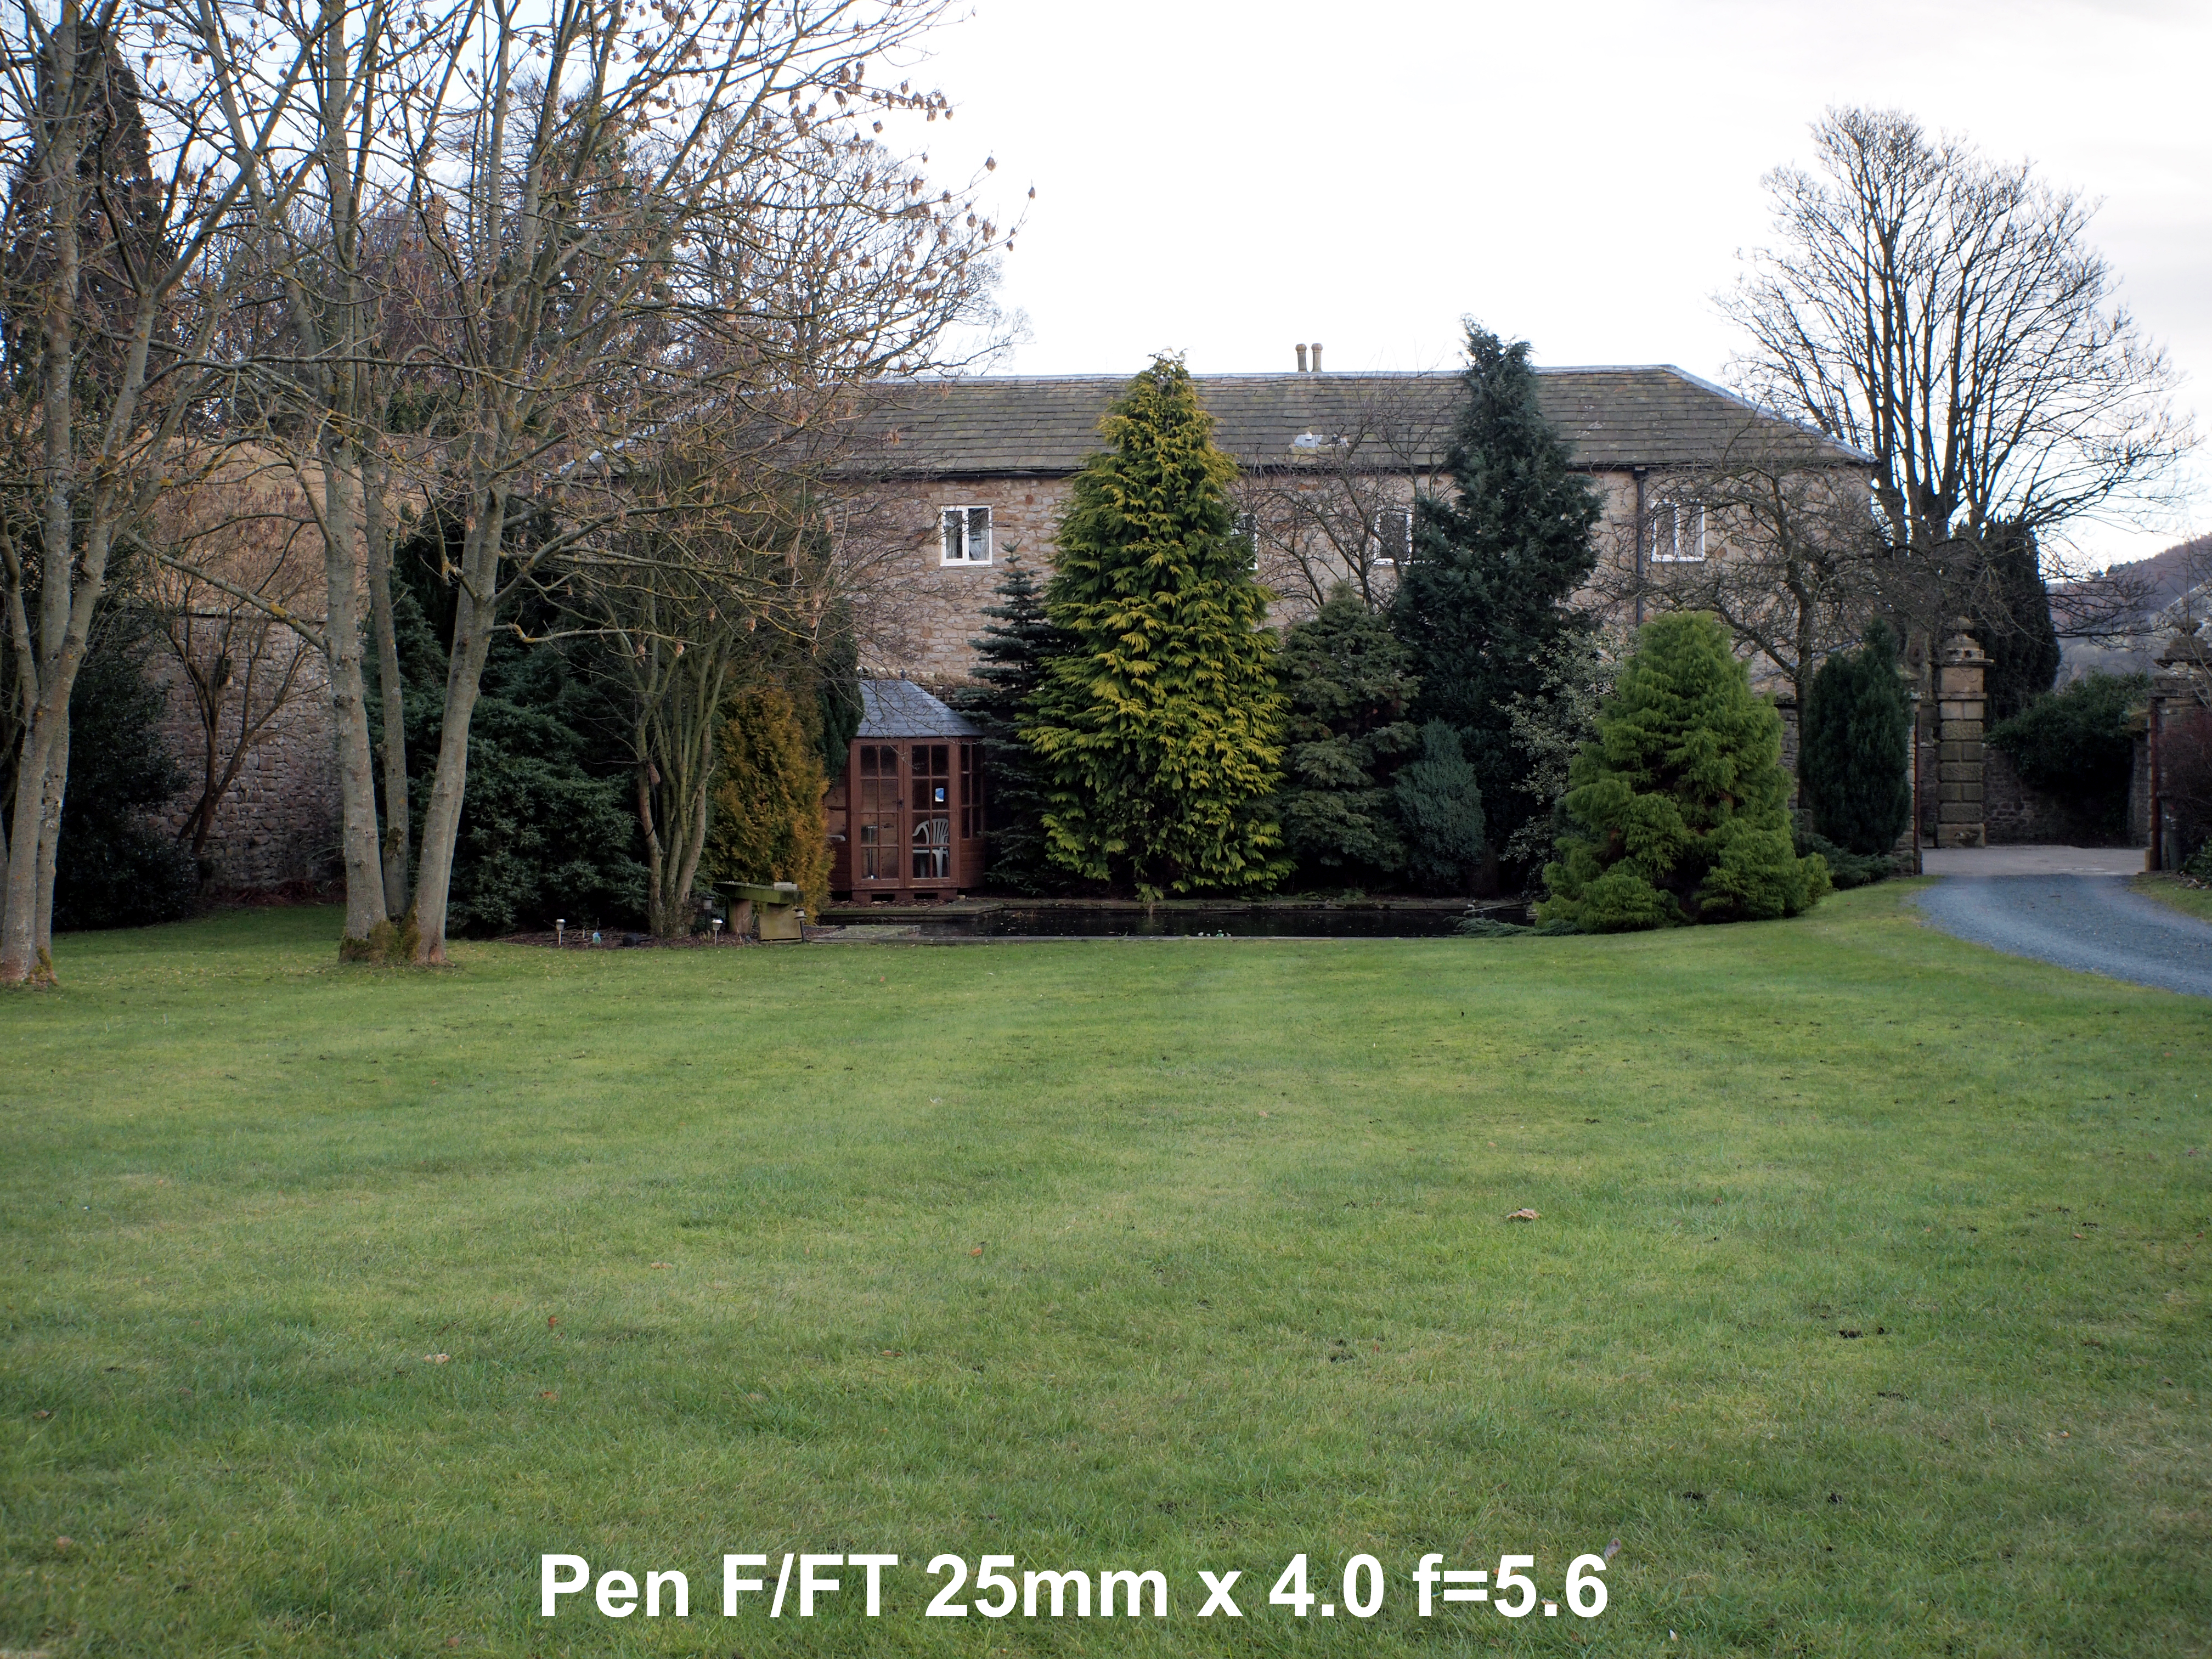
E-P2 AND PEN F/FT/FV LEGACY LENSES USING THE RJ Camera ADAPTER Olympus Pen F was a half-frame camera system from the 1960's. Because the film area was only 18mm x 24mm the range of lenses were specially designed to deliver better resolution to such a small format. As the MicroFourThirds format is only about half this size, many folks are curious to see how the old Pen F lenses from the 1960's perform on the digital Pen. I sent to China for the m4/3rds to Pen F adapter that cost about £60. If you're interested the adapters are available here. I undertook some testing with the E-P1 and most of my Pen F lenses and had mixed results. The widest Pen F lens made was the 20mm x 3.5 which, when used on MFT equates to a not so appealing 40mm. Generally I found Pen F wide angle lenses to be 'OK-ish' but nothing spectacular. The best performers were the standard range 38mm x 1,8, 38 x 2.8 Pancake, 40mm x 1.4 and 42mm x 1.2 all of which produced pretty good results with the fast 42mm giving great bokeh. Some of the telephoto's were quite acceptable too. I haven't written that report up as yet and I'm not going to repeat those tests for this review. However I did decide to use the common and cheap Pen F 25mm f=4.0 for the test below.
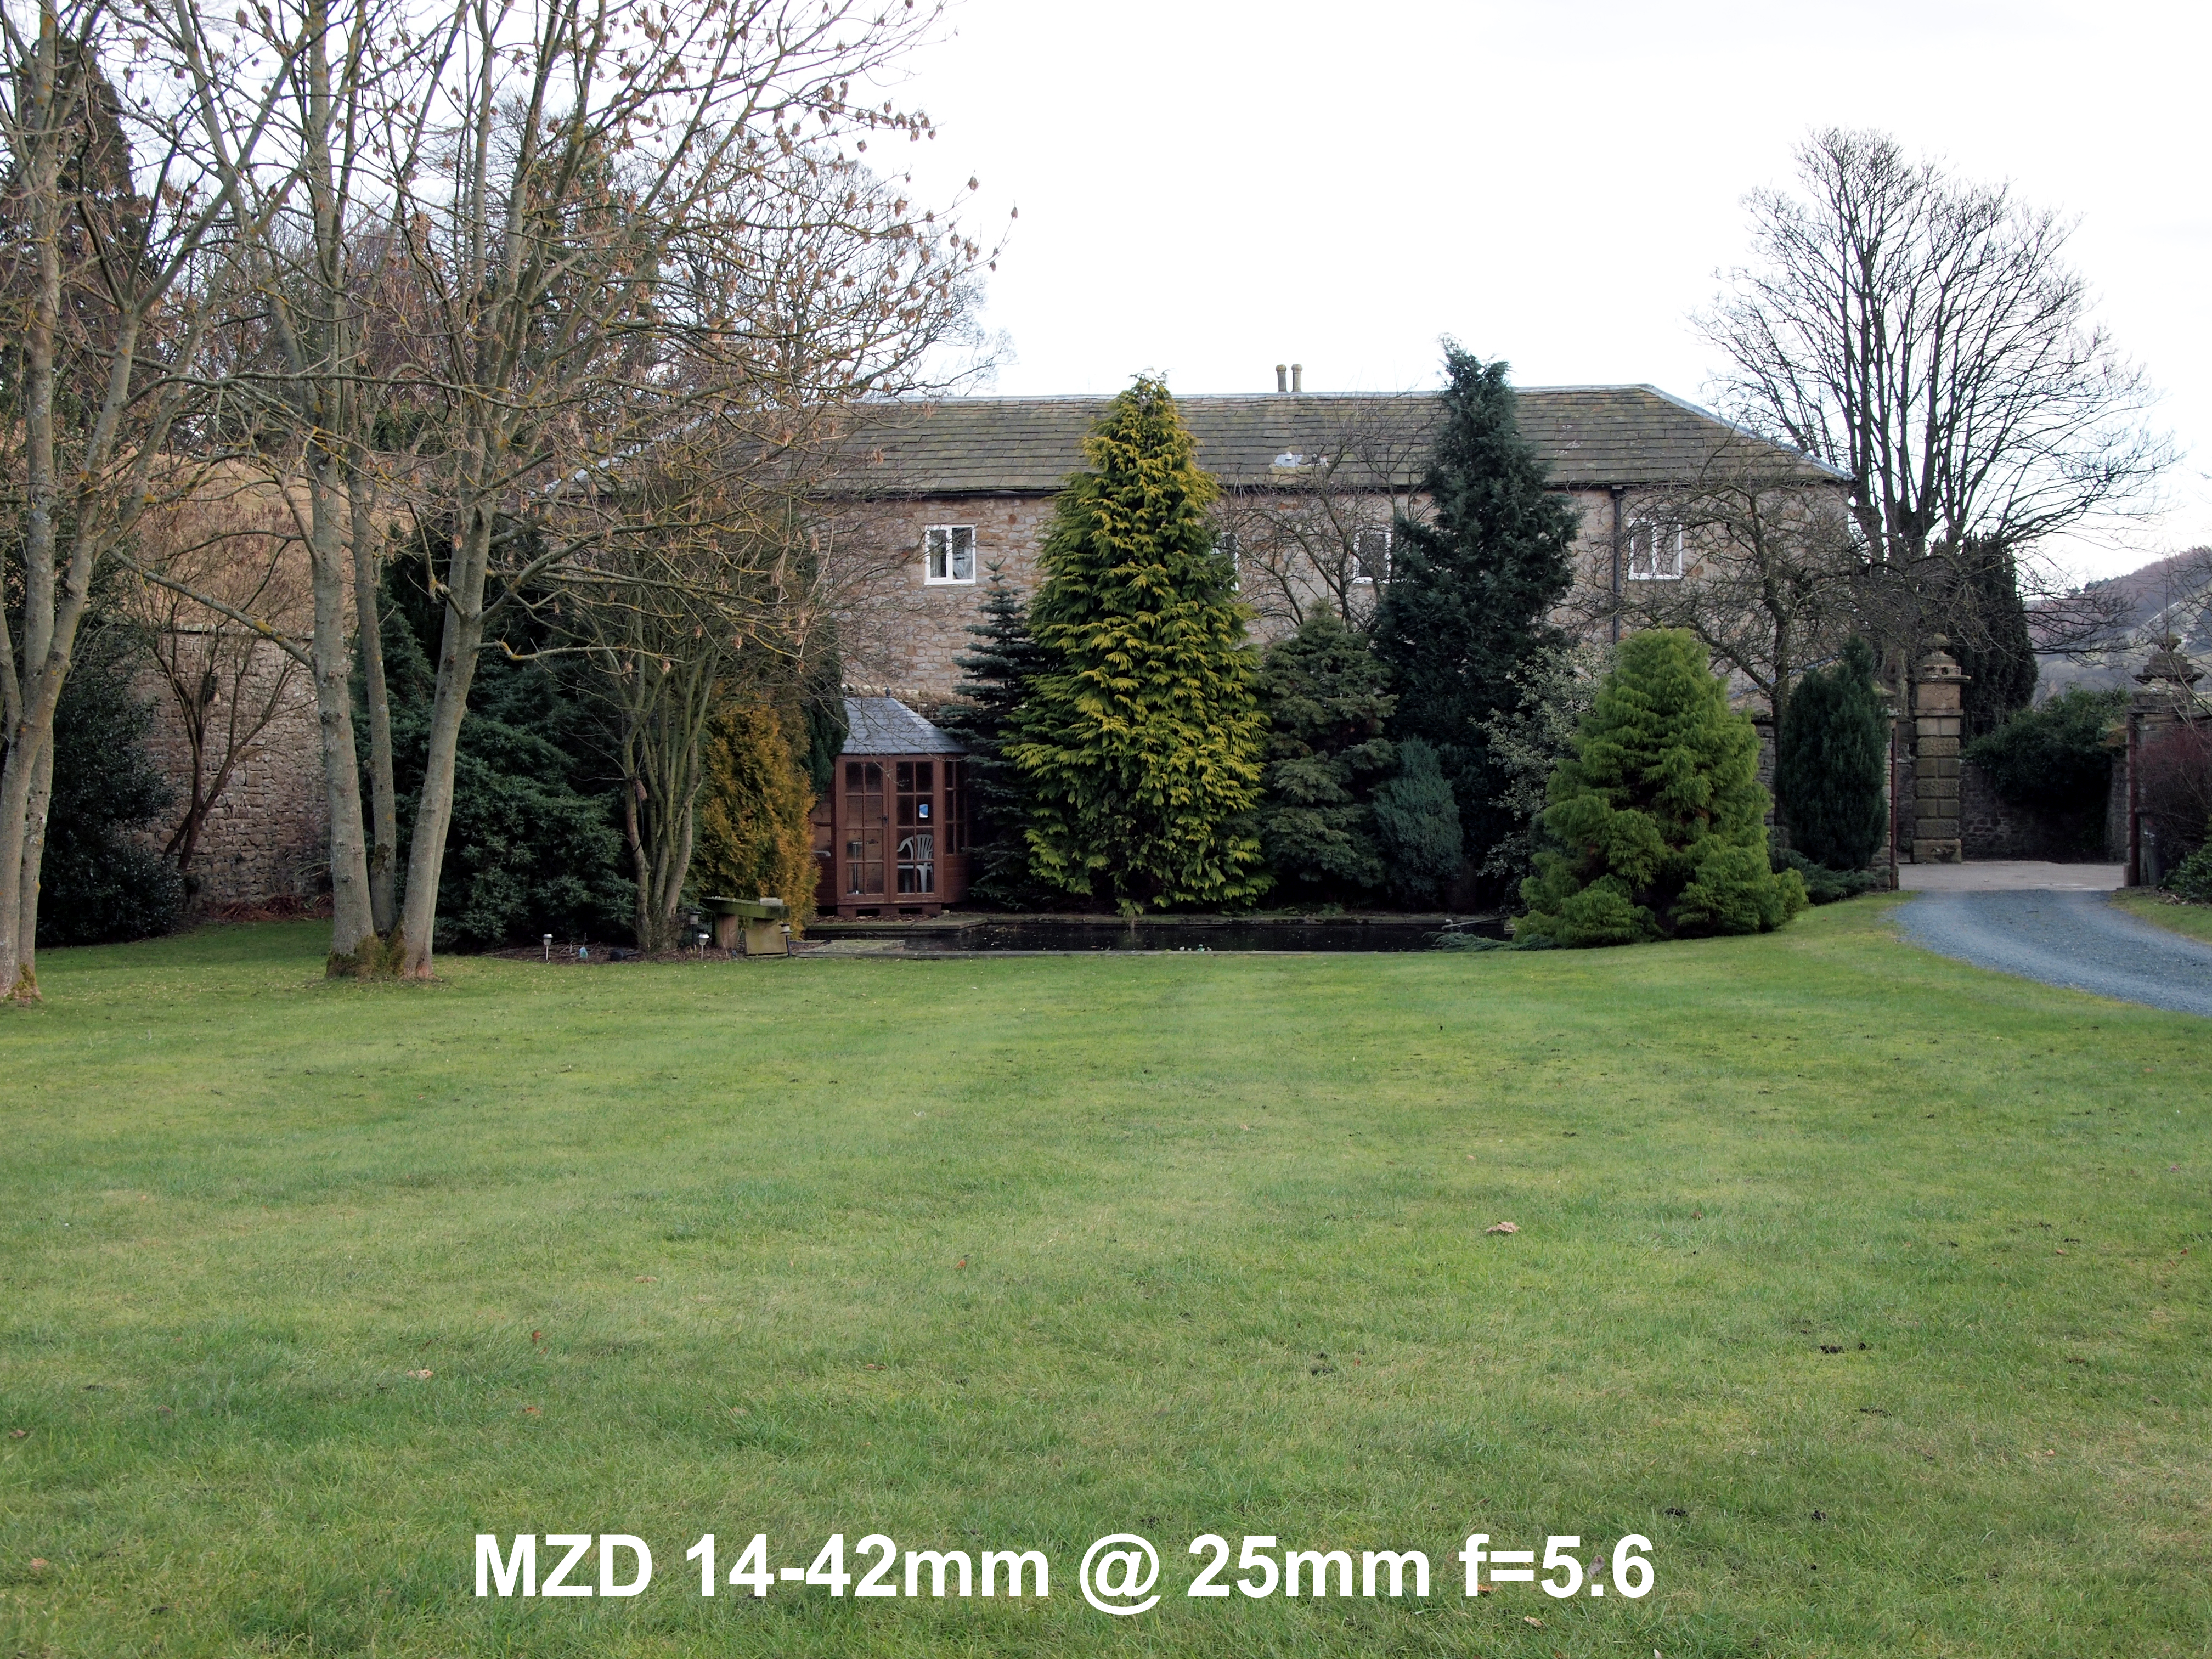
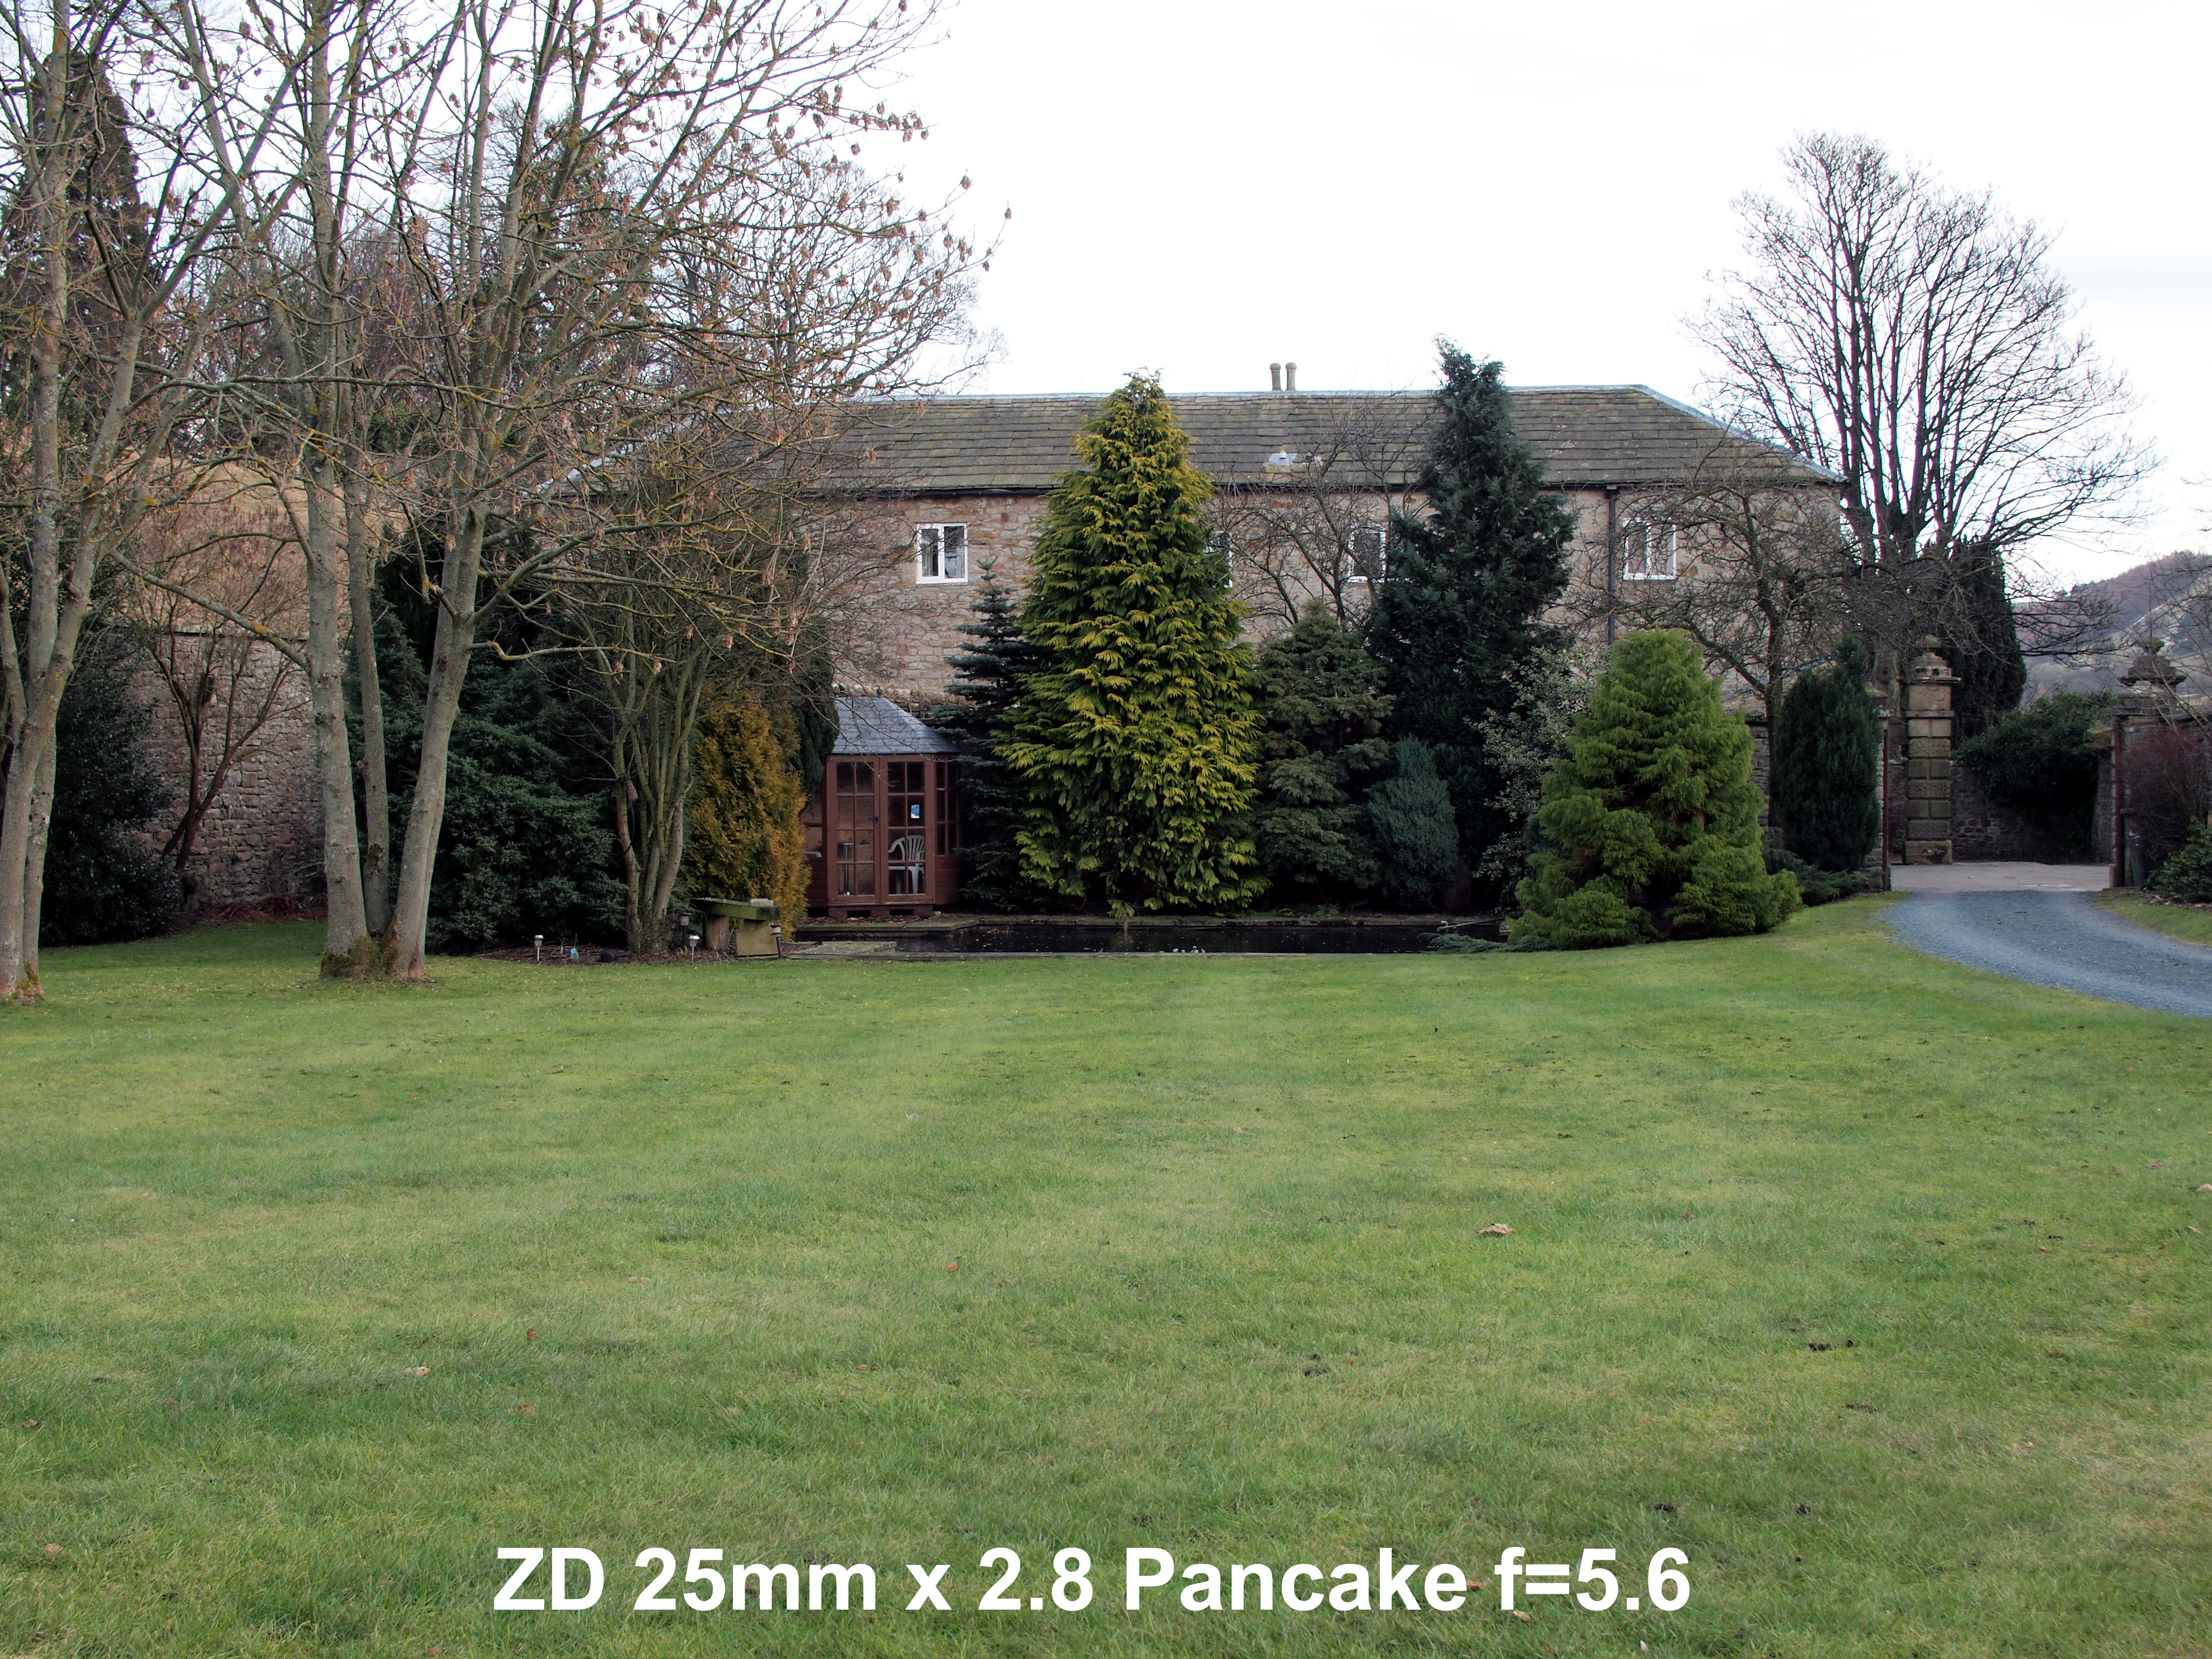
A QUICK EXAMPLE OF DIFFERENT LENSES ON THE E-P2 To set the scene I decided to take advantage of the reasonable weather today and photographed the same scene at 25mm x f=5.6 with the MZD kit zoom; the ZD pancake; an OMZ 24mm x 2.0 and a Pen F/FT 25mm x 4.0. Apart from the application of auto-levels in PS to each these are out of the camera JPEG's.
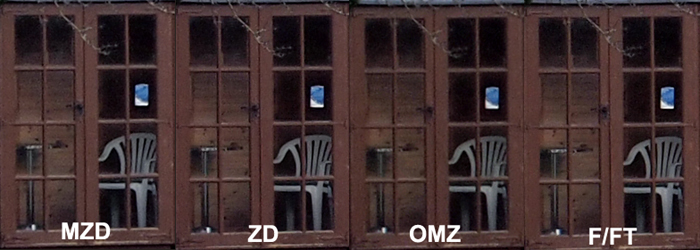
CROPS FROM ABOVE On the monitor all four looked comparable with the exception of the OMZ24mm that looked a little soft. I cropped out the door to the summerhouse from each to compare at 100%. The OMZ crop was slightly smaller due to the 1mm of shorter focal length but I upsized it to match the rest. Of course this isn't fair but the overall result from the OMZ is a tad soft anyway. Take a look at the results.
CRITIQUE This quick test reveals there's no huge differences between the lenses, in terms of resolution and rendition. With some JPG manipulation any gap can close. Of course if you go pixel peeping there are variations; the MZD has some C/A; the ZD Pancake even more; the two manual lenses have C/A but it's of a different hue and much less invasive. In the sharpness stakes the modern lenses have the edge with little to choose between them (ZD Pancake is marginally better); the older manual lenses are acceptable but the 1960's Pen F/FT lens has the edge over the expensive 24mm x 2.0 fast OM, though it's down on contrast. And the new AF lenses are more convenient to use. But, overall I was quite surprised particularly with the cheap Pen F/FT 25mm x 4.0 (the example used was one of the last, made in 1970) which delivered quite satisfactory results albeit a bit soft in the corners. Combine this little lens with the ART Filter Pin Hole or Diorama for cracking effects.
LEGACY GLASS It is easy to see why there's a resurgence of interest in legacy lenses from many defunct stables. Be warned that Pen F lenses have been collected strongly since the demise of the system in 1970 so prices can be eye-watering. Some OM lenses too fetch staggering prices, especially for the brighter version primes. My experience tells me that the slower version OM primes actually perform better than their faster siblings so look for these if you fancy a small stable of fixed length lenses for your bag. OM zooms are fiddly to use as you have to manually stop down, manually focus and zoom; a process that some find too lengthy. Most run of the mill OM zooms produce 'OK-ish' results and to me are not worth investing time in. However, the more expensive and fast zooms like the OM 35-70 x 3.5 and the famed OM 35-80 x 2.8 do deliver very good results if you can be bothered. Using old glass on modern cameras is not only fun, it harks back to an era when the photographer was more 'in control' and had more input into the photographic process. If you want to quickly learn how to focus, and about depth of field and hyperfocal distance, then pop a manual lens on your digital Pen! Whether anyone should actively acquire legacy lenses is a matter for them. If I didn't already have a stable of OM & Pen F lenses I'm not certain if I'd seek them solely for use on the E-P1/2.
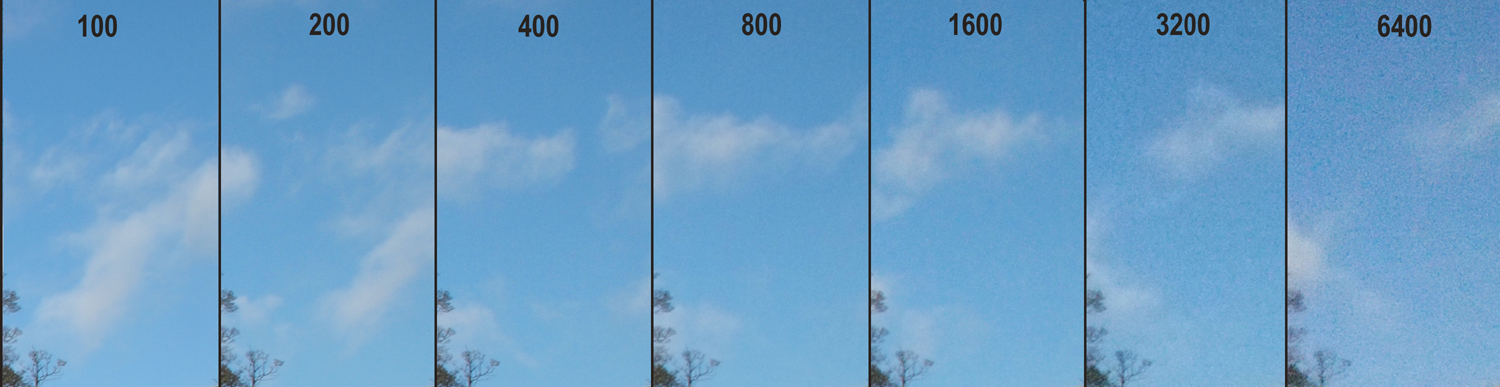
ISO TEST Much has been made of the better heightened ISO performance of the E-P1/2. I undertook a series of shots at ISO 100-6400 in 7 stops; 100, 200, 400, 800, 1600, 3200, 6400. Here's the target followed by the crops from more or less the centre of the frame. At the bottom of the section I've also provided an image showing the sky crops (good place to look for sensor noise) from the right-hand corner of the 7 images. Click on any image to see the original jpg.
CRITIQUE These shots are fine up to and including ISO 1600. At the two higher ISO gains the loss of detail is quite dramatic - if you start to pixel peep. However, if you are simply printing, then at a reasonable print size even the highest ISO renderings will print quite reasonably. The E-P2's sensor and basic noise removal is delivering much cleaner high ISO's than previous incarnations of 4/3rds chips. Note too where there is noise present, there is no apparent banding. These files will benefit from noise reducing software too. Download the original jpg's and try them through your own noise reducing software. I have the basic camera settings very conservatively so all the files should take some sharpening if necessary. If you require the RAW files please email me direct and ask.
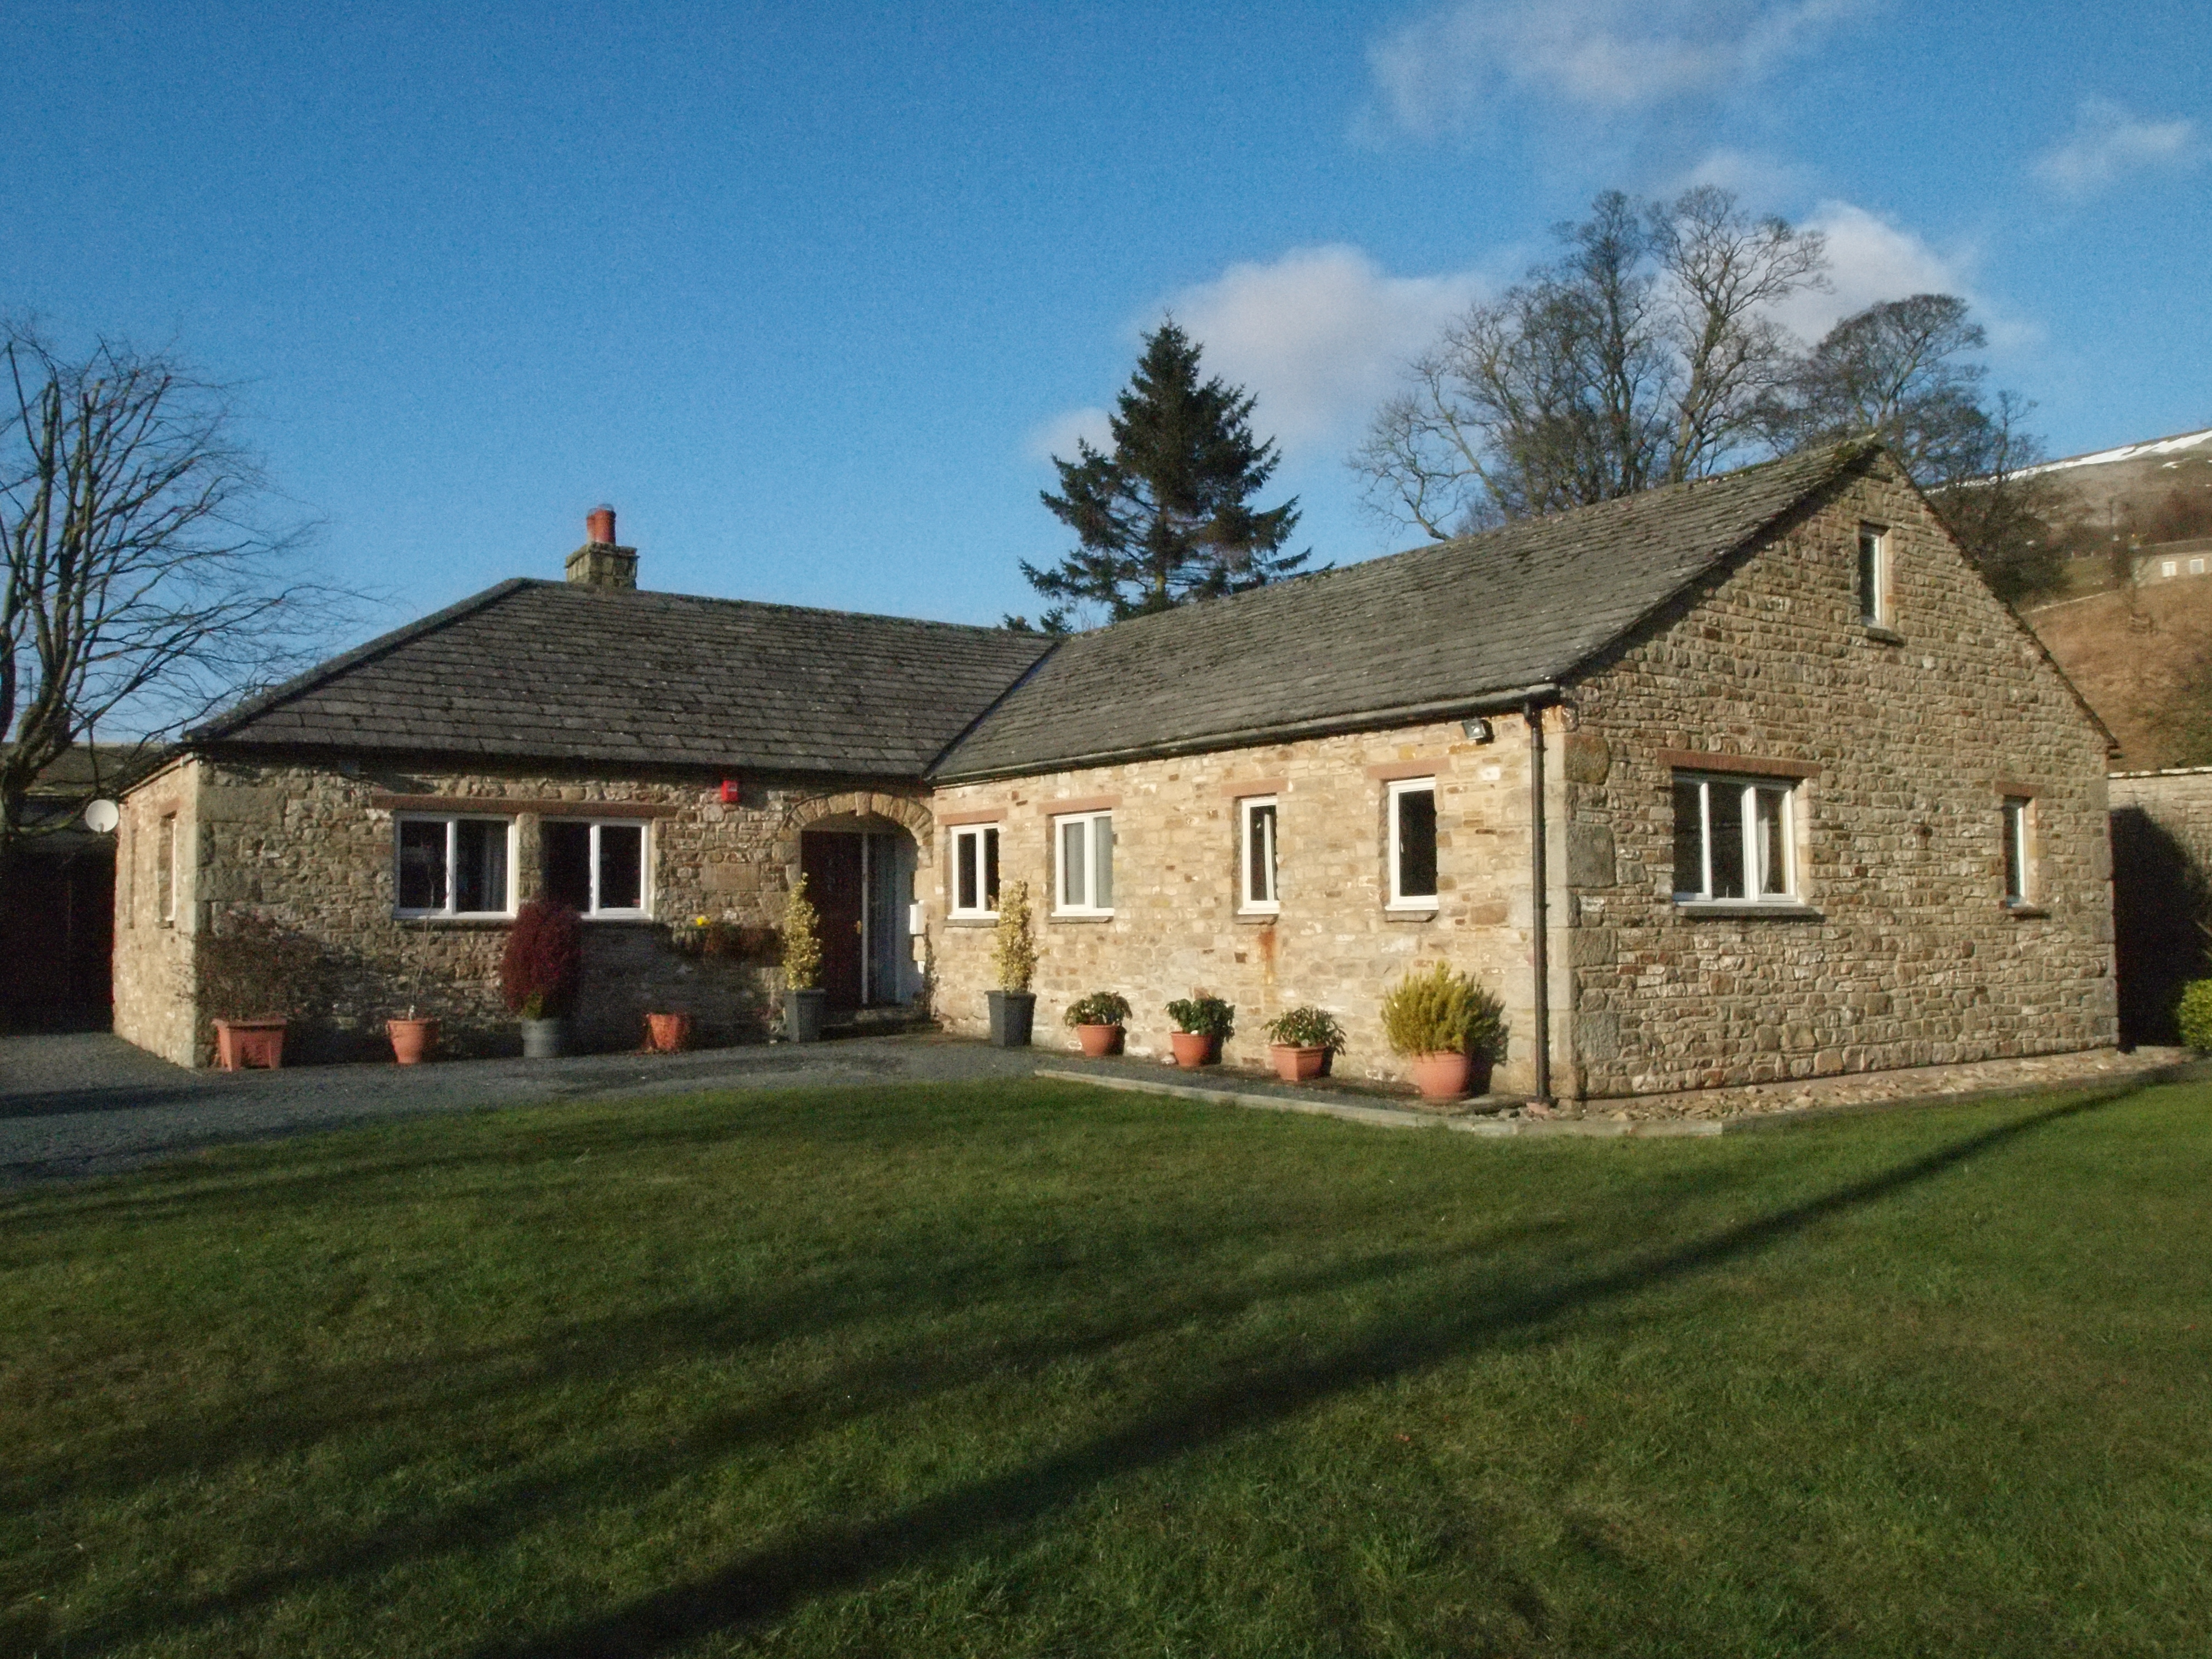
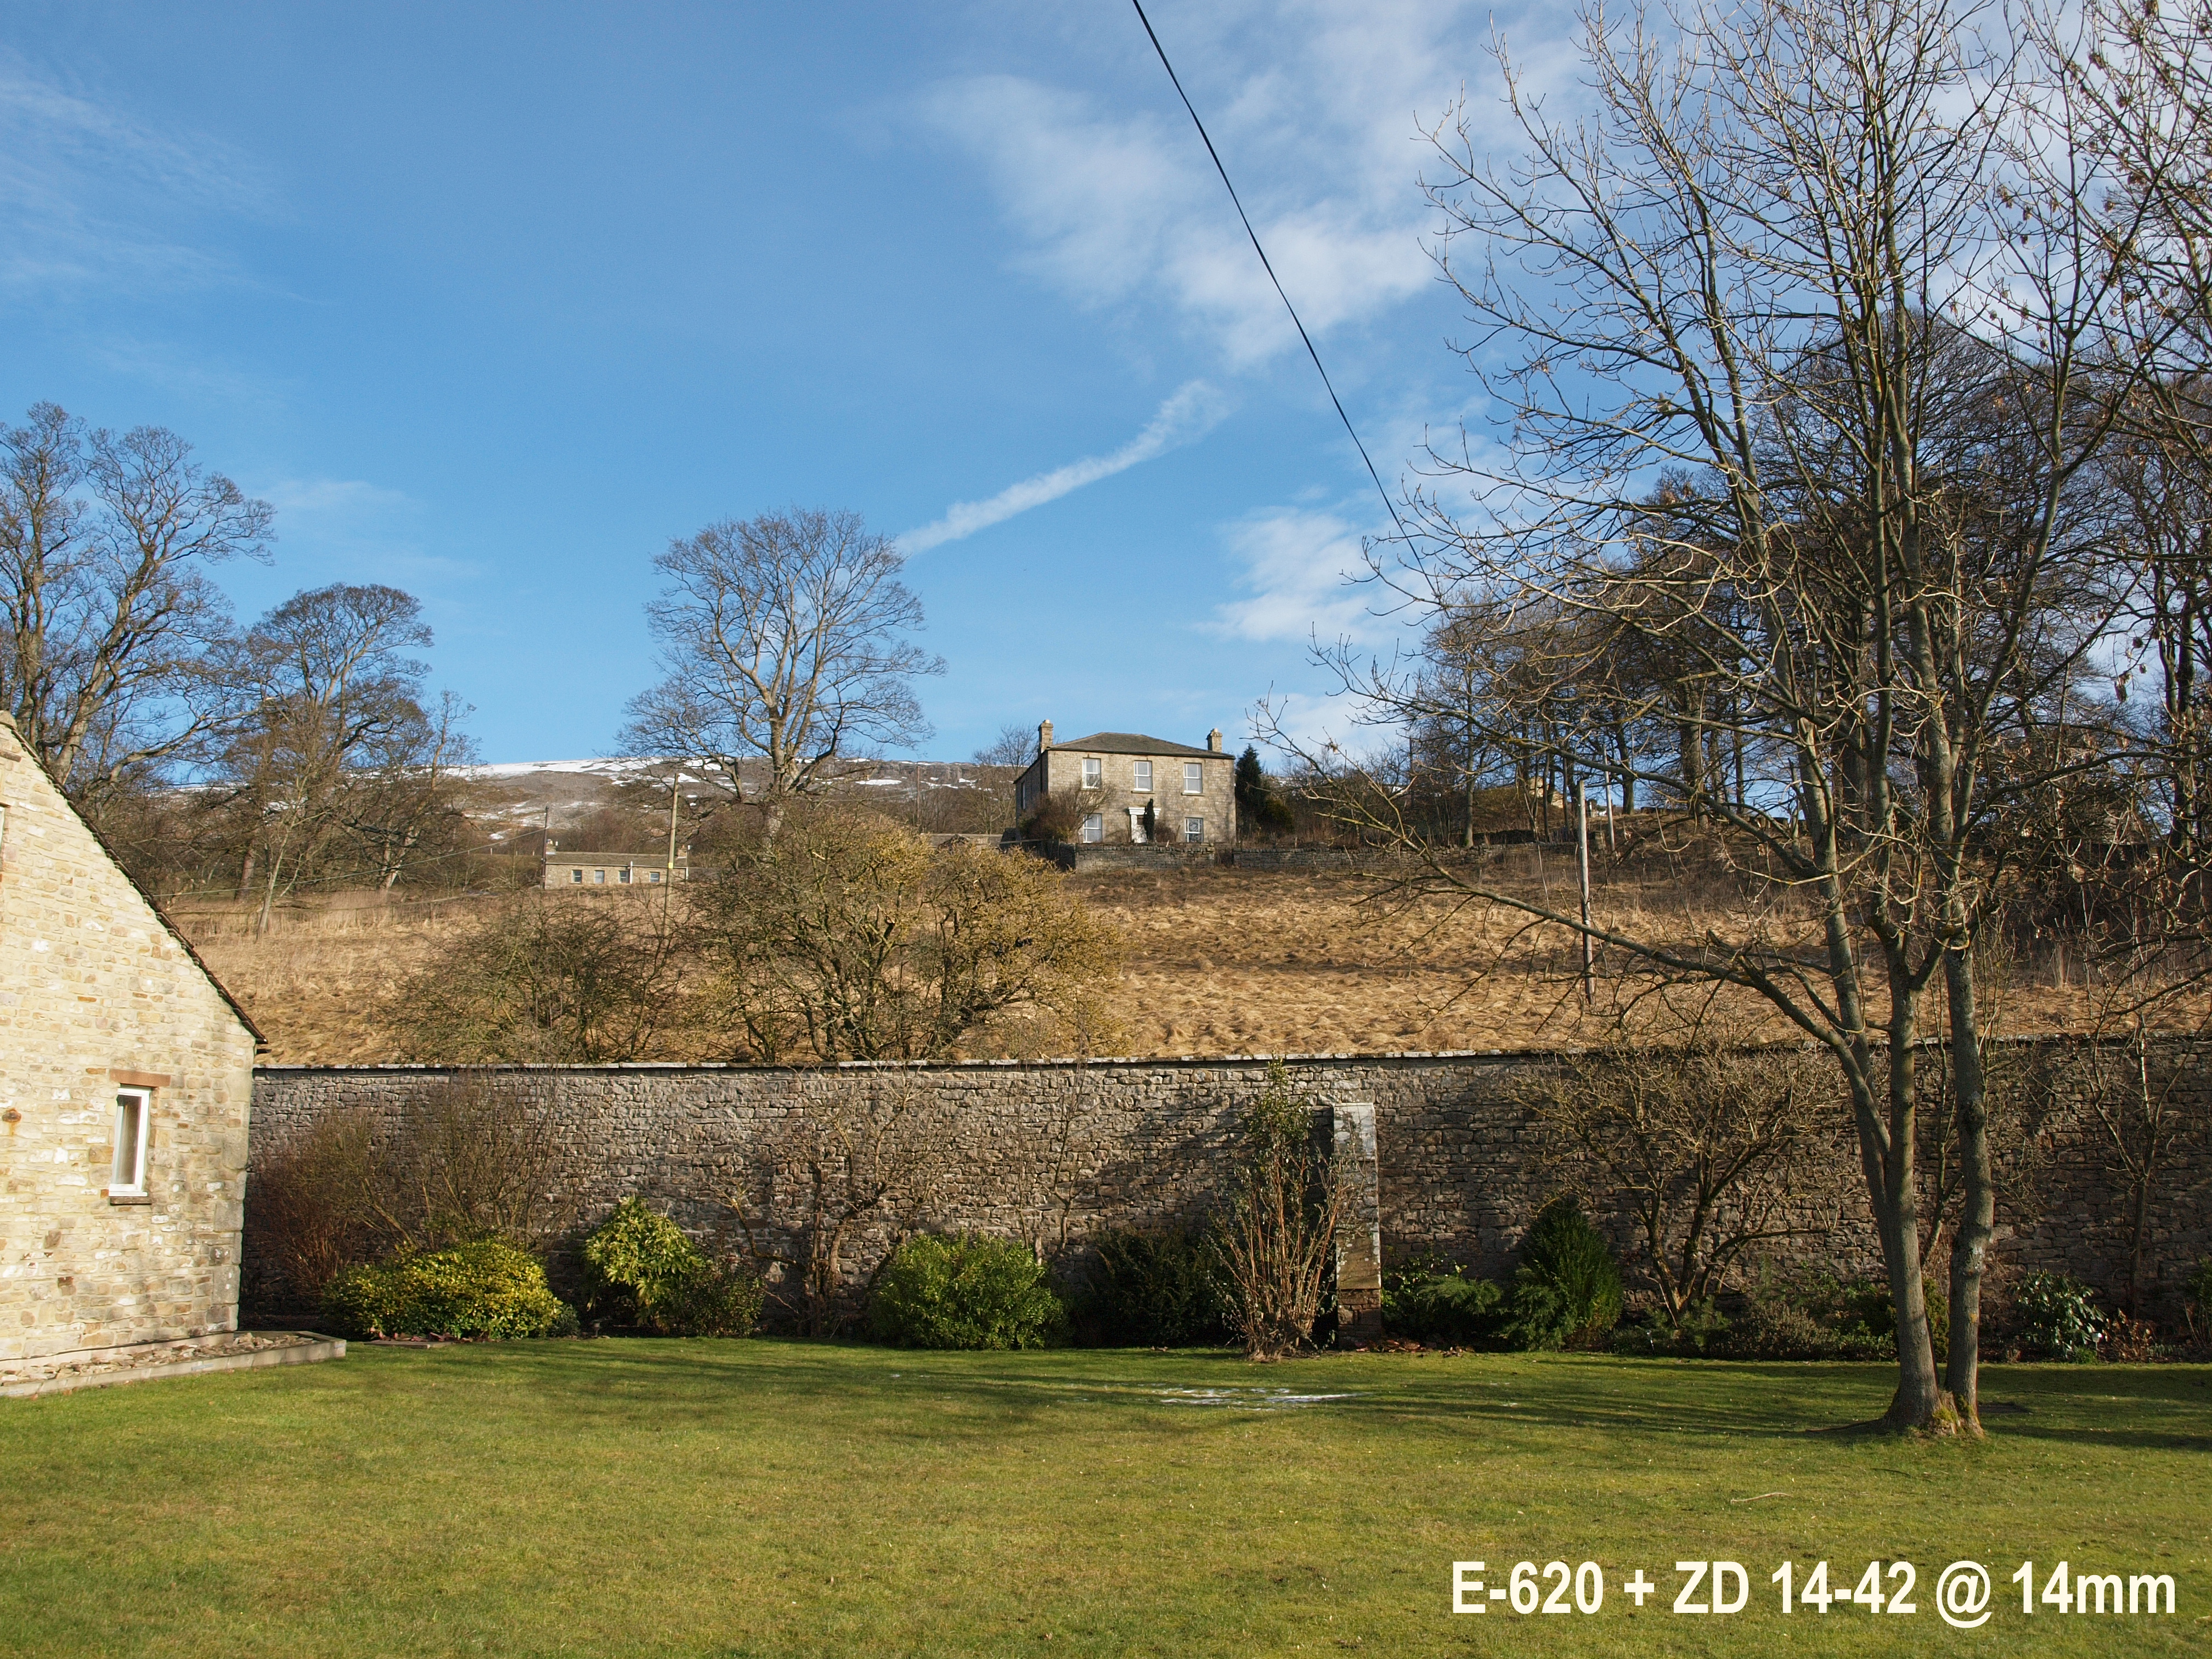
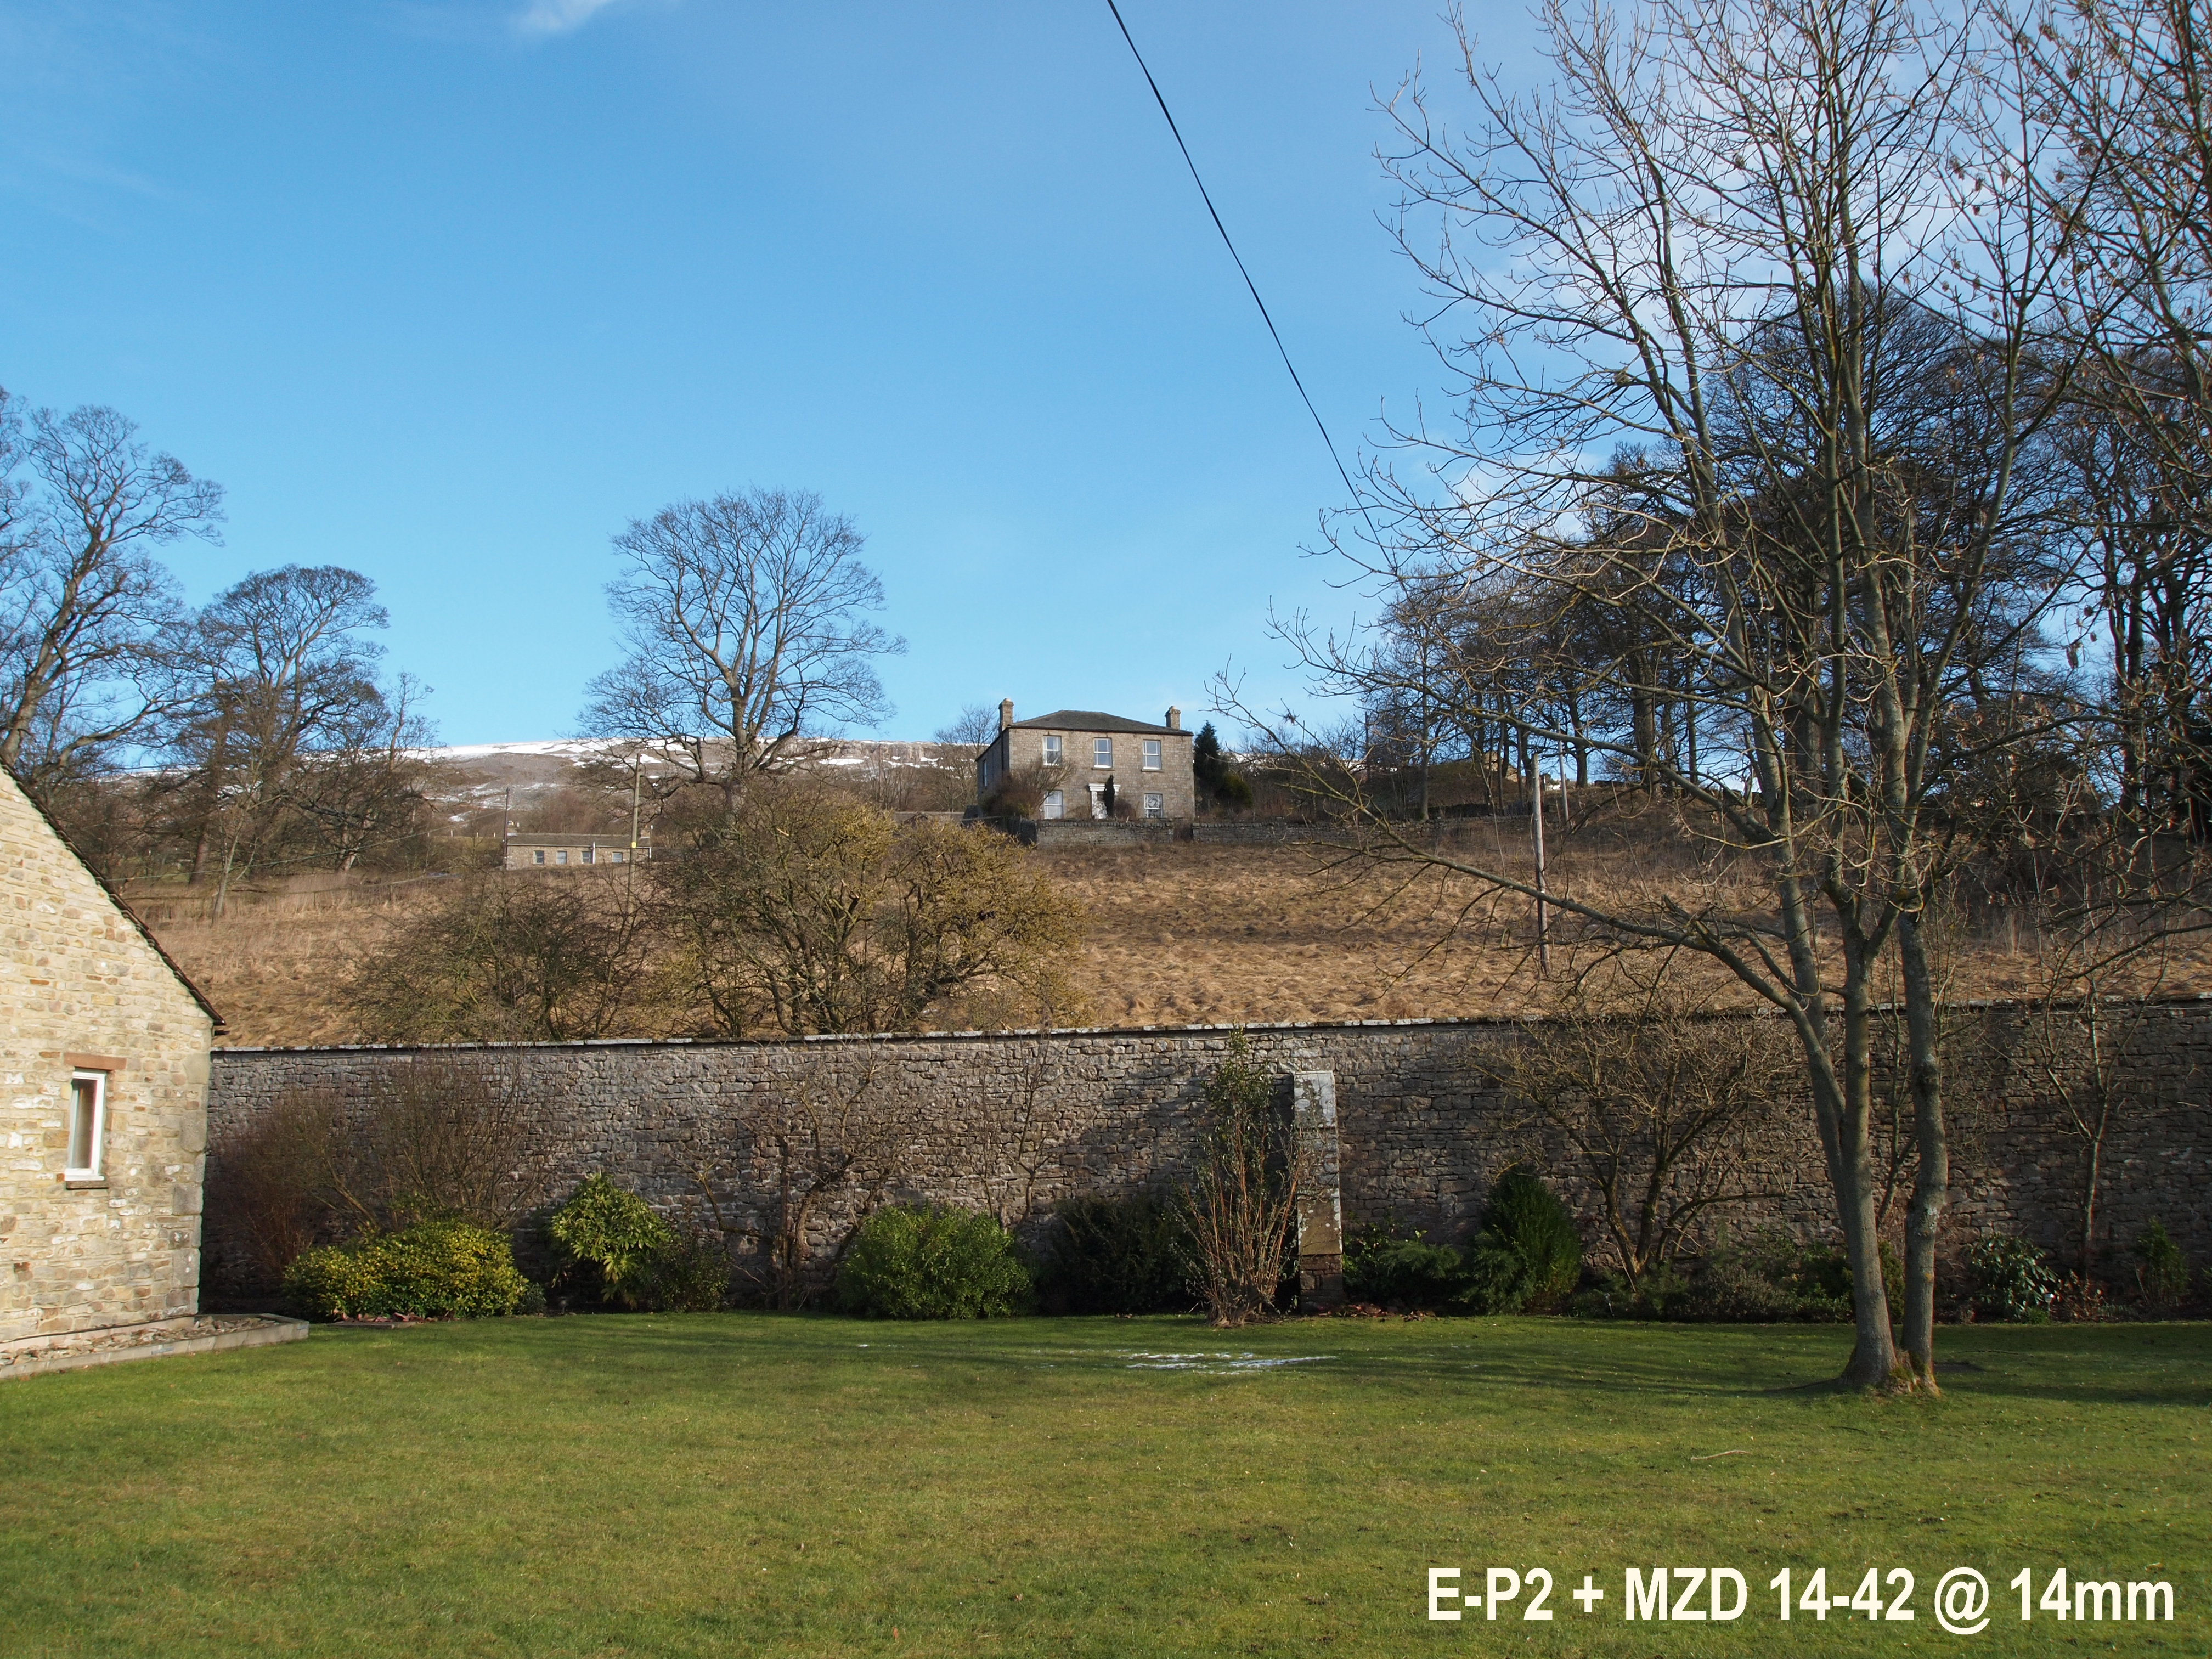
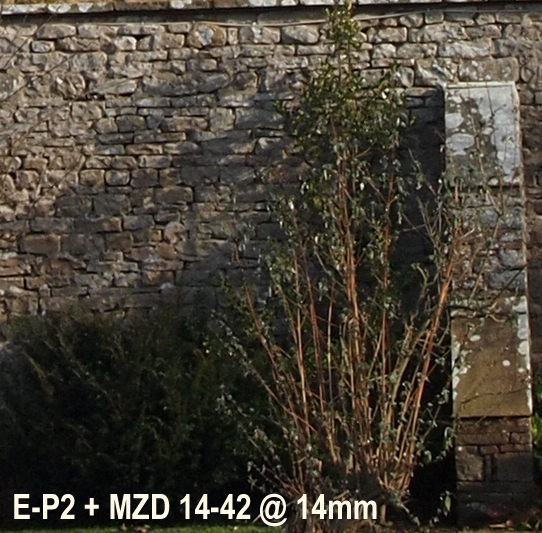
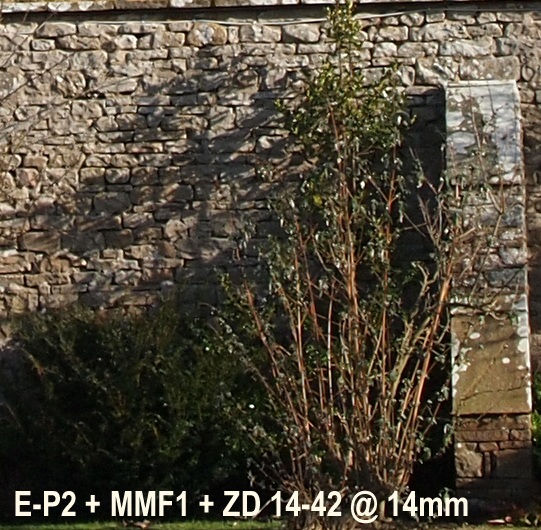
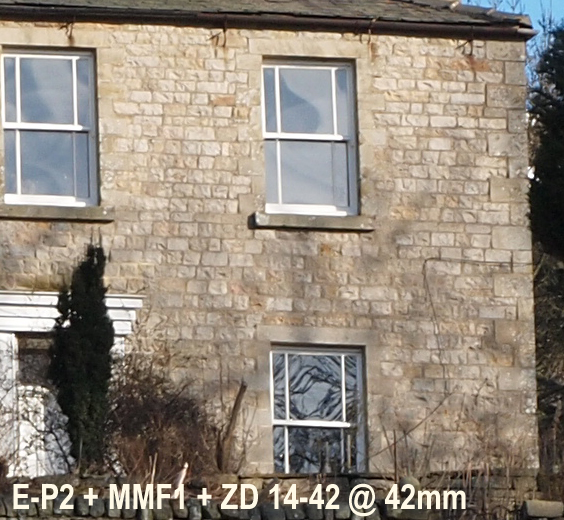
COMPARING THE MZD 14-42mm and ZD 14-42mm ON E-P2 AGAINST E-620 On a bright Winters day in temperatures of about -4C I endeavoured to provide some shots showing the performance of the kit MZD 14-42 on the E-P2 against the similarly specified E-Series kit lens, the ZD 14-42mm on the E-620. Since I have the MMF1 adapter I thought I'd mount the ZD kit lens on the E-P2 as well to demonstrate any differences. It was freezing hard and it kept throwing the odd snow shower too but I eventually managed to get a decent set. This was the third attempt and I used a single tripod and changed the camera and tripod plate. (For information) The first two attempts I set up both cameras to the same settings and mounted them on a cross beam tripod with twin heads. The cameras were about 16" apart on the beam and at the same height. Each was aimed at the target as accurately as possible and shutter set on the 2 second delay. I did not fire the shutters simultaneously, rather I counted 10 seconds inbetween, to ensure there was no vibration along the beam. I had undertaken this test the day before when I fired both shutters together and had the results spoiled by beam vibration. Unfortunately the lighting conditions on day two were dire and although I completed the set of images I found on examination there was still some vibration so I abandoned the cross beam idea and went with the single tripod. The first set of three images are taken at 14mm with the said lenses/cameras. Here you can examine the differences in primary exposure between the cameras. I've got to say conditions were far from static but in general the E-P2 tended to underexpose whereas the E-620 is a tad over, in these conditions. SET 1 Here I set the lens(es) at its widest - 14mm
OBSERVATIONS There's little difference between the three images. There might be a third of a stop between them with the E-620 providing the brightest (slightly over-exposed?) image. But the ambient light was changing constantly as the winter sun popped in and out of light cloud cover. Also note the different angle of view between the two lenses. You may want to check how the different TruePic engines deal with the jpg rendering or how the differing AA filters affect sharpness. Personally I can't see a great deal of difference. Download the samples and compare them in your own software. If you want the RAW file please email me direct.
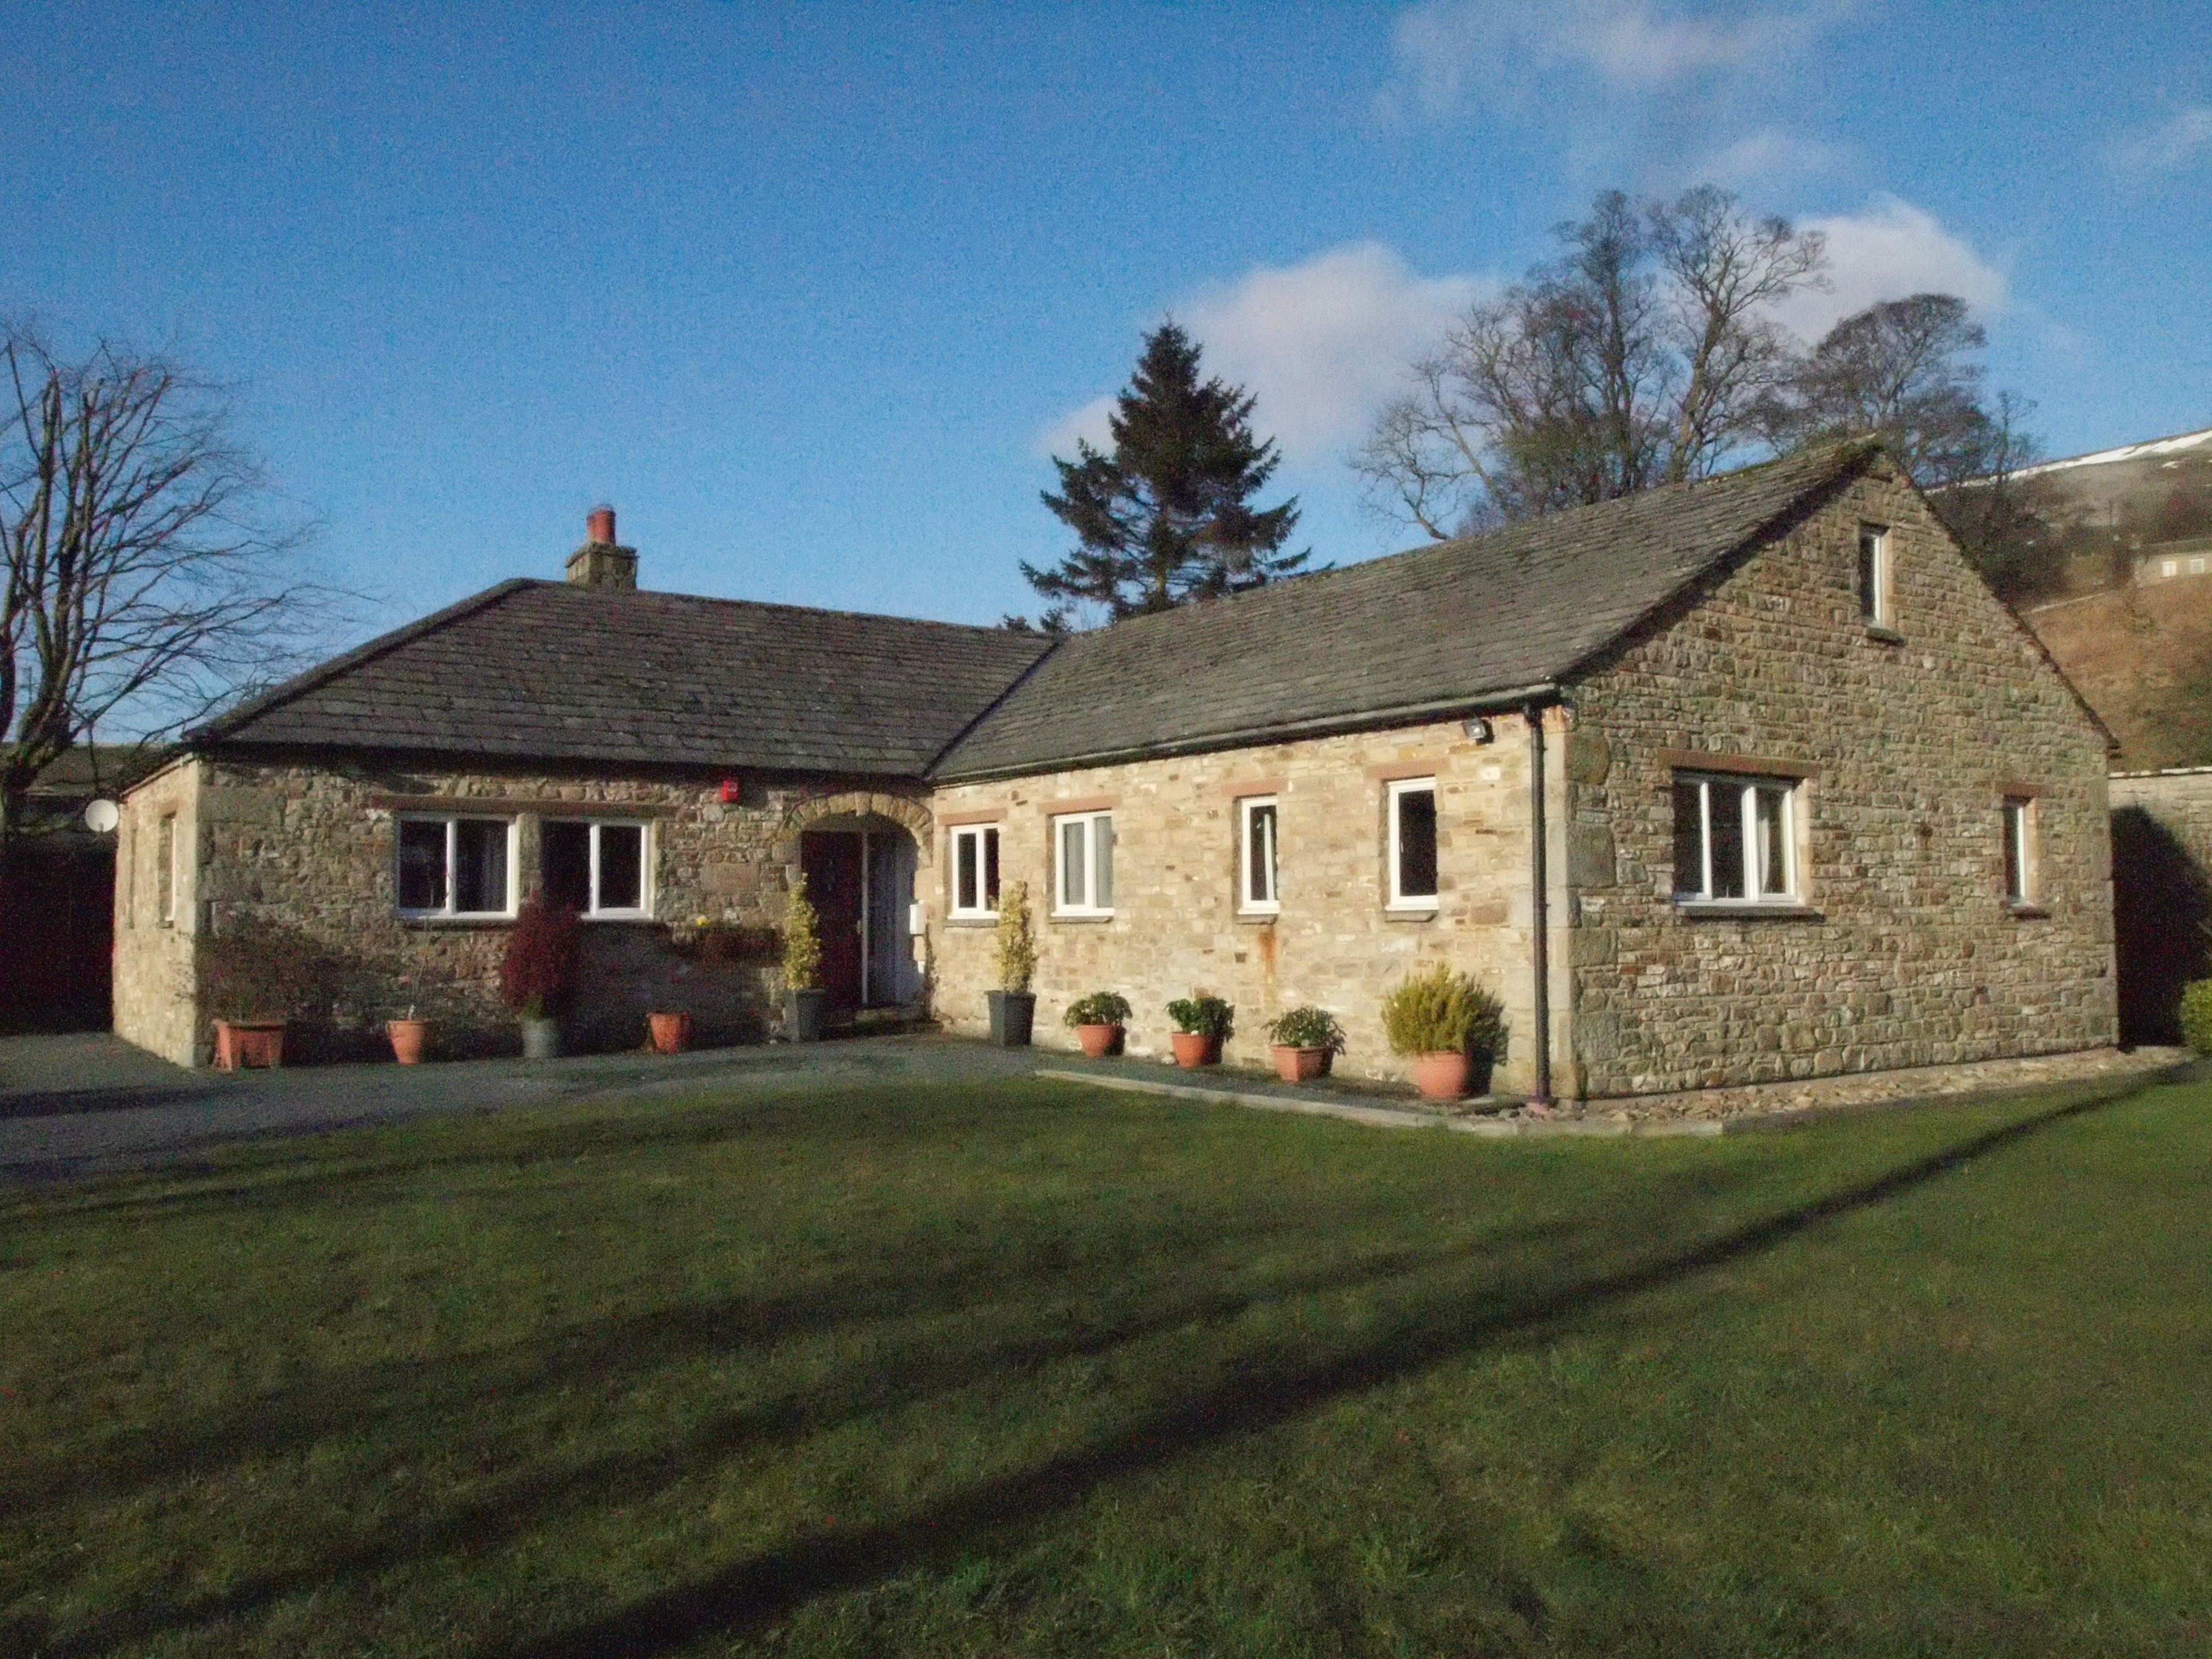
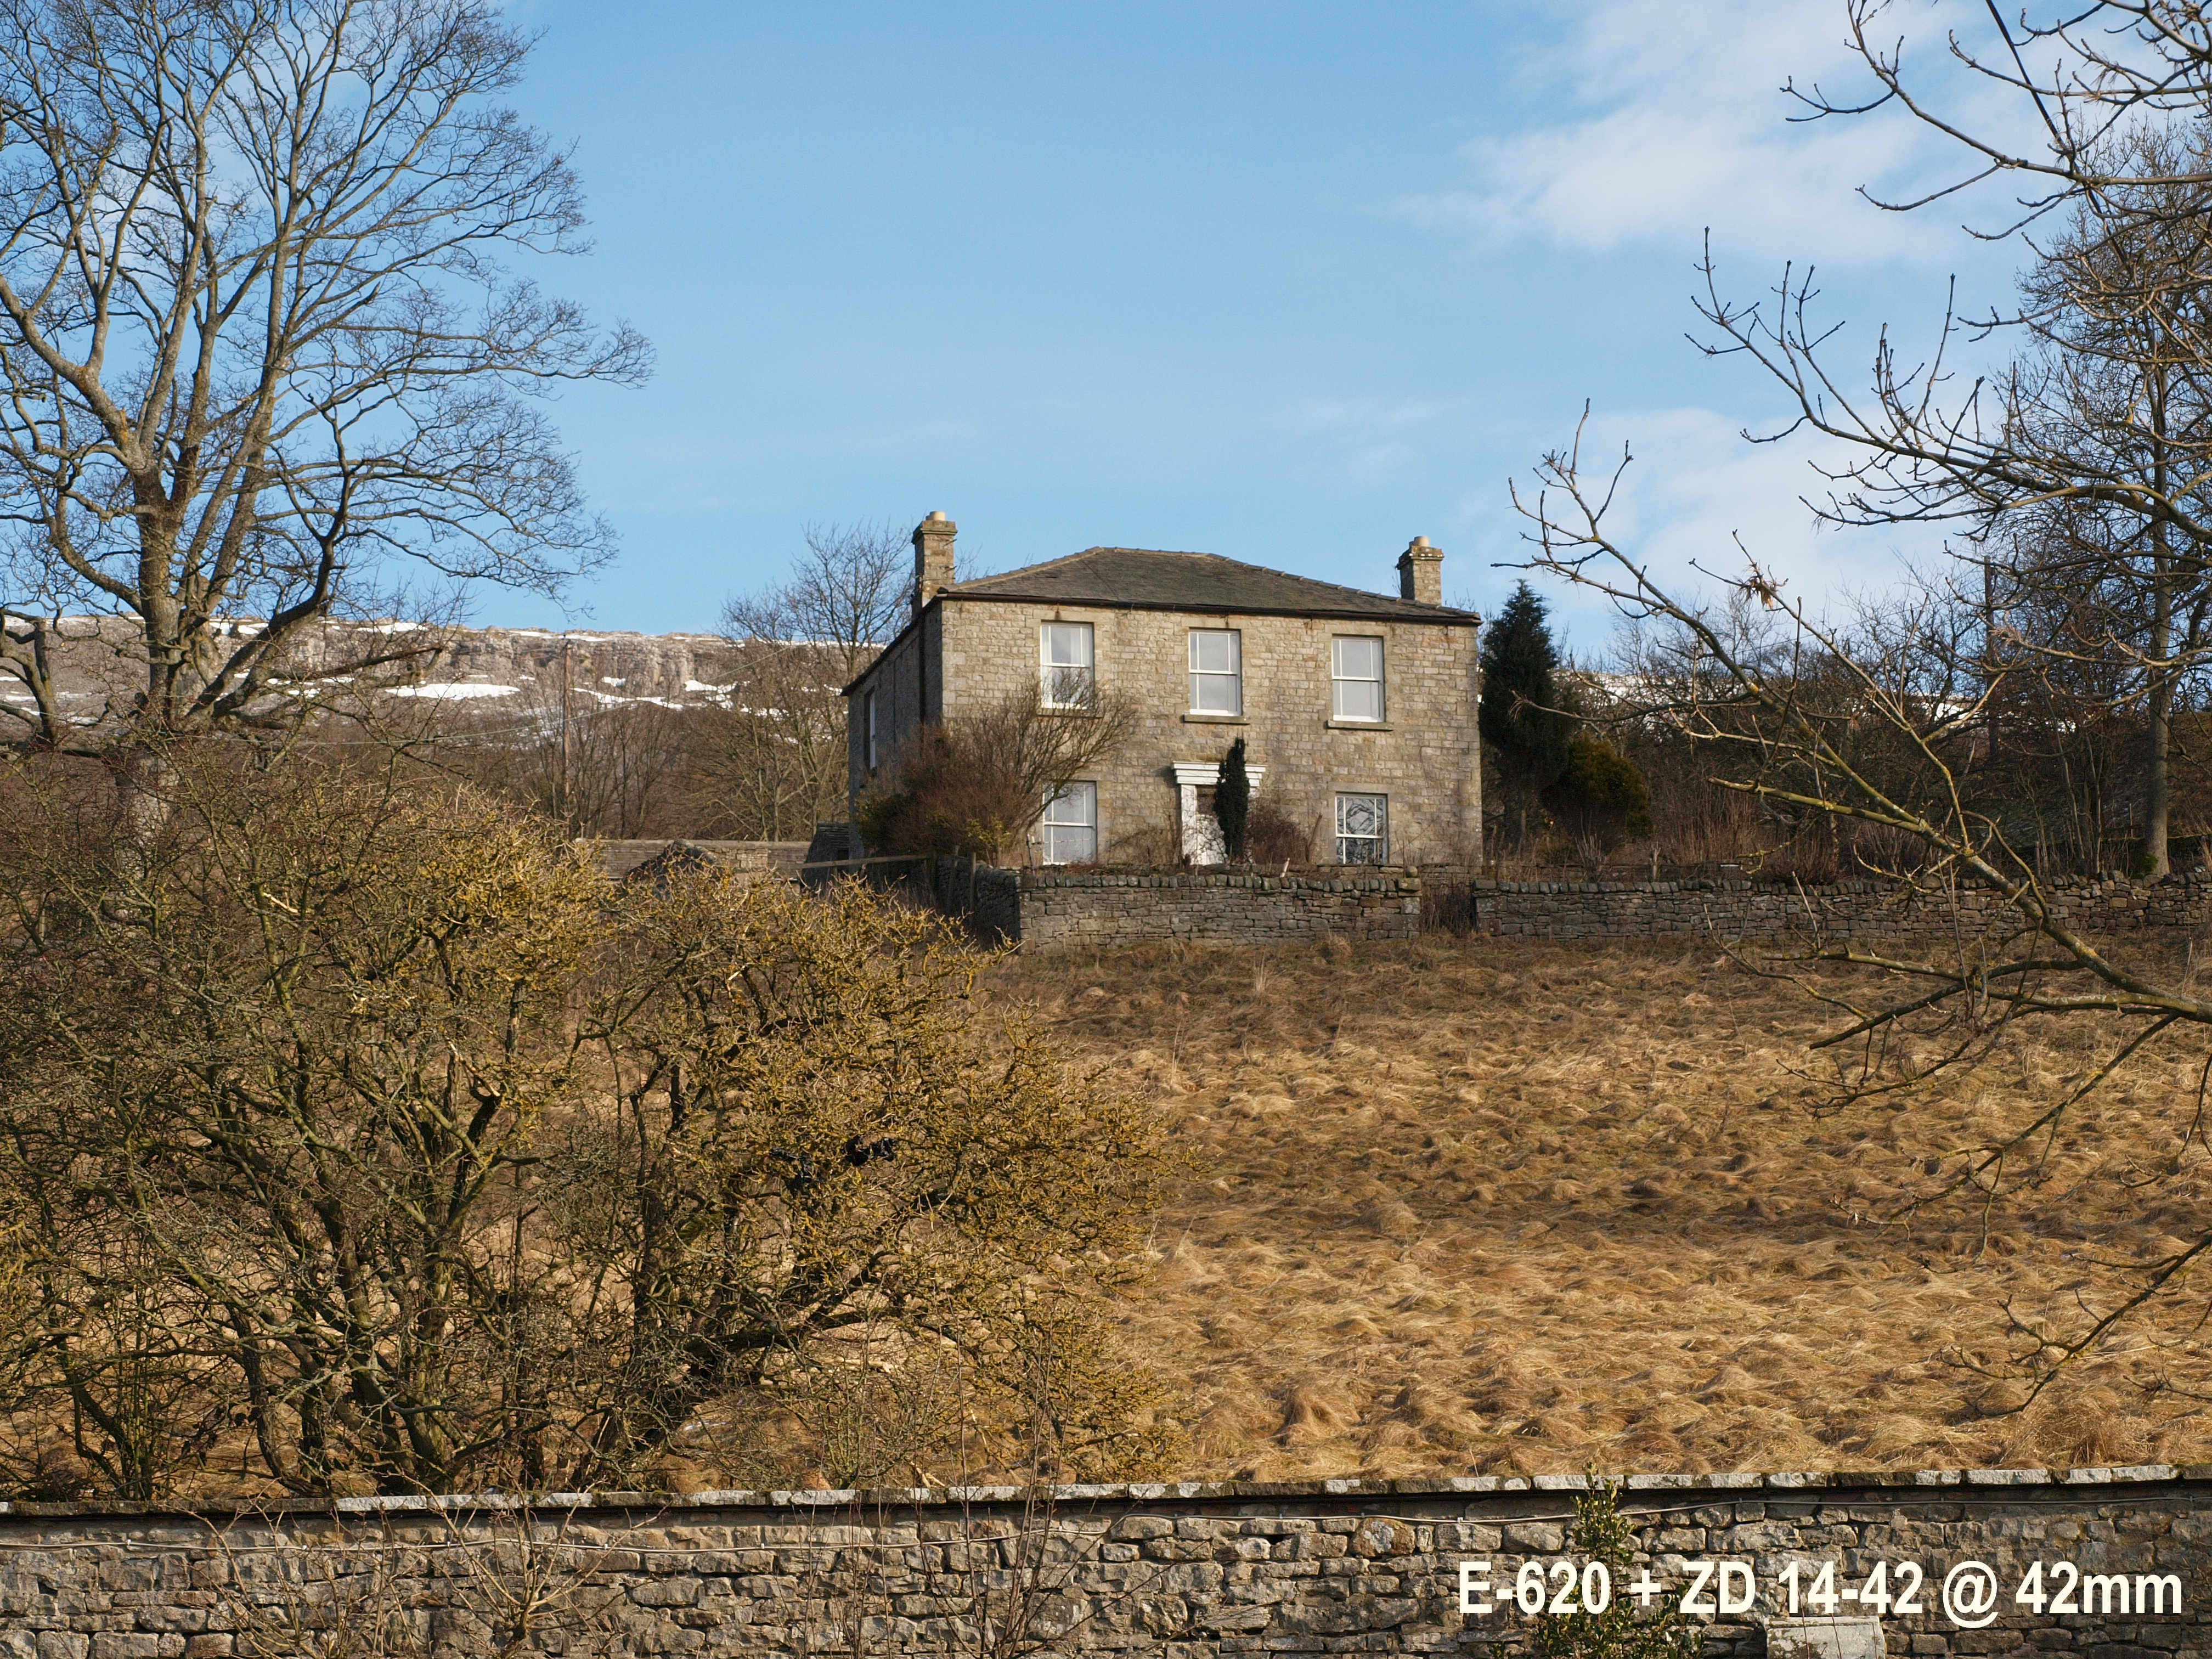
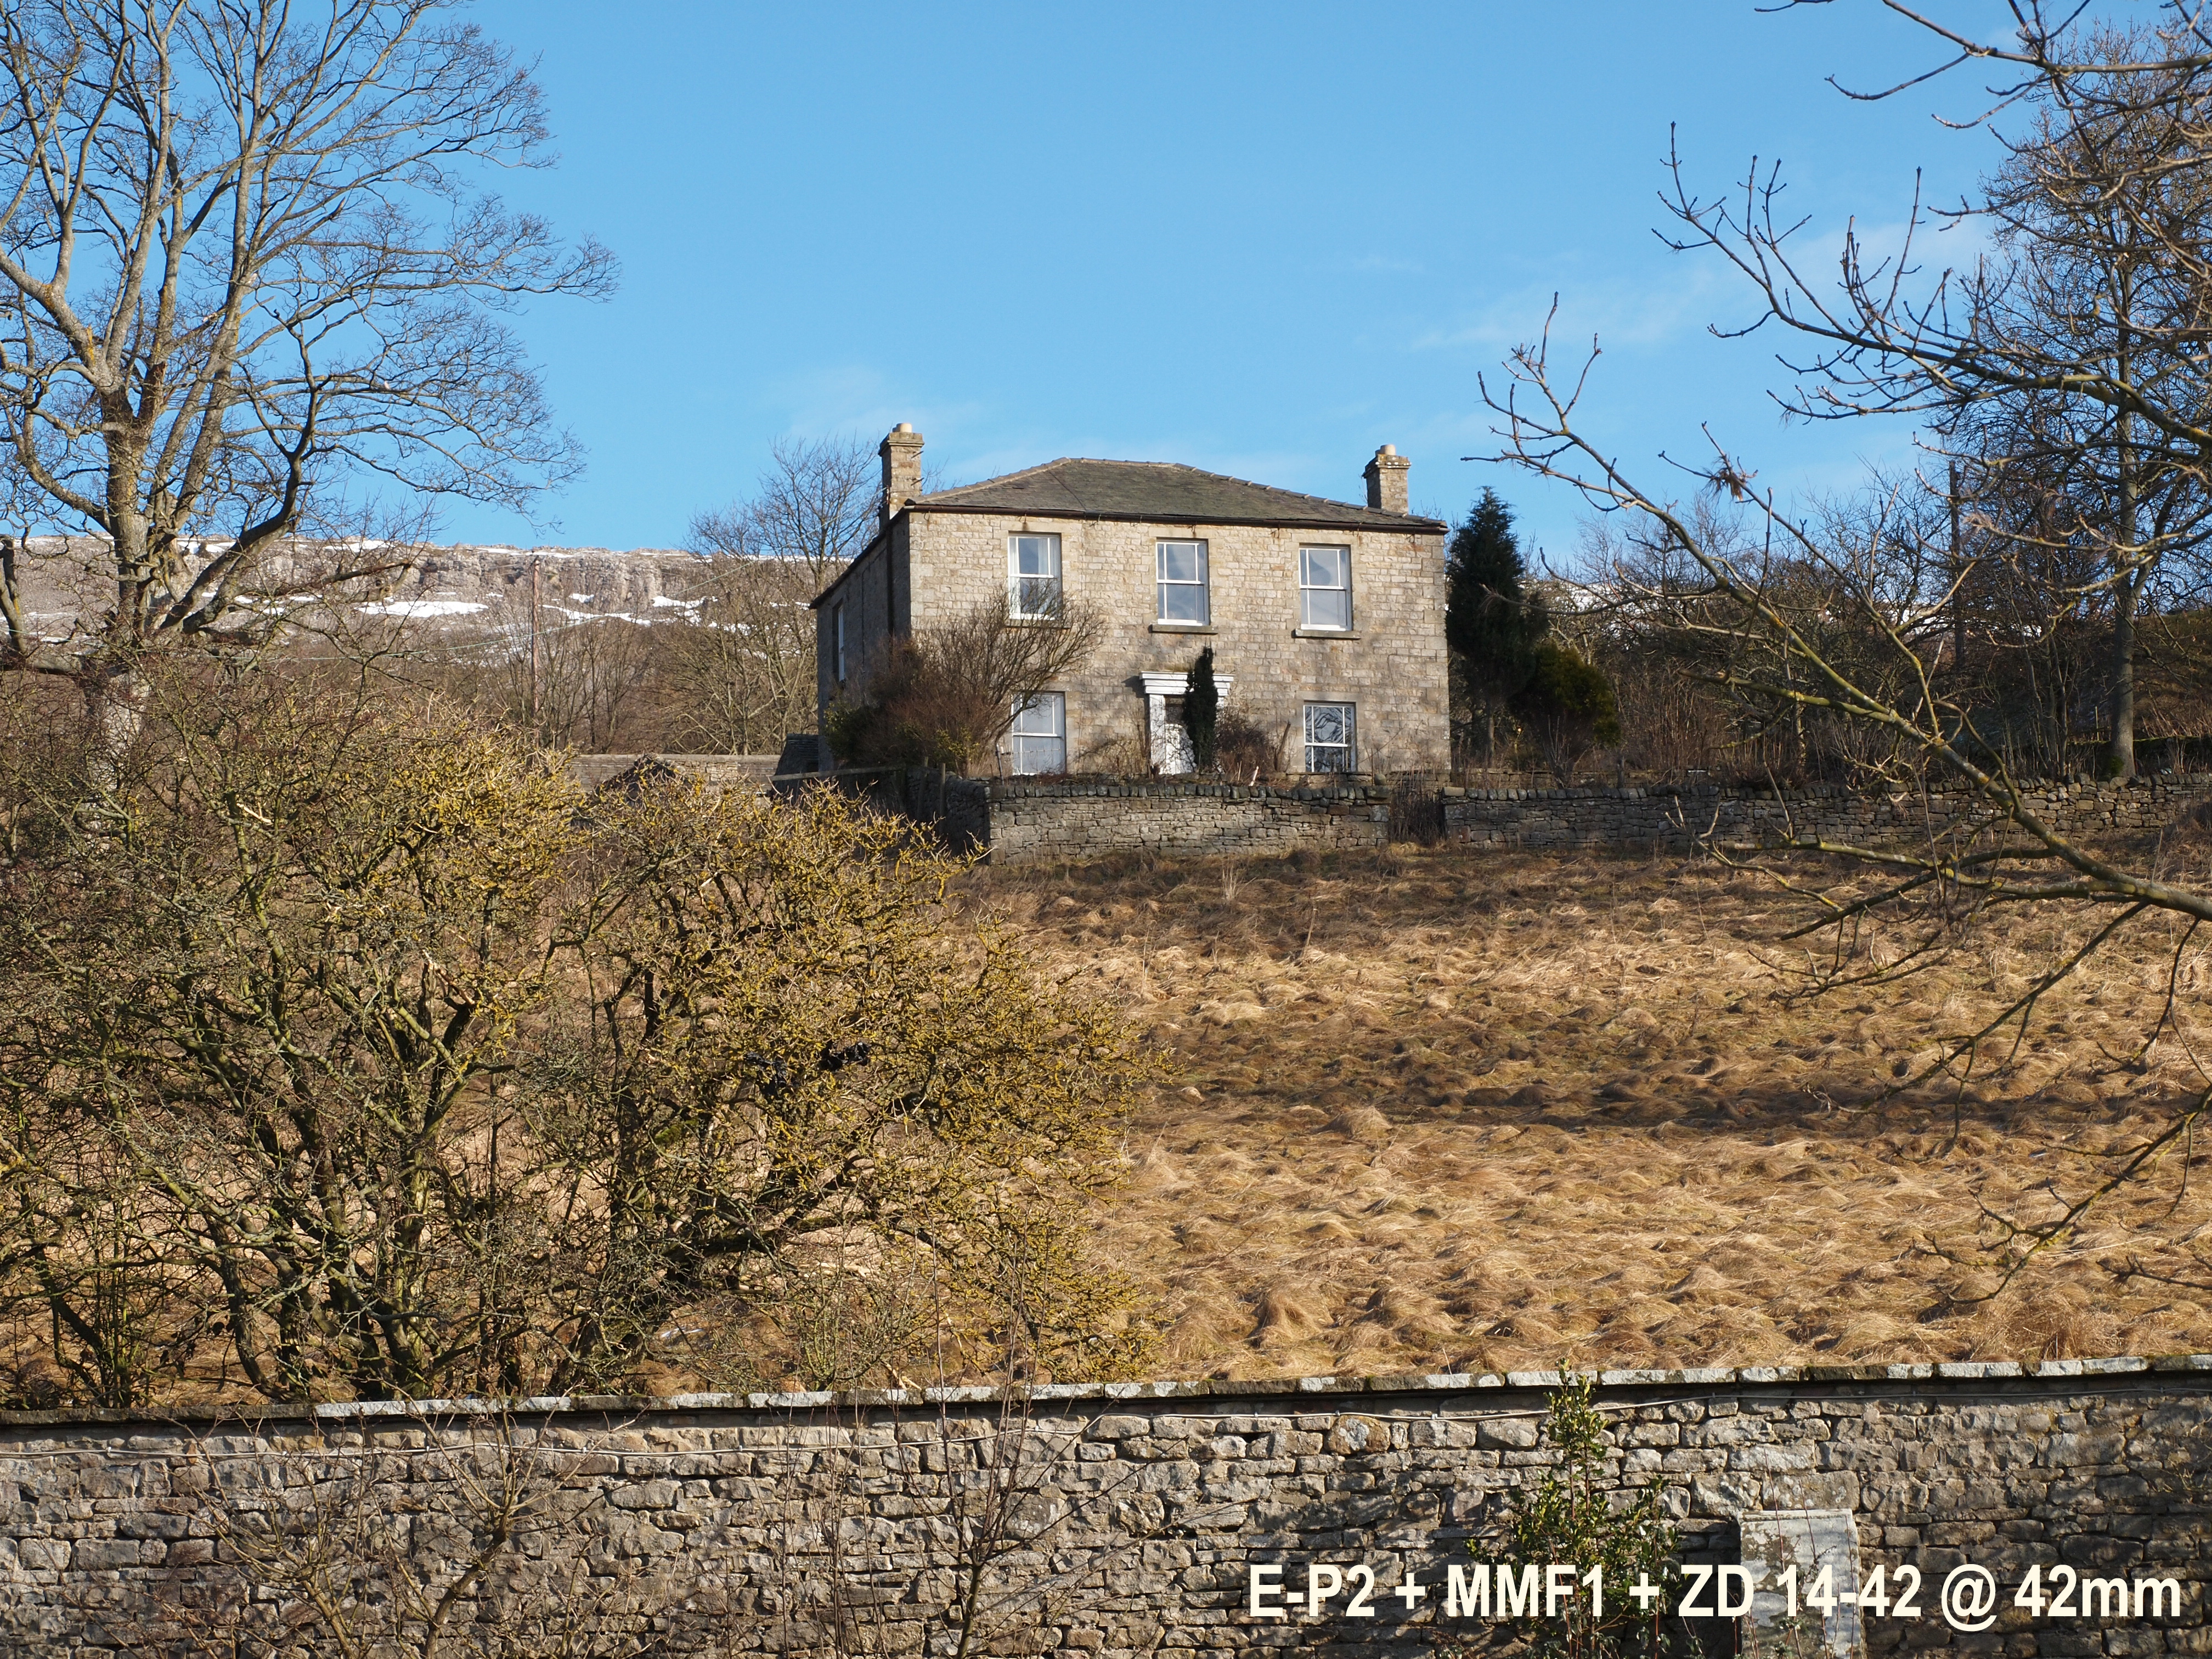
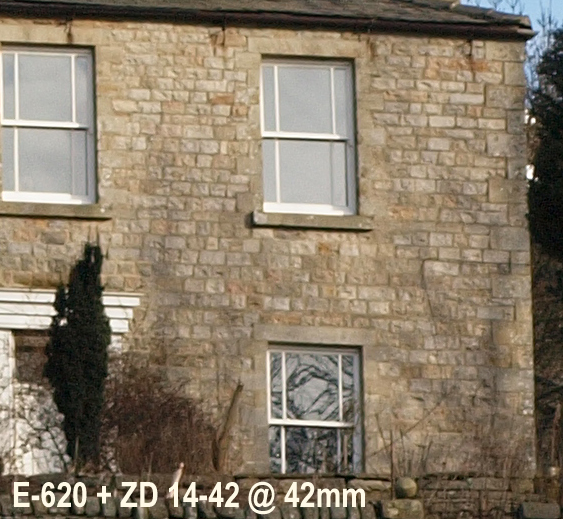
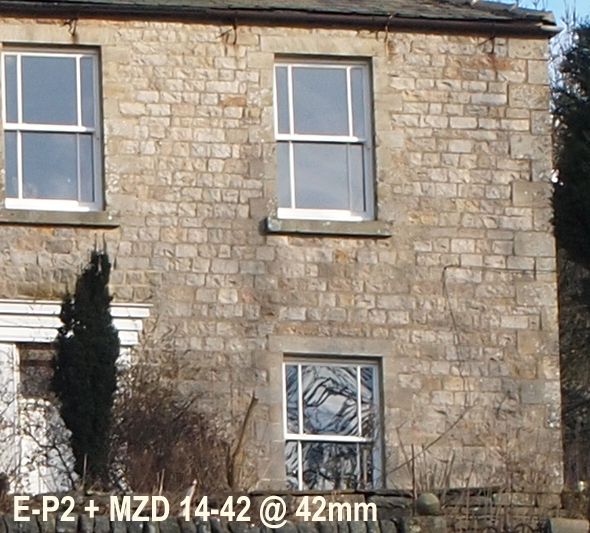
SET 2 Here I set the len(es) at their longest - 42mm.
OBSERVATIONS At telephoto there's even less difference in exposure between the three. Note the slight difference in the sky rendering and tonality of the stonework of the house. Again, no huge differences.
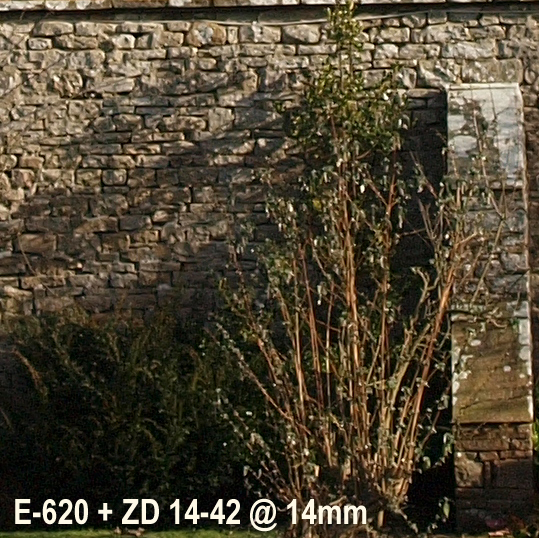
SET 3: CROPS I've cropped out some areas at 100% to allow detailed comparisons.
OBSERVATIONS In the wide angle crops there is not a great deal to choose between the crops - any difference is probably due to the changing contrast in the scene. I'd say the E-620 with the Kit ZD 14-42 just has the edge; a close second is the E-P2 with the ZD kit lens and third is the E-P2 with its own kit lens, the MZD 14-42mm. But any differences are subtle indeed. The telephoto crops are also very similar. I'd be hard pressed to chose between them. Note too the field of view difference with the E-P2 with its kit lens result. But don't take my word for it. Download the full size JPG's to study at your leisure. If you want to examine the RAW file(s) please email me and ask.
CONCLUSION The E-P2 is only the second incarnation of Olympus' interpretation of MicroFourThirds. At the time of writing this review Olympus has announced their 'Lite' version of the Pen ideal - the E-PL1 that includes the communiactions port and an on-board flash. So things are moving fast and I suspect the E-P1 will soon disappear from the shelves. How long the E-P2 will last is anyones guess but probably no more than 12 months. MFT is the most rapidly expanding segment of the digital camera market at the moment so we should forgive Olympus for trying to exploit it while they can. As a photographic tool the E-P2 is, to me, superior to the E-P1 and I wonder if the second version is what Olympus originally intended but could not deliver on time? The VF-2 is exceptional and eminently usable in all but the very worst lighting conditions. The camera will deliver crisp and well exposed images with the typical 'Olympus' colour signature applied to the out of camera jpg without the need to develop any RAW files. RAW files respond well to manipulation in Studio and then PhotoShop. I get the general impression the E-P2 slightly under-exposes as a matter of course. This does protect the highlights and prevents blowing out lighter skies. It seems to do so without the disadvantage of increased noise in the shadows. I'm not sure if this is sensor or processor or a mixture of both. The E-P2 is a photographers dream with seemingly unending ways to customise the camera to your own specification. In that sense it is clearly aimed at the more experienced user and that may be a weakness - it's just too complex. And there's the irony - the camera that promises to be less complex than a DSLR is, in reality, no less complex at all. I think the camera would benefit from an entirely new menu system, rather than relying on the ones from its cousin, the E-System. Bearing in mind its target audience, it strikes me that with a more 'compact style' interface the E-P2 might lose some of its complexity and be more appealing. That said, the E-P2 is a fantastic camera; it is small and reasonably light and can be just about be classed as pocketable. Its standard kit zoom is very capable, delivering sharp and quite contrasty images. The amount of customization available means the machine can be set to match your expectations or can simply be left at default and still produce very good results. The mixture of modes, both manual, semi-manual and automatic with the availability of differing scene capturing choices and the very novel Art Filters will attract buyers from across the spectrum. For the nostalgic amongst us the retro design, the VF-2 and the ability to use legacy glass will be irresistible.
LIKES I like the VF-2 as it not only provides an excellent finder but a support for the camera against the head. The aesthetics; to me black cameras are very desirable. The image output is very good indeed with exceptional jpg's and no need for post processing. The so called 'low resolution' screen provides enough clarity and contrast to review my images just fine.
DISLIKES I do not like some ergonomics - rear wheel and small buttons for example. The intermediate or Live View control Panel. Position of the battery/card compartment in relation to tripod bush. Having to manually switch the VF-2 on/off - a sensor to do this would be more convenient.
OTHER RECOMMENDED READING There are some reviews on the Internet; I'd recommend these: By Ian Burley at FourThirdsUser here . And by LetsGoDigital here. DCResource's review is here.
NOTE: This article seeks nothing other than to inform. Only you can decide what equipment you want/need for your use. Bear in mind I own these cameras/lenses, out of my own pocket; I have nothing to gain or lose by publishing this article, photographs, examples or opinion.
|